← All firearms · Printable work order
FN 509
- easy
- Shop tier 2
- high confidence
- Pistol
- striker fired
- polymer frame
- ambidextrous
- duty pistol
field strip ~1 min · reassembly ~2 min · detail strip ~20 min
Specifications
- Manufacturer
- FN Herstal
- Origin
- United States
- Category
- Pistol
- Action
- Striker-fired, short recoil
- Calibers
- 9x19mm Parabellum
- Capacity
- 17+1 with the standard magazine
- Production
- 2017–present (in-production)
- Also known as
- FN 509 Tactical, FN 509 Compact, FN 509 MRD
Model-specific safety
- This pistol requires a trigger press to field strip — the striker has to be released before the slide will come off. Verify the chamber is empty, verify it again, and point the muzzle somewhere a round would not matter before your finger goes near the trigger.
- The recoil spring assembly is under tension when the slide is off.
- Controls are fully ambidextrous. Confirm the slide stop on both sides is clear of your grip during the function check.
If it will not go back together
Common ways this firearm resists reassembly, and what is actually wrong. Forcing a part that will not seat is how firearms get damaged.
-
The slide will not pull forward off the frame.
Why The striker has not been released, or was inadvertently recocked.
Fix With the chamber verified empty and the muzzle in a safe direction, keep the rear of the slide and frame aligned and press the trigger to release the striker, then pull the slide forward.
-
The barrel will not come out of the slide.
Why It is being lifted straight out. The 509 barrel clears the extractor first.
Fix Grasp the barrel by its lug, lift it up and around the extractor, then slide it rearward out of the slide.
Under spring tension
- Recoil spring assembly
Easily lost parts
Takedown lever
Tools
No tools required for the field strip.
Shop difficulty
Shop tier 2 Tier 2 — moderate among pistols, for the full job: strip to the parts that get coated and put it back together working. 59 line items in FN's standard-model list (some are day/night, backstrap and magazine variants); FN marks the unlock-block pin, fire-control pin, extractor pin and sights as replace-after-removal, restricts detail work to an armorer, and the manual-safety fire control carries a ball detent and spring. More parts and more traps than a Glock.
Parts: 59 numbered parts (FN 509 standard model, full-size frame, NMS and MS fire control; the parts list on this page (schematic pp. 58-59, list pp. 60-61); MRD/Tactical slide and Midsize/Compact lists omitted; 59 pieces), from FN 509 Owner's Manual — FN America, LLC, p. 60–61 fnamerica.wpenginepowered.com [1].
Bench time: about 25 min to strip, 35 min to rebuild (estimate). Estimate for an experienced tech with the right tools, detail strip to coatable parts (slide internals, frame pins, trigger group, sights) and rebuild to a function-checked gun; scale used across pistols: Glock-pattern 15/20 min, other strikers 20-30/25-40, DA/SA hammer guns 30-35/45-50, Hi-Power, Colt 1903 and Mark 23 40-45/60-75.
Small parts: 8 pins, 13 springs, 2 detents or plungers (counted from the manufacturer's parts list (one per key number unless a quantity is given))
What comes off for coating
- Slide: slide end cap, striker, springs, guide and stop pin, striker block and spring, extractor, pin and spring, front sight, rear sight
- Barrel: barrel, recoil spring assembly
- Frame: backstrap and pin, unlock block retaining pin and unlock block, trigger pin and trigger assembly, slide stop lever and spring, take down lever, fire control pin and fire control assembly (sear, carrier, springs, pins; ball detent on MS), magazine release and spring — punch set, frame fixture (optional)
Special tools
- Replacement pins kit (unlock block retaining pin, fire control pin, extractor pin) — FN marks these replace-after-removal
- Frame fixture / support block (e.g. Apex FN disassembly fixture) — Driving the forward unlock-block pin without damage
Known pain points
- Several pins and the sights are single-use per FN: the unlock block retaining pin, fire control pin, extractor pin and front/rear sights carry 'replacement recommended after removal', so a shop needs new ones on hand. (reassembly)
Source: FN 509 Owner's Manual (66-100498 R2, 2603) — FN America, LLC fnamerica.com [4] — “* Replacement recommended after removal” - FN restricts disassembly past the field strip to a qualified armorer. (both)
Source: FN 509 Owner's Manual (66-100498 R2, 2603) — FN America, LLC fnamerica.com [4] — “Disassembly beyond the instructions provided in this manual should only be carried out by a qualified armorer.” - Manual-safety models carry a ball bearing and detent spring in the fire control, a captive detent that can fly. (both)
Source: FN 509 Owner's Manual (66-100498 R2, 2603) — FN America, LLC fnamerica.com [4] — “411*** Spring, Detent”
See also 2 documented reassembly problems and their fixes.
Fit or check on rebuild
- Install new pins and sights — FN marks the pins and sights 'replacement recommended after removal'
Source: FN 509 Owner's Manual (66-100498 R2, 2603) — FN America, LLC fnamerica.com [4] — “* Replacement recommended after removal” - Sight position / re-zero — Drift or pressed sights moved for coating shift point of impact unless witness-marked and returned to the same spot
- Full function check (trigger reset, safeties, slide lock-back, drop of striker/hammer only on trigger) — Standard after any fire-control strip; confirms springs and sears went back correctly
This is Pew-Takedown's rating, not the manufacturer's. How tiers are rated. Forum reports are owners' experience, not specifications.
Procedures
Clear and Make Safe
Clear & Make Safe- Point the muzzle in a safe direction and keep your finger off the trigger.
- Press the magazine release and remove the magazine.Removed at this step:
Magazine - Retract the slide fully to eject any chambered round and lock it open.
- Visually inspect the chamber and magazine well, then physically feel the chamber to confirm it is empty.WarningLook and feel. Both, every time.
- Remove all live ammunition from the work area.
Field Strip
Field Strip- Complete the Clear and Make Safe procedure and confirm the chamber is empty. Wear eye protection.
- Retract the slide and lock it in its rearward position using the slide stop.
- Remove the magazine and rotate the takedown lever downward.
- Release the slide stop and ease the slide forward.
- Keeping the rear of the slide and the rear of the frame in alignment, point the muzzle in a safe direction and press the trigger to release the striker. The slide moves forward slightly as it releases.WarningThis pistol requires a trigger press to field strip — the striker has to be released before the slide will come off. Verify the chamber is empty, verify it again, and point the muzzle somewhere a round would not matter before your finger goes near the trigger.TipFN's manual states the pistol must be completely unloaded to perform this step, and warns that failure to follow it could result in serious injury or death.
- Pull the slide forward and away from the frame.TipIf the striker was inadvertently recocked, go back and release it again before trying.Removed at this step:
Slide - Hold the slide upside down, grasp the small spring of the recoil spring assembly, and lift the assembly up and out of the slide.Removed at this step:
Recoil spring assembly - Remove the thread protector or muzzle device if the pistol has a threaded barrel.
- Grasp the barrel by its lug, lift it up and around the extractor, and slide it rearward out of the slide.TipUp and around the extractor, then rearward. It does not lift straight out.Removed at this step:
Barrel - Stop here. FN states this level of disassembly is sufficient for a thorough cleaning.
Reassembly
Reassembly- Fit the barrel back into the slide, reversing the lift-and-around-the-extractor motion.
- Install the thread protector or muzzle device if the pistol has a threaded barrel.
- Place the large end of the recoil spring assembly against the recess in the front of the slide, compress it, and slide the back of the recoil spring guide onto the recess until it is centred on the front of the barrel lug.
- Guide the slide and barrel assembly onto the frame and pull the slide to its rearmost position, locking it with the slide stop.
- Rotate the takedown lever upward, locking the frame and slide together.
- Release the slide and let it travel forward, then test the slide stop, trigger, magazine release and manual safety if fitted.
Patent drawings
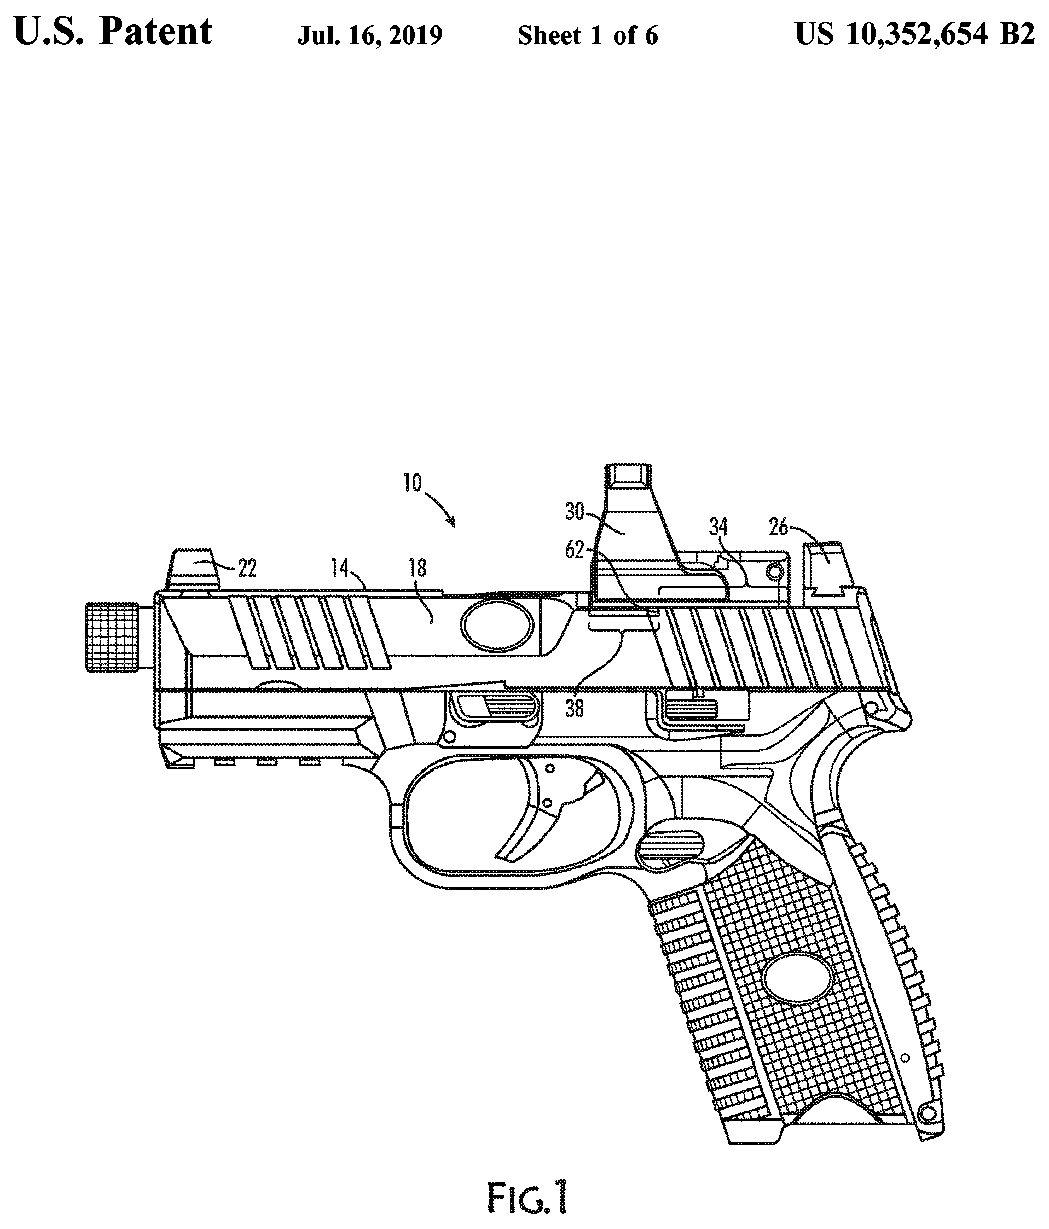
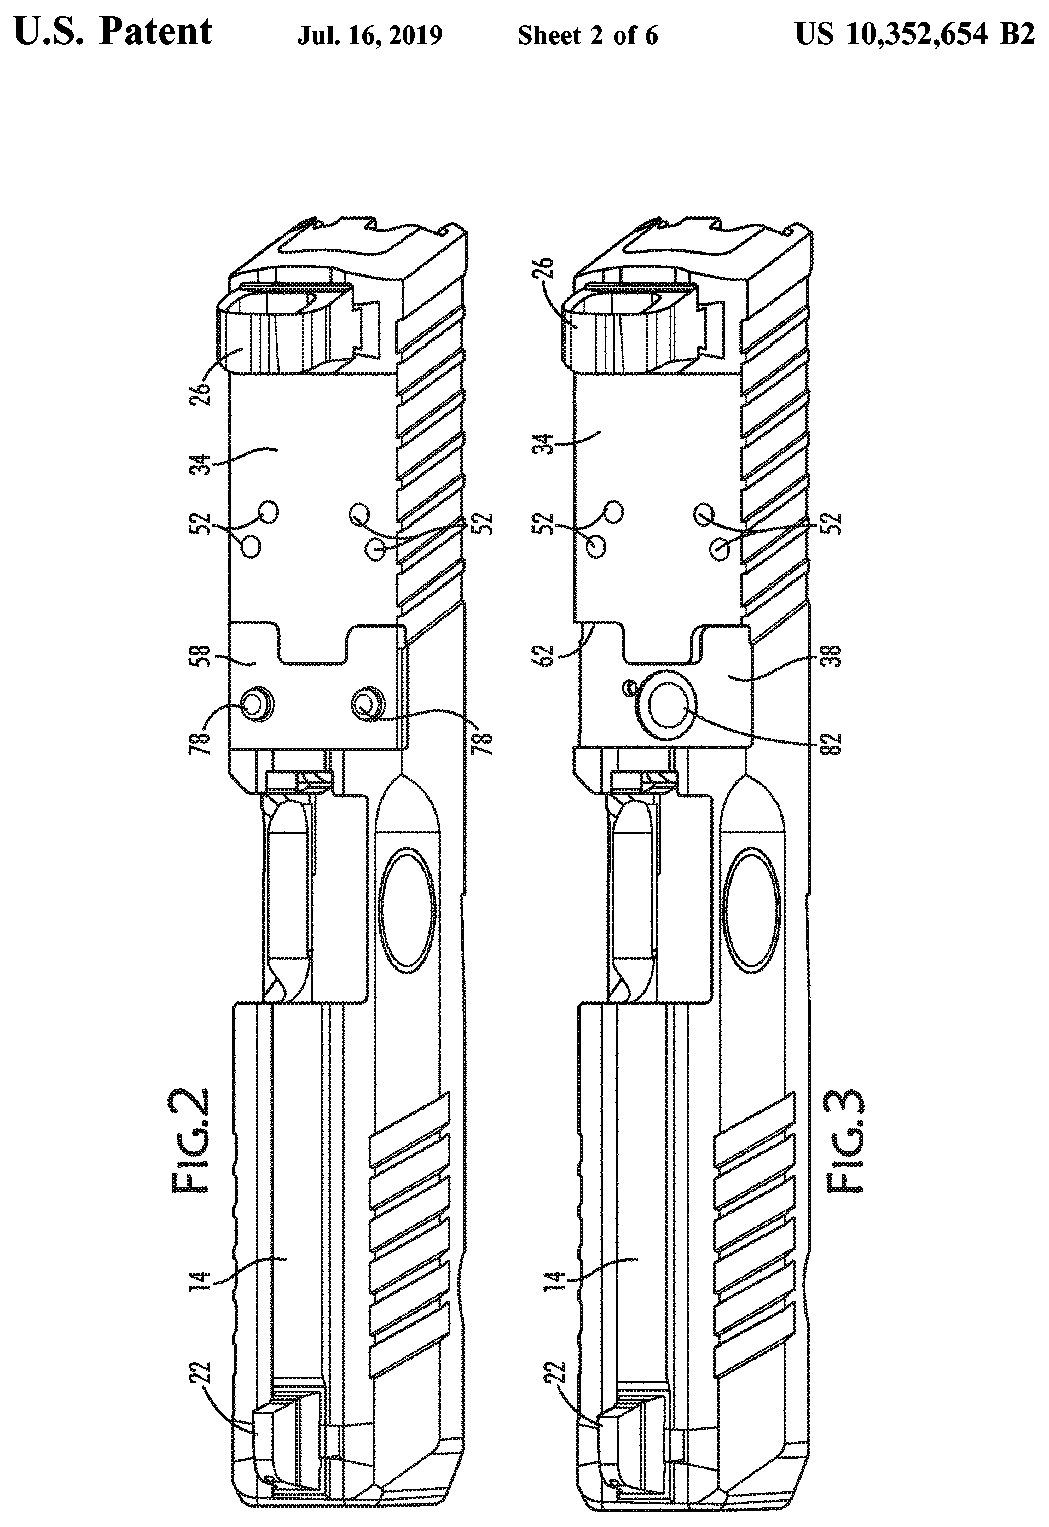
not under copyrightDrawings from US patents on this design. A patent shows the invention as the inventor filed it; the firearm that shipped can differ in detail, and later production often does. Use them to see how the parts relate, not as a parts reference or a procedure. Per the USPTO, the text and drawings of a patent are typically not subject to copyright; each patent here was checked for a copyright notice.
US Patent 10,352,654 — Firearm with interchangeable sighting device system
Olivier Holger Costet, Luke Randel Howlett · assigned to FN Herstal SA · filed 2018-05-02 · granted 2019-07-16. Full patent (USPTO)
The optics-ready (MRD) slide of the FN 509: the stepped cut in the top of the slide, the interchangeable adaptor plate and its retaining spring, and how a red-dot sight bolts onto it.
Why this is the FN 509’s patent: listed on the maker’s patent-marking page — FN Patents | FN® Firearms — FN America, LLC fnamerica.com [8]: “Pursuant to 35 U.S.C. § 287(a), FN hereby provides notice that the FN products identified below are protected by the corresponding patents listed. ... FN 509® Series* U.S. Patent No. 10,352,654 *Excludes the following products: non optics-ready FN 509, FN 509 Midsize and FN 509 Compact.”
Torque specifications
| Fastener | Torque | Sequence, notes and the source's words | Where it comes from |
|---|---|---|---|
| Optic / slide-cap mounting screws (T10 Torx) through the MRD plate FN Optics Mounting System ("FN's patented Low Profile Optics Mounting System, U.S. Patent No. 10,352,654"), the MRD system the FN 509 owner's manual describes in section 11 with the same plates (501-5 |
22 in-lb 2.5 N·m · 1.8 ft-lb |
Remove lubrication from screws and holes; o-ring in slide recess; MRD plate over o-ring; optic or slide cap (with MRD insert if required); start both screws; tighten with finger pressure with the T10 wrench. Threadlocker: "DO NOT USE THREADLOCKER." (self-locking system) “Start both mounting screws and tighten them down clock-wise with finger pressure with the provided T10 Torx wrench. (Recommended Torque spec: 22 in-lbs)” |
Quick Setup & Reference Guide: FN Optics Mounting System (2603) — FN America, LLC, PDF p. 1, step 9 fnamerica.com [3] |
Notes: The manufacturer's documents give no torque value. They say: "Start both mounting screws and tighten them down clock-wise with finger pressure with the provided T10 Torx wrench." (FN 509 Owner's Manual (66-100498 R2, 2603), PDF p. 25 (section 11, optic installation step 9)) "Thread the suppressor or muzzle device on to the barrel and tighten it following the manufacturers recommendations." (FN 509 Owner's Manual (66-100498 R2, 2603), PDF p. 27)
Reported by other sources — not the manufacturer
| Fastener | Torque | Who says so, and their words | Where it comes from |
|---|---|---|---|
| Optic plate to slide screws (6-40 x 5/8 T10) FN 509 series (optics-ready) with Forward Controls Design OPF-FN509T, ACRO plate |
13–15 in-lb 1.5–1.7 N·m · 1.1–1.2 ft-lb |
Reported by Forward Controls Design “Torque value for the plate to slide 6-40 x 5/8 T10 screws is 13 to 15 in lbs.” |
OPF-FN509T, ACRO (product page) — Forward Controls Design forwardcontrolsdesign.com [2] |
| Aimpoint ACRO P1/P2 mounting screw FN 509 series with FCD OPF-FN509T, ACRO plate, Aimpoint ACRO P1/P2 |
26 in-lb 2.9 N·m · 2.2 ft-lb |
Reported by Forward Controls Design “Torque value for Aimpoint P1/P2 is 26 in lbs, and 20 in lbs for Steiner MPS.” |
OPF-FN509T, ACRO (product page) — Forward Controls Design forwardcontrolsdesign.com [2] |
| Steiner MPS mounting screw FN 509 series with FCD OPF-FN509T, ACRO plate, Steiner MPS |
20 in-lb 2.3 N·m · 1.7 ft-lb |
Reported by Forward Controls Design “Torque value for Aimpoint P1/P2 is 26 in lbs, and 20 in lbs for Steiner MPS.” |
OPF-FN509T, ACRO (product page) — Forward Controls Design forwardcontrolsdesign.com [2] |
| Red-dot optic mounting screws (6-32 flat head, supplied) into EGW rear-dovetail sight mount FN 509 (listed as fitting EGW's Sig #8-cut dovetail mount; EGW lists FN 509 Tactical as NOT fitting) with the EGW 'Trijicon RMR / SRO, Holosun 407c / 507c Mount for Sig Sauer P220, P226, P229, P320' ( |
15 in-lb 1.7 N·m · 1.2 ft-lb |
Reported by Evolution Gun Works (EGW) Remove the rear sight, install the EGW mount in the dovetail, tighten the set screw if applicable, place the optic on the mount, then apply blue Loctite and torque the optic screws. Threadlocker: Blue Loctite on the provided mounting screws (EGW instructions) “Torque mounting screws to 15in/lbs” |
Trijicon RMR / SRO, Holosun 407c / 507c Mount for Sig Sauer P220, P226, P229, P320 (EGW product page, installation instructions section) — Evolution Gun Works (EGW) egwguns.com [6] |
| Red-dot optic mounting screws (supplied) into EGW rear-dovetail sight mount (Docter/Venom/Viper/FastFire footprint) FN 509 (listed as fitting EGW's Sig #8-cut dovetail mount; EGW lists FN 509 Tactical as NOT fitting) with the EGW 'SIG Sauer P220 P226 P229 P320 Red Dot Mount | Fits Vortex Venom, Viper & Burris FastF |
15 in-lb 1.7 N·m · 1.2 ft-lb |
Reported by Evolution Gun Works (EGW) Remove the rear sight, install the EGW mount in the dovetail, tighten the set screw if applicable, place the optic on the mount, then apply blue Loctite and torque the optic screws. Threadlocker: Blue Loctite on the provided mounting screws (EGW instructions) “Torque mounting screws to 15 in/lbs” |
SIG Sauer P220 P226 P229 P320 Red Dot Mount | Fits Vortex Venom, Viper & Burris FastFire | EGW (EGW product page, installation instructions section) — Evolution Gun Works (EGW) egwguns.com [7] |
Materials and factory finish
As stated by FN Herstal. Prep, masking and cure depend on these; a polymer or aluminium part, a nitrided or anodised finish, and a blued steel part are each a different job. Variants with other finishes may exist — check the maker's page for the exact SKU on the bench.
| Component | Material | Factory finish | Where it comes from |
|---|---|---|---|
| Barrel FN 509 (standard, 4in), e.g. 66-100002 FN 509 NMS BLK/BLK | stainless steel | — | FN 509® — product page (Specs / Primary Features) — FN America, LLC fnamerica.com [5] “BARREL … Cold hammer-forged stainless steel” |
| Frame FN 509 (standard, 4in), e.g. 66-100002 FN 509 NMS BLK/BLK | Polymer | — | FN 509® — product page (Specs / Primary Features) — FN America, LLC fnamerica.com [5] “FRAME … Polymer construction with replaceable steel frame/slide rails” |
| Magazine FN 509 (standard, 4in), e.g. 66-100002 FN 509 NMS BLK/BLK | polymer | black | FN 509® — product page (Specs / Primary Features) — FN America, LLC fnamerica.com [5] “MAGAZINE … High visibility, low-friction follower; polymer base with black finish” |
Parts list
Transcribed from the manufacturer's parts list (FN 509 Owner's Manual — FN America, LLC, p. 60–61 fnamerica.wpenginepowered.com [1]) — FN 509 standard model (full-size frame; NMS and MS fire control). Omitted: 509 Tactical/MRD slide assemblies list (pp.64-65) and 509 series Midsize/Compact frame & magazine list (pp.68-69). Schematic pp.58-59.. Key numbers refer to the exploded view in that document.
59 parts
| Key | Part | Part no. | Qty | Group |
|---|---|---|---|---|
| 101 | Unlock Block | 1 | ||
| 102 | Pin, Unlock Block Retaining Replacement recommended after removal | 1 | ||
| 103 | Trigger Assembly | 1 | ||
| 104 | Lever, Slide Stop | 1 | ||
| 105 | Spring, Slide Stop | 1 | ||
| 106 | Pin, Trigger | 1 | ||
| 107 | Lever, Take Down | 1 | ||
| 108 | Pin, Fire Control Replacement recommended after removal | 1 | ||
| 109 | Release, Magazine | 1 | ||
| 110 | Spring, Magazine Catch | 1 | ||
| 111F-A | Backstrap, Small, Black | 1 | ||
| 111F-B | Backstrap, Medium, Black | 1 | ||
| 111F-C | Backstrap, Large, Black | 1 | ||
| 112 | Pin, Backstrap Retaining | 1 | ||
| 200-A | Slide Assembly, FN 509, Black, DS | 1 | ||
| 200-B | Slide Assembly, FN 509, Black, NS | 1 | ||
| 201 | Slide, FN 509, 9mm, Black | 1 | ||
| 202 | Barrel, 4.02" | 1 | ||
| 203 | Recoil Spring Assembly | 1 | ||
| 204-A | Sight, Front, Day Replacement recommended after removal | 1 | ||
| 204-B | Sight, Front, Night Replacement recommended after removal | 1 | ||
| 205-A | Sight, Rear, Day Replacement recommended after removal | 1 | ||
| 205-B | Sight, Rear, Night Replacement recommended after removal | 1 | ||
| 206 | Extractor | 1 | ||
| 207-A | Pin, Extractor Replacement recommended after removal | 1 | ||
| 208 | Spring, Extractor | 1 | ||
| 209 | Striker | 1 | ||
| 210 | Spring, Striker Return | 1 | ||
| 211 | Striker Spring Stop | 1 | ||
| 212 | Pin, Striker Spring Stop | 1 | ||
| 213 | Spring, Striker | 1 | ||
| 214 | Guide, Striker Spring | 1 | ||
| 215 | Slide End Cap | 1 | ||
| 216 | Block, Striker | 1 | ||
| 217 | Spring, Block | 1 | ||
| 300F-A | Magazine Assembly, 17 Rd, Black | 1 | ||
| 300F-B | Magazine Assembly, 10 Rd, Black | 1 | ||
| 301 | Follower, 9mm, Orange | 1 | ||
| 302F | Spring, Magazine | 1 | ||
| 303 | Catch, Magazine Floorplate | 1 | ||
| 304 | Floorplate, Magazine, Black | 1 | ||
| 305F-A | Tube, 509F Magazine, 17 Rd | 1 | ||
| 305F-B | Tube, 509F Magazine, 10 Rd | 1 | ||
| 400-A | Fire Control Assembly, 509, NMS | 1 | ||
| 400-B | Fire Control Assembly, 509, MS | 1 | ||
| 401 | Housing, Left | 1 | ||
| 402 | Housing, Right | 1 | ||
| 403 | Sear | 1 | ||
| 404 | Carrier, Sear | 1 | ||
| 405 | Cam, Disconnect | 1 | ||
| 406 | Spring, Disconnect | 1 | ||
| 407 | Spring, Sear | 1 | ||
| 408 | Spring, Carrier | 1 | ||
| 409 | Pin, Carrier | 1 | ||
| 410 | Pin, Carrier Spring | 1 | ||
| 411 | Spring, Detent Manual safety model only | 1 | ||
| 412 | Bearing, Ball Manual safety model only | 1 | ||
| 413 | Clip, Retaining Non-manual safety model only | 1 | ||
| 414 | Overmold, Manual Safety Manual safety model only | 1 |
Function check
- Verify the pistol is unloaded with no magazine inserted before each check.
- Rack the slide and press the trigger. The striker should release cleanly.
- Hold the trigger to the rear, rack the slide, then release slowly and confirm the reset.
- Press the trigger again to confirm the striker releases.
- Confirm the slide locks open on an empty magazine and the magazine drops free.
Maintenance
Lubrication points
- Frame rails where the slide rides
- Barrel hood and locking lug
- Outside of the barrel at the muzzle end
- Rear barrel lug where the recoil spring assembly bears
Cleaning notes
Light lubrication only — a thin film on the rails and barrel. Keep the striker channel dry and free of solvent, since oil there collects fouling and causes light strikes.
Suggested inspection interval: roughly every 5000 rounds. This is a general guideline, not a manufacturer specification.
Wear parts to inspect
Recoil spring assembly · Extractor · Striker spring
Common issues
| Symptom | Likely cause | What to do |
|---|---|---|
| Slide locks back with rounds remaining | Support-hand thumb riding the ambidextrous slide stop | Adjust grip so the thumb rides clear of the lever. |
Also covers
The procedures above are reported to apply to: FN 509 Tactical · FN 509 Compact · FN 509 LS Edge. Verify against the manual for your specific model.
Similar manual of arms
Sourcing
- Confidence
- high — Cross-checked against a primary source such as the manufacturer's manual or an issuing military technical manual.
- Verification
- Checked against the manufacturer manual
- Last updated
- 2026-10-29
References
Every source this page draws on, with its web address so you can read it yourself. Numbers in brackets elsewhere on the page point here.
- [1] FN 509 Owner's Manual — FN America, LLC manufacturer manual primary source
https://fnamerica.wpenginepowered.com/wp-content/uploads/2026/03/2603_FN_509-OM_66-100498_R2.pdf (checked 2026-09-15) - [2] OPF-FN509T, ACRO (product page) — Forward Controls Design website secondary source
https://www.forwardcontrolsdesign.com/OPF-FN509T-ACRO_p_517.html (checked 2026-09-27) - [3] Quick Setup & Reference Guide: FN Optics Mounting System (2603) — FN America, LLC manufacturer manual primary source
https://fnamerica.com/wp-content/uploads/2026/03/2603_Quick_Setup_Reference_Guide_FN_OPTICS_MOUNTING_final.pdf (checked 2026-09-27) - [4] FN 509 Owner's Manual (66-100498 R2, 2603) — FN America, LLC manufacturer manual primary source
https://fnamerica.com/wp-content/uploads/2026/03/2603_FN_509-OM_66-100498_R2.pdf (checked 2026-09-27) - [5] FN 509® — product page (Specs / Primary Features) — FN America, LLC website primary source
https://fnamerica.com/products/pistols/fn-509/ (checked 2026-10-03) - [6] Trijicon RMR / SRO, Holosun 407c / 507c Mount for Sig Sauer P220, P226, P229, P320 (EGW product page, installation instructions section) — Evolution Gun Works (EGW) website secondary source
https://egwguns.com/trijicon-rmr-sro-holosun-407c-507c-mount-for-sig-sauer-p220-p226-p229-p320 (checked 2026-10-11) - [7] SIG Sauer P220 P226 P229 P320 Red Dot Mount | Fits Vortex Venom, Viper & Burris FastFire | EGW (EGW product page, installation instructions section) — Evolution Gun Works (EGW) website secondary source
https://egwguns.com/vortex-viper-venom-sig-sauer-p220-p226-p229-p320-sight-mount-fits-burris-fastfire-and-docter (checked 2026-10-11) - [8] FN Patents | FN® Firearms — FN America, LLC website primary source
https://fnamerica.com/fn-patents/ (checked 2026-10-13)
Notes: Cleanup on 2026-09-15: when this entry's trigger-press flag was corrected, the stale text asserting the opposite was left behind. The rendered page carried the new warning and the old contradicting one together, and in some cases a 'no trigger pull takedown' tag in the header. Removed. This was caught by screenshotting the built page rather than by any test, which is why a test now covers it. CORRECTED on 2026-09-15 against the factory manual. The entry recorded triggerPullRequiredToDisassemble as false. The FN 509 requires the striker to be released with the trigger before the slide will come off the frame, and FN's manual carries an explicit warning that the pistol must be completely unloaded for that step or serious injury or death could result. That makes five pistols in this pass found carrying the flag backwards. Also corrected the barrel removal, which goes up and around the extractor then rearward rather than lifting straight out. Rated medium pending confirmation against a specific variant manual; the 509 line includes Tactical, Compact, MRD, and LS Edge models differing in slide, barrel, and optic mounting.