← All firearms · Printable work order
Ruger Vaquero
- easy
- Shop tier 1
- high confidence
- Revolver
- revolver
- single action
- loading gate
- transfer bar
- cowboy action
- traditional styling
field strip ~2 min · reassembly ~3 min · detail strip ~25 min
Specifications
- Manufacturer
- Sturm, Ruger & Co.
- Origin
- United States
- Category
- Revolver
- Action
- Single-action revolver
- Calibers
- .45 Colt, .357 Magnum
- Capacity
- 6 rounds
- Production
- 1993–present (in-production)
- Also known as
- New Vaquero
Model-specific safety
- A single-action revolver is loaded and unloaded one chamber at a time through the loading gate. There is no swing-out cylinder and no ejector star — index each chamber and check it individually.
- New Model Rugers have a transfer bar safety and are designed to be carried with all chambers loaded. Old Model Rugers (pre-1973, three screws in the frame) do not, and should be carried with an empty chamber under the hammer. Count the screws before you assume which you have.
- On New Models, opening the loading gate frees the cylinder to rotate. That is the intended design.
- Never remove, replace, or carry a loaded cylinder that is not installed in a revolver. The cartridges can fire if their primers are struck.
Under spring tension
- Base pin latch spring
- Mainspring
- Loading gate detent spring
Easily lost parts
Base pin · Base pin latch and spring · Cylinder
Tools
No tools required for the field strip.
Shop difficulty
Shop tier 1 Tier 1 — easy among revolvers, for the full job: strip to the parts that get coated and put it back together working. New Model coil-spring lockwork with fixed sights (51 pieces); described as not difficult. Extra small traps are the cylinder rotation-stop detent and spring set by a tiny screw in the hammer channel, plus the usual pawl plunger, grip-frame springs and loading gate.
Parts: 50 numbered parts (Current (New) Vaquero, 2005 on; the original large-frame Vaquero is not covered (50 line items)), from Instruction Manual for the Ruger Vaquero Revolver (PM170) — Sturm, Ruger & Co., p. 29 ruger-docs.s3.amazonaws.com [4].
Bench time: about 25 min to strip, 40 min to rebuild (estimate). Estimated for an experienced tech: cylinder, ejector housing, base pin latch, grip frame, lockwork and gate out of the cylinder frame. Rebuild is longer for the pawl spring/plunger, the two springs between grip frame and frame, the loading gate and the transfer bar, then a function check.
Small parts: 11 pins, 5 springs, 6 detents or plungers (counted from the manufacturer's parts list (one per key number unless a quantity is given))
What comes off for coating
- Cylinder, ejector and base pin: base pin and cylinder, ejector housing with compressed ejector spring and rod, base pin latch, nut and spring — jaw-protected pliers
- Grip frame: grip panels, mainspring assembly (captured on its strut), grip frame / trigger guard screws and grip frame, trigger spring, trigger spring pivot and retaining pins, cylinder latch spring plunger and spring — pin or nail to capture the mainspring, fitted hollow-ground screwdrivers
- Cylinder frame: hammer pivot and hammer with pawl, pawl spring and plunger, trigger pivot, trigger and transfer bar, cylinder latch, loading gate and gate detent spring, firing pin, rebound spring and recoil plate cross pin (if the frame is stripped bare), front sight blade (fixed-sight model; rear notch is in the frame) — small pin punches
Special tools
- Fitted hollow-ground screwdrivers — Grip-frame, ejector housing and base pin latch screws
- Jaw-protected pliers — Holding the base pin latch nut while the latch is unscrewed (Ruger manual)
- Pin, nail or paper clip — Capturing the mainspring on its strut
- Small pin punches — Hammer, trigger and spring pivot pins
Known pain points
- Owners describe the New Vaquero strip as not difficult, done with knowledge of the parts. (both)
Owners report: Ruger New Vaquero Disassembly — Cowboy Action Shooting (CAS City) forum cascity.com [7] — “It's not difficult....quite a few folks reference this page for the Ruger....” - The pawl spring and plunger must go back in the right way round, plunger in and spring out. (reassembly)
Owners report: Ruger New Vaquero Disassembly — Cowboy Action Shooting (CAS City) forum cascity.com [7] — “# 45 - Pawl Spring and Plunger assembly...make sure when you put the gun back together to get the plunger in and spring out.” - The latch spring has to be compressed off the trigger pin and the loading-gate spring pops out of place on reassembly. (both)
Owners report: Ruger New Vaquero Disassembly — Cowboy Action Shooting (CAS City) forum cascity.com [7] — “getting the latch spring to release from the trigger pin was a chore...” - The New Vaquero adds a spring-loaded cylinder rotation-stop detent held by a small set screw in the hammer channel. (both)
Owners report: No clicks heard when rotating cylinder on brand new NMV — Cowboy Action Shooting (CAS City) forum cascity.com [8] — “if you cock the hammer and look in the hammer channel on the lower left side you can see the allen screw that holds the detent and spring in.” - Aligning the grip frame to the cylinder frame without displacing the two springs that sit between them is touchy. (reassembly)
Owners report: Ruger New Vaquero Disassembly — Cowboy Action Shooting (CAS City) forum cascity.com [7] — “it took me for ever to get the handle and the gun lined up with out damaging the springs that fit between them, there are 2 one by the hammer, one by the trigger touchy and easy to pop out of place”
Fit or check on rebuild
- Cylinder rotates and locks in each chamber, trigger returns, loading gate opens and closes normally — Ruger’s own post-reassembly check for the single actions.
Source: Instruction Manual for Ruger New Model Blackhawk Single-Action Revolvers — Sturm, Ruger & Co., Inc. ruger-docs.s3.amazonaws.com [2] — “Check to be sure that the cylinder rotates and locks correctly, that the trigger returns in a positive manner when released, and that the loading gate opens and closes normally.” - Transfer bar moves freely and the hammer cannot reach the firing pin with the trigger forward — A pinched transfer bar stops trigger return; this is the New Model safety.
Source: Blackhawk Trigger Return Issue Help? — 24hourcampfire 24hourcampfire.com [9] — “The transfer bar is a prime candidate because it links directly to the trigger. Look hard at both sides of it, where it should travel freely in the frame.” - Base pin fully seated and latched; base pin latch nut tight — A pin that is not home walks forward under recoil (entry commonIssues).
- Ejector housing screw re-threadlocked (non-permanent) — Ruger installs it with thread locker and asks for it to be reapplied.
Source: Instruction Manual for Ruger Wrangler Single-Action Revolvers — Sturm, Ruger & Co., Inc. ruger-docs.s3.amazonaws.com [3] — “NOTE: The ejector housing screw is installed with a thread-locking adhesive.”
This is Pew-Takedown's rating, not the manufacturer's. How tiers are rated. Forum reports are owners' experience, not specifications.
Manufacturer videos
Official videos from Sturm, Ruger & Co.'s own channels, linked rather than copied. Where a video and the steps on this page differ, follow the manufacturer's manual and video.
- Ruger® Single Action Revolver Disassembly Tech Tip RugerFirearms
field strip · 2021-11-19
Covers: Ruger single-action revolvers (generic Ruger video); assumed to cover the Vaquero / New Vaquero - Ruger® Single Action Revolver Reassembly Tech Tip RugerFirearms
reassembly · 2021-11-19
Covers: Ruger single-action revolvers (generic Ruger video); assumed to cover the Vaquero / New Vaquero - Ruger® Single Action Revolver Cleaning Tech Tip RugerFirearms
cleaning · 2021-11-19
Covers: Ruger single-action revolvers (generic Ruger video); assumed to cover the Vaquero / New Vaquero - Ruger® Single Action Revolver Cylinder Removal Tech Tip RugerFirearms
field strip · 2021-11-19
Covers: Any Ruger Single Action revolver (per the description)
Procedures
Clear and Make Safe
Clear & Make SafeSingle actions unload one chamber at a time. There is no shortcut.
- Point the muzzle in a safe direction and keep your finger off the trigger.
- Open the loading gate on the right side of the frame. On a New Model this frees the cylinder to rotate.
- Rotate the cylinder to bring the first chamber in line with the loading gate and push the ejector rod rearward to eject the cartridge or case.Removed at this step:
One cartridge or case per cycle - Repeat for every chamber, rotating and ejecting one at a time.
- Rotate the cylinder through a full revolution and look into every chamber to confirm each is empty.WarningEvery chamber, verified individually. There is no way to see them all at once.
- Confirm the bore is clear and remove all live ammunition from the work area.
Field Strip — Cylinder Removal
Field StripManufacturer’s videos: Ruger® Single Action Revolver Disassembly Tech Tip RugerFirearms · Ruger® Single Action Revolver Cylinder Removal Tech Tip RugerFirearms
- Complete the Clear and Make Safe procedure.
- Open the loading gate.TipThe cylinder will not come out with the gate closed.
- Press in the base pin latch on the left side of the frame ahead of the cylinder and hold it.
- Pull the base pin forward and out of the frame.WarningA small part the revolver will not function without. Set it where it cannot roll away.Removed at this step:
Base pin - Roll the cylinder out through the loading gate opening on the right side of the frame.Removed at this step:
Cylinder - Close the loading gate once the cylinder is out. This is as far as you need to go for routine cleaning.
- Clean the chambers, bore, cylinder face, and forcing cone.
Reassembly
ReassemblyManufacturer’s video: Ruger® Single Action Revolver Reassembly Tech Tip RugerFirearms
- Open the loading gate and roll the cylinder back into the frame from the right side.
- Align the cylinder with the base pin hole and slide the base pin in from the front.TipIf the pin will not go fully home, the cylinder is not aligned. Rotate it slightly rather than forcing the pin.
- Push the base pin fully home until the latch snaps into its groove.WarningConfirm the latch has engaged by pulling forward on the base pin. A base pin that walks forward under recoil will tie up the revolver.
- Close the loading gate and perform the function check.
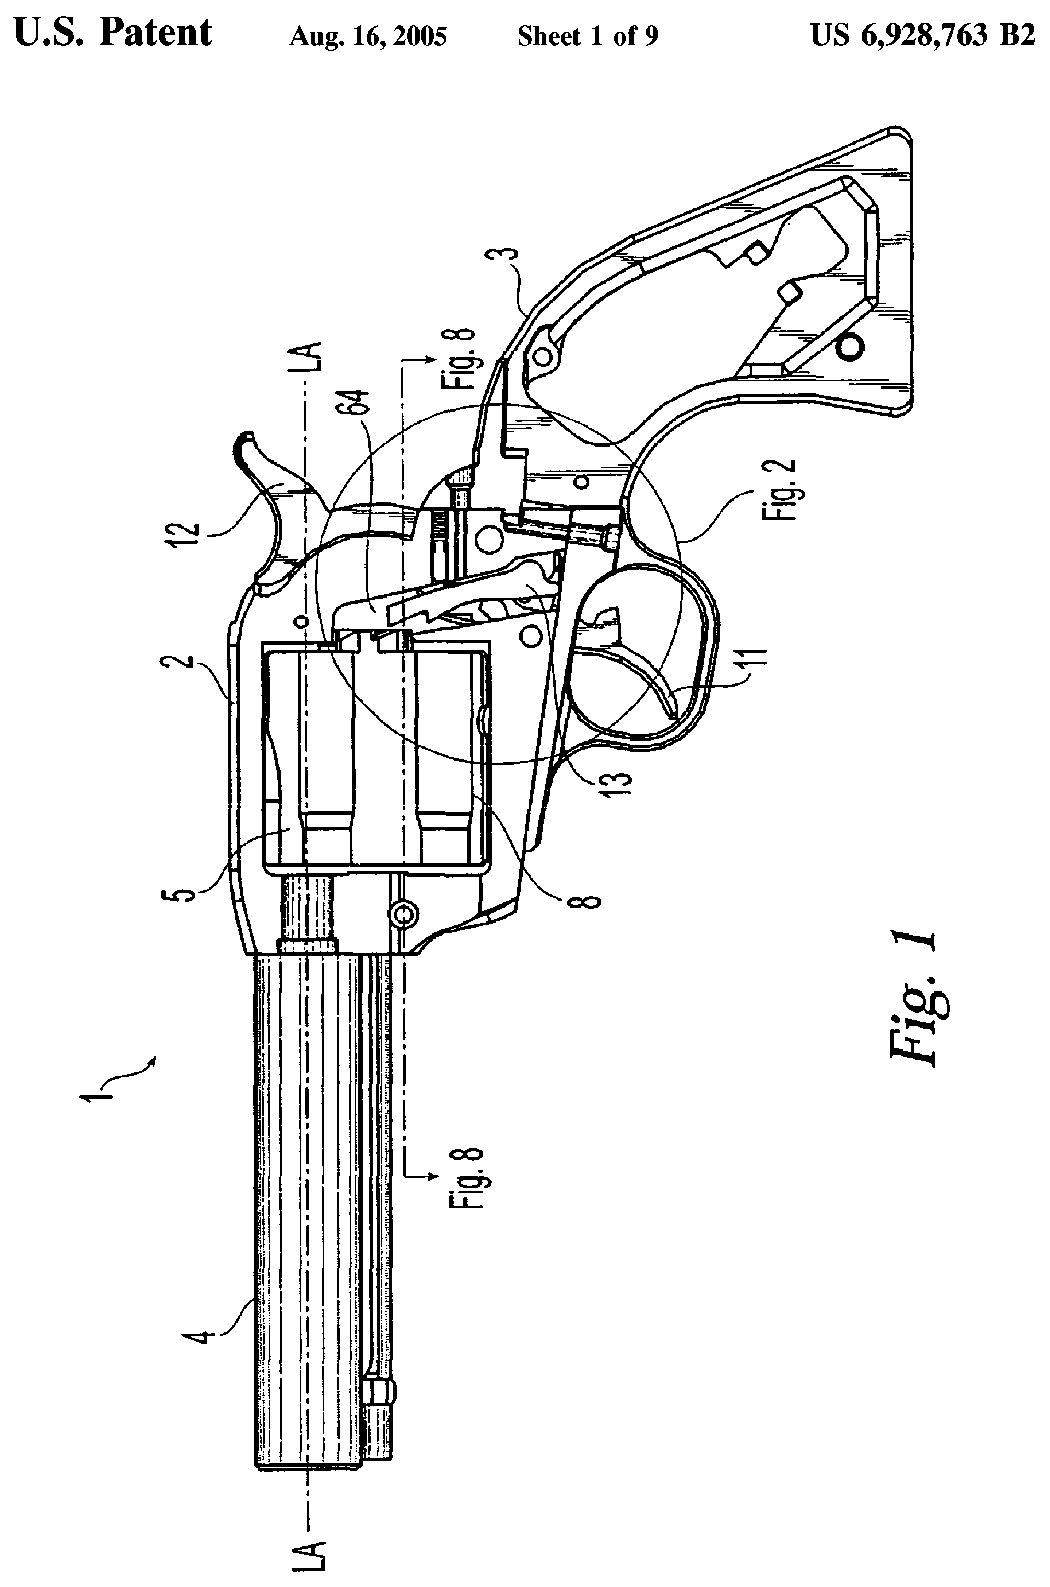
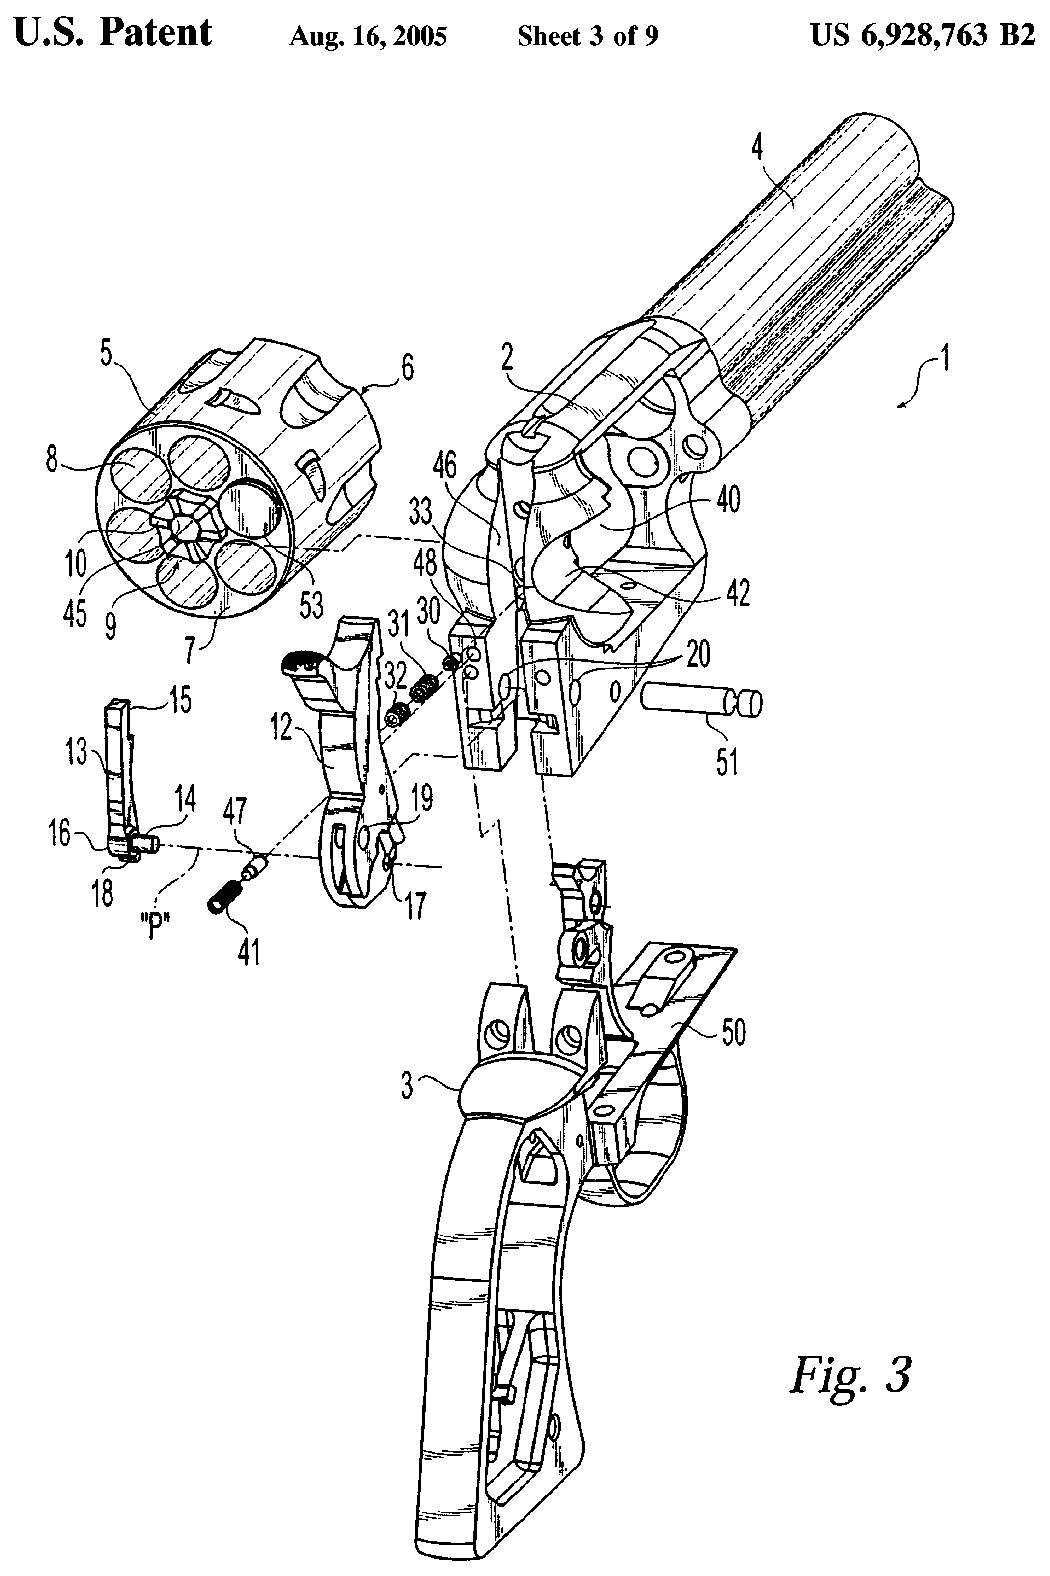
Patent drawings
not under copyrightDrawings from US patents on this design. A patent shows the invention as the inventor filed it; the firearm that shipped can differ in detail, and later production often does. Use them to see how the parts relate, not as a parts reference or a procedure. Per the USPTO, the text and drawings of a patent are typically not subject to copyright; each patent here was checked for a copyright notice.
US Patent 6,928,763 — Firearm cylinder indexing mechanism
Joseph J. Zajk, Jeffrey R. Cornish · assigned to Sturm, Ruger & Company, Inc. · filed 2003-09-15 · granted 2005-08-16. Full patent (USPTO)
The Vaquero's cylinder, frame, pawl, loading gate and the cylinder indexing stop pin.
Why this is the Ruger Vaquero’s patent: listed on the maker’s patent-marking page — Ruger Patents — Sturm, Ruger & Co., Inc. ruger.com [6]: “Ruger Vaquero® 6,928,763”
Torque specifications
No sourced torque values from the manufacturer are recorded for this firearm. Where a fastener has a specified torque — action screws, scope bases, muzzle devices, barrel nuts — get it from the manufacturer or a gunsmith rather than estimating it.
What the manufacturer does say: The manufacturer's documents give no torque value. They say: "NOTE: The ejector housing screw is installed with a thread-locking adhesive. If the screw is removed it is recommended that a non-permanent thread-locking adhesive be reapplied to the screw." (Instruction Manual for the Ruger Vaquero Revolver (PM170), PDF p. 20)
Materials and factory finish
As stated by Sturm, Ruger & Co.. Prep, masking and cure depend on these; a polymer or aluminium part, a nitrided or anodised finish, and a blued steel part are each a different job. Variants with other finishes may exist — check the maker's page for the exact SKU on the bench.
| Component | Material | Factory finish | Where it comes from |
|---|---|---|---|
| Frame Blued, Model 5101 (.45 Colt, 5.50 in) | Alloy Steel | Blued | Ruger Vaquero Blued Single-Action Revolver — Specifications (model 5101) — Sturm, Ruger & Co. ruger.com [5] “Material Alloy Steel … Finish Blued” |
| Grips Model 5101 | Hardwood | — | Ruger Vaquero Blued Single-Action Revolver — Specifications (model 5101) — Sturm, Ruger & Co. ruger.com [5] “Grips Hardwood” |
Parts list
Transcribed from the manufacturer's parts list (Instruction Manual for the Ruger Vaquero Revolver (PM170) — Sturm, Ruger & Co., p. 29 ruger-docs.s3.amazonaws.com [4]) — Current (New) Vaquero, 2005 on. The original large-frame Vaquero (1993–2005) differs and is not covered by this list. Exploded view on p. 30. Key numbers refer to the exploded view in that document.
50 parts
| Key | Part | Part no. | Qty | Group |
|---|---|---|---|---|
| 1 | Barrel Parts so marked must be factory fit. | 1 | ||
| 2 | Grip Frame | 1 | ||
| 3 | Cylinder Frame The cylinder frame is a serial-numbered part and is not offered for sale. | 1 | ||
| 4 | Front Sight Blade | 1 | ||
| 5 | Loading Gate Parts so marked must be factory fit. | 1 | ||
| 6 | Recoil Plate Parts so marked must be factory fit. | 1 | ||
| 7 | Firing Pin Parts so marked must be factory fit. | 1 | ||
| 8 | Firing Pin Reboind Spring Parts so marked must be factory fit. | 1 | ||
| 9 | Recoil Plate Cross Pin Parts so marked must be factory fit. | 1 | ||
| 10 | Base Pin Assembly | 1 | ||
| 11 | Base Pin Latch Nut | 1 | ||
| 12 | Base Pin Latch Body | 1 | ||
| 13 | Trigger Spring Retaining Pin | 1 | ||
| 14 | Trigger Spring Pivot Pin | 1 | ||
| 15 | Base Pin Latch Spring | 1 | ||
| 16 | Trigger Spring | 1 | ||
| 17 | Cylinder Parts so marked must be factory fit. | 1 | ||
| 18 | Mainspring Seat | 1 | ||
| 19 | Hammer, only | 1 | Hammer Assembly | |
| 20 | Hammer Plunger Cross Pin | 1 | Hammer Assembly | |
| 21 | Hammer Plunger | 1 | Hammer Assembly | |
| 22 | Hammer Plunger Spring | 1 | Hammer Assembly | |
| 23 | Pawl Spring Plunger | 1 | ||
| 24 | Pawl Spring | 1 | ||
| 25 | Cylinder Latch Spring Plunger | 1 | ||
| 26 | Cylinder Latch Spring | 1 | ||
| 27 | Trigger Pivot Pin | 1 | ||
| 28 | Grip Frame Screw – A – Front | 1 | ||
| 29 | Hammer Pivot Pin | 1 | ||
| 30 | Hammer Strut | 1 | ||
| 31 | Mainspring | 1 | ||
| 32 | Ejector Alignment Pawl | 1 | ||
| 33 | Cylinder Rotation Stop Spring | 1 | ||
| 34 | Cylinder Rotation Stop Screw | 1 | ||
| 35 | Trigger | 1 | ||
| 36 | Grip Frame Screw & Pivot Lock | 1 | ||
| 37 | Grip Frame Screw – C – Bottom | 1 | ||
| 38 | Grip Frame Screw – B – Back | 2 | ||
| 39 | Gate Detent Spring | 1 | ||
| 40 | Cylinder Latch Assembly | 1 | ||
| 41 | Transfer Bar | 1 | ||
| 42 | Pawl Parts so marked must be factory fit. | 1 | ||
| 43 | Ejector Rod Assembly | 1 | ||
| 44 | Ejector Housing | 1 | ||
| 45 | Ejector Housing Screw | 1 | ||
| 46 | Ejector Housing Spring | 1 | ||
| 47 | Grip Panel Ferrule | 1 | ||
| 48 | Grip Panels – Sold in Pairs Only | 1 | ||
| 49 | Grip Panel Screw | 1 | ||
| 50 | Grip Panel Dowel | 1 |
Function check
- Verify every chamber is empty before each check.
- Cock the hammer and confirm the cylinder indexes and locks at each chamber.
- With the hammer cocked, confirm the cylinder is locked with minimal rotational play.
- Press the trigger and confirm a clean hammer fall.
- With the hammer down, press forward on the hammer. On a New Model the transfer bar should prevent the firing pin from being struck.
- Open the loading gate and confirm the cylinder rotates freely and the hammer cannot be cocked.
- Confirm the base pin is fully seated and latched.
Maintenance
Lubrication points
- Base pin
- Cylinder bore where it rides on the base pin
- Hammer and trigger pivots
- Loading gate pivot
Cleaning notes
Clean the base pin and the cylinder centre hole — fouling there is the usual reason a single-action cylinder drags.
Suggested inspection interval: roughly every 1000 rounds. This is a general guideline, not a manufacturer specification.
Wear parts to inspect
Base pin latch spring · Cylinder stop · Pawl (hand) · Firing pin
Common issues
| Symptom | Likely cause | What to do |
|---|---|---|
| Cylinder drags or binds | Fouling on the base pin or in the cylinder centre hole | Remove the cylinder and clean the base pin and centre bore. |
| Base pin walks forward during shooting | Worn base pin latch or a pin not fully seated | Confirm it seats and latches; replace the latch spring or fit an oversized base pin if it persists. |
Similar manual of arms
Sourcing
- Confidence
- high — Cross-checked against a primary source such as the manufacturer's manual or an issuing military technical manual.
- Verification
- Checked against the manufacturer manual
- Last updated
- 2026-10-29
References
Every source this page draws on, with its web address so you can read it yourself. Numbers in brackets elsewhere on the page point here.
- [1] Ruger Instruction Manuals — Sturm, Ruger & Co., Inc. manufacturer manual primary source
https://ruger.com/dataProcess/serialHistory/manuals.php (checked 2026-09-14) - [2] Instruction Manual for Ruger New Model Blackhawk Single-Action Revolvers — Sturm, Ruger & Co., Inc. manufacturer manual primary source
https://ruger-docs.s3.amazonaws.com/_manuals/blackhawk.pdf (checked 2026-09-14) - [3] Instruction Manual for Ruger Wrangler Single-Action Revolvers — Sturm, Ruger & Co., Inc. manufacturer manual primary source
https://ruger-docs.s3.amazonaws.com/_manuals/wrangler.pdf (checked 2026-09-14) - [4] Instruction Manual for the Ruger Vaquero Revolver (PM170) — Sturm, Ruger & Co. manufacturer manual primary source
https://ruger-docs.s3.amazonaws.com/_manuals/newVaquero.pdf (checked 2026-09-27) - [5] Ruger Vaquero Blued Single-Action Revolver — Specifications (model 5101) — Sturm, Ruger & Co. website primary source
https://ruger.com/products/vaquero/specSheets/5101.html (checked 2026-10-03) - [6] Ruger Patents — Sturm, Ruger & Co., Inc. website primary source
https://ruger.com/micros/Patents/index.html (checked 2026-10-13) - [7] Ruger New Vaquero Disassembly — Cowboy Action Shooting (CAS City) forum community anecdotal source
https://www.cascity.com/forumhall/index.php?topic=19598.0 (checked 2026-10-29) - [8] No clicks heard when rotating cylinder on brand new NMV — Cowboy Action Shooting (CAS City) forum community anecdotal source
https://www.cascity.com/forumhall/index.php?topic=49794.0 (checked 2026-10-29) - [9] Blackhawk Trigger Return Issue Help? — 24hourcampfire community anecdotal source
https://www.24hourcampfire.com/ubbthreads/ubbthreads.php/topics/15795388/2/blackhawk-trigger-return-issue-help (checked 2026-10-29)
Notes: The New Model single-action takedown was verified on 2026-09-14 against two factory manuals — the Blackhawk and the Wrangler — which give an identical procedure and describe it as common to Ruger single-action revolvers. This model's own manual was not read directly, so the citation is to those two.