← All firearms · Printable work order
Springfield Armory XD
- easy
- Shop tier 1
- high confidence
- Pistol
- striker fired
- grip safety
- polymer frame
field strip ~1 min · reassembly ~2 min · detail strip ~20 min
Specifications
- Manufacturer
- Springfield Armory, Inc.
- Origin
- Croatia / United States
- Category
- Pistol
- Action
- Striker-fired, short recoil
- Calibers
- 9x19mm Parabellum, .40 S&W, .45 ACP, .357 SIG
- Capacity
- 16+1 in 9mm Service Model
- Production
- 2001–present (in-production)
- Also known as
- XD-9, XD-40, HS2000, XD Service Model
Model-specific safety
- This pistol requires a trigger pull to field strip. That single fact is responsible for a large share of negligent discharges during cleaning. Verify the chamber is empty, verify it again, and point the muzzle somewhere that a round would not matter.
- The XD has a grip safety in addition to the trigger safety. The grip safety must be depressed for the trigger to function, which matters when you perform the function check.
- The loaded chamber indicator on top of the slide and the striker status indicator at the rear are convenience features, not clearing procedures. Verify the chamber by sight and by touch regardless of what they show.
- The recoil spring assembly is under tension when the slide is off.
- Wear eye protection while disassembling. The manual requires it.
Under spring tension
- Recoil spring assembly
Easily lost parts
Takedown lever · Recoil spring assembly
Tools
No tools required for the field strip.
Shop difficulty
Shop tier 1 Tier 1 — easy among pistols, for the full job: strip to the parts that get coated and put it back together working. 49 rows include three recoil-assembly variants and five magazine parts, leaving about 41 working parts; pinned frame with grip safety and spring, and a slide with striker, striker safety and loaded-chamber indicator on cross pins. Nothing timed; the grip safety and slide spring tension are the cautions.
Parts: 49 numbered parts (Original XD 'XD Frame Parts List' (p. 38) + 'XD Slide Parts List' (p. 40), incl. magazine and three recoil spring assembly variants; Mod.2 and thumb-safety lists omitted.), from XD Operation & Safety Manual — Springfield Armory, Inc., p. 38, 40 springfield-armory.com [1].
Bench time: about 20 min to strip, 30 min to rebuild (estimate). Slide (striker retainer pin, striker assembly, striker safety, LCI and pin, extractor, sights) and frame (trigger/locking block pins and retainers, sear, grip safety, slide stop, mag catch); rebuild longer for grip safety spring and striker safety.
Small parts: 9 pins, 14 springs, 0 detents or plungers (counted from the manufacturer's parts list (one per key number unless a quantity is given))
What comes off for coating
- Slide: striker retainer pin and striker assembly, striker safety, spring and retaining pin, loaded chamber indicator, pin and spring, extractor, rear sight, front sight — pin punches, sight pusher
- Frame: locking block/trigger pins and retainers, trigger, trigger bar and spring, sear, pin and spring, grip safety, pin and spring, ejector and pin, slide stop lever and spring, disassembly lever, magazine catch, pin, spring and button — pin punches
Special tools
- dovetail sight pusher (or brass drift and padded vise) — Removing and refitting dovetailed sights for coating
Known pain points
- The slide comes off under recoil spring tension and must be controlled. (disassembly)
Source: XD Operation & Safety Manual — Springfield Armory, Inc. springfield-armory.com [1] — “CAUTION: Slide is under spring tension. Maintain control.” - Springfield says anything past the field strip is for Springfield or a pistolsmith. (both)
Source: XD Operation & Safety Manual — Springfield Armory, Inc. springfield-armory.com [1] — “Further dismantling is not necessary and should only be done by Springfield, Inc. or a qualified pistolsmith.”
Fit or check on rebuild
- Grip safety blocks the trigger until depressed — Check the grip safety spring went back under the grip safety
- Function check: trigger reset, sear/striker engagement, safeties — Standard post-reassembly check on any pistol whose fire-control parts were removed; a mis-seated spring shows up here, not on the bench
This is Pew-Takedown's rating, not the manufacturer's. How tiers are rated. Forum reports are owners' experience, not specifications.
Procedures
Clear and Make Safe
Clear & Make Safe- Point the muzzle in a safe direction and keep your finger off the trigger.
- Press the magazine release and remove the magazine.Removed at this step:
Magazine - Retract the slide fully to eject any chambered round and lock it open.
- Visually inspect the chamber and magazine well, then physically feel the chamber to confirm it is empty.WarningLook and feel. Both, every time.
- Do not rely on the loaded chamber indicator in place of looking and feeling.WarningIndicators fail. Fingers and eyes are the check.
- Remove all live ammunition from the work area.
Field Strip
Field Strip- Complete the Clear and Make Safe procedure and put on eye protection. The manual requires it.
- Draw the slide back to the rear stop position and lock it open by pushing up the slide stop lever.
- Visually inspect the chamber to confirm the pistol is unloaded.
- Rotate the disassembly lever clockwise to a vertical 12 o'clock position.TipClockwise and up to vertical. It travels up, not down.
- Pull the slide slightly to the rear to release the slide stop lever, then grip the slide firmly and let it move forward slowly until the spring tension is released.WarningThe slide is under spring tension. Maintain control.
- While holding the slide and with the pistol pointed in a safe direction, pull and release the trigger to fully unlock the slide from the frame.WarningThis pistol cannot be field stripped without pulling the trigger. Only do this on a chamber you have just verified empty.
- Move the complete slide assembly forward and off the frame.Removed at this step:
Slide assembly - Remove the recoil spring assembly from the slide.WarningThe 5 in Tactical models do not have a captive recoil system, so the spring is loose and under tension. Maintain control on those.Removed at this step:
Recoil spring assembly - Remove the barrel from the slide. The pistol is now field stripped.Removed at this step:
Barrel
Reassembly
Reassembly- Set the barrel into the inverted slide and seat it fully forward.
- Seat the recoil spring assembly in the cut in the barrel lug and press it down into the slide channel.
- Set the slide onto the frame rails and run it rearward until it seats.
- Rotate the disassembly lever counter-clockwise back to its horizontal locked position.
- Rack the slide several times and perform the function check.
Patent drawings
not under copyrightDrawings from US patents on this design. A patent shows the invention as the inventor filed it; the firearm that shipped can differ in detail, and later production often does. Use them to see how the parts relate, not as a parts reference or a procedure. Per the USPTO, the text and drawings of a patent are typically not subject to copyright; each patent here was checked for a copyright notice.
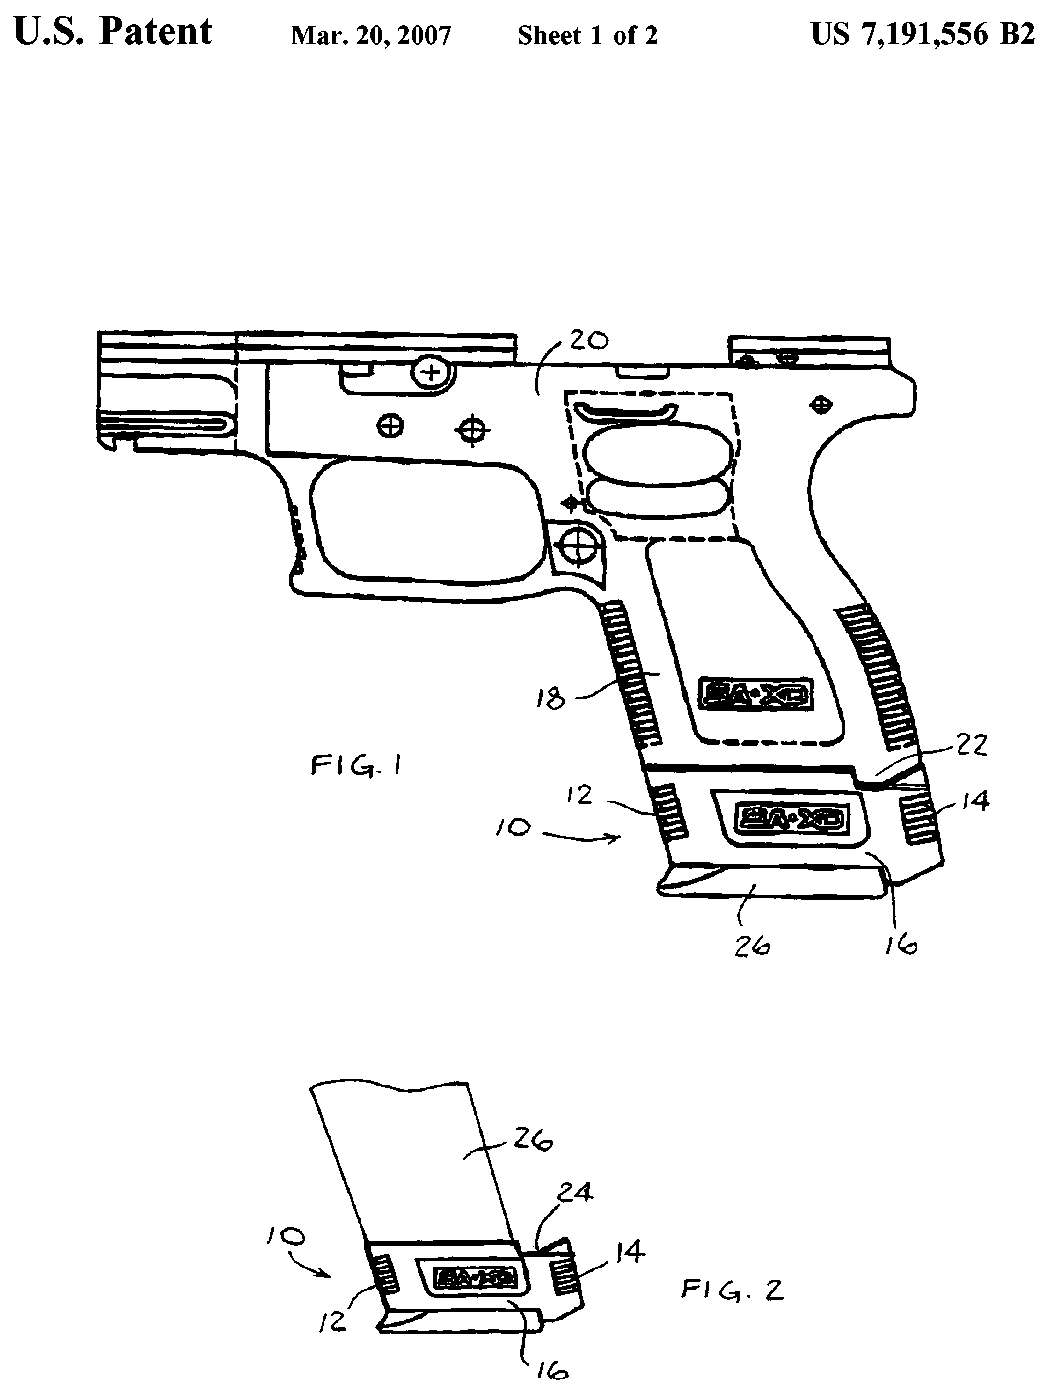
US Patent 7,191,556 — Magazine sleeve
Dov Pikielny · filed 2004-12-10 · granted 2007-03-20. Full patent (USPTO)
A magazine sleeve that fits a sub-compact XD grip; the drawing shows the XD frame and grip with magazine inserted.
Why this is the Springfield Armory XD’s patent: listed on the maker’s patent-marking page — Springfield Armory® Patents — Springfield Armory (patent-marking site linked as "Patents" from the springfield-armory.com footer) sa-ip.com [7]: “XD® Handguns Applicable Patents: PATENT PENDING US7191556”
Torque specifications
No sourced torque values from the manufacturer are recorded for this firearm. Where a fastener has a specified torque — action screws, scope bases, muzzle devices, barrel nuts — get it from the manufacturer or a gunsmith rather than estimating it.
Reported by other sources — not the manufacturer
| Fastener | Torque | Who says so, and their words | Where it comes from |
|---|---|---|---|
| Red-dot optic mounting screws (6-32 flat head, supplied) into EGW rear-dovetail sight mount Springfield XD / XD Mod.2 (non-optics-ready) with the EGW 'Trijicon RMR / SRO, Holosun 407c / 507c Mount for Springfield XD, XDM' (replaces the rear sight; for Trijicon RMR/SRO, Holosun 407C/507C foot |
15 in-lb 1.7 N·m · 1.2 ft-lb |
Reported by Evolution Gun Works (EGW) Remove the rear sight, install the EGW mount in the dovetail, tighten the set screw if applicable, place the optic on the mount, then apply blue Loctite and torque the optic screws. Threadlocker: Blue Loctite on the provided mounting screws (EGW instructions) “Torque mounting screws to 15in/lbs” |
Trijicon RMR / SRO, Holosun 407c / 507c Mount for Springfield XD, XDM (EGW product page, installation instructions section) — Evolution Gun Works (EGW) egwguns.com [5] |
| Red-dot optic mounting screws (supplied) into EGW rear-dovetail sight mount (Docter/Venom/Viper/FastFire footprint) Springfield XD / XD Mod.2 (non-optics-ready) with the EGW 'EGW Springfield XD / XDM Sight Mount (fits Burris FastFire, Docter, Viridian RFX25)' (replaces the rear sight) |
15 in-lb 1.7 N·m · 1.2 ft-lb |
Reported by Evolution Gun Works (EGW) Remove the rear sight, install the EGW mount in the dovetail, tighten the set screw if applicable, place the optic on the mount, then apply blue Loctite and torque the optic screws. Threadlocker: Blue Loctite on the provided mounting screws (EGW instructions) “Torque mounting screws to 15in/lbs” |
EGW Springfield XD / XDM Sight Mount (fits Burris FastFire, Docter, Viridian RFX25) (EGW product page, installation instructions section) — Evolution Gun Works (EGW) egwguns.com [6] |
Materials and factory finish
As stated by Springfield Armory, Inc.. Prep, masking and cure depend on these; a polymer or aluminium part, a nitrided or anodised finish, and a blued steel part are each a different job. Variants with other finishes may exist — check the maker's page for the exact SKU on the bench.
| Component | Material | Factory finish | Where it comes from |
|---|---|---|---|
| Barrel XD 4in Service Model 9mm, Black, XD9101 (low-capacity listing) | Steel | Melonite® | XD® 4" 9mm Handgun, Low Capacity - XD9101 - Springfield Armory (Specs) — Springfield Armory, Inc. springfield-armory.com [4] “Barrel … 4" Hammer Forged Steel, Melonite® Finish, 1:10” |
| Slide XD 4in Service Model 9mm, Black, XD9101 (low-capacity listing) | Steel | Melonite® | XD® 4" 9mm Handgun, Low Capacity - XD9101 - Springfield Armory (Specs) — Springfield Armory, Inc. springfield-armory.com [4] “Slide … Forged Steel, Melonite® Finish” |
| Frame XD 4in Service Model 9mm, Black, XD9101 (low-capacity listing) | Polymer | Black | XD® 4" 9mm Handgun, Low Capacity - XD9101 - Springfield Armory (Specs) — Springfield Armory, Inc. springfield-armory.com [4] “Frame … Black Polymer” |
Parts list
Transcribed from the manufacturer's parts list (XD Operation & Safety Manual — Springfield Armory, Inc., p. 38, 40 springfield-armory.com [1]) — Original XD (9mm/40SW/357SIG/45GAP/45ACP): 'XD Frame Parts List' p.38 + 'XD Slide Parts List' p.40. Omitted: XD Mod.2 frame/slide lists (pp.34, 36) and XD 45ACP With Thumb Safety frame/slide lists (pp.42, 44).. Key numbers refer to the exploded view in that document.
49 parts
| Key | Part | Part no. | Qty | Group |
|---|---|---|---|---|
| Frame parts list | ||||
| 1 | Receiver | 1 | ||
| 4 | Locking Block | 1 | ||
| 5 | Locking Block Pin/Trigger pin-2 | 1 | ||
| 6 | Locking Block Pin/Trigger Pin Retainer-2 | 1 | ||
| 7 | Trigger with Safety | 1 | ||
| 8 | Trigger Bar | 1 | ||
| 9 | Trigger Bar Spring | 1 | ||
| 10 | Sear | 1 | ||
| 11 | Sear Pin | 1 | ||
| 12 | Ejector Pin | 1 | ||
| 13 | Sear Spring | 1 | ||
| 14 | Ejector | 1 | ||
| 15 | Grip Safety | 1 | ||
| 16 | Grip Safety Pin | 1 | ||
| 17 | Grip Safety Spring | 1 | ||
| 18 | Slide Stop Lever | 1 | ||
| 19 | Slide Stop Lever Spring | 1 | ||
| 20 | Disassembly Lever | 1 | ||
| 21 | Magazine Catch | 1 | ||
| 22 | Magazine Catch Pin | 1 | ||
| 23 | Magazine Catch Spring | 1 | ||
| 24 | Magazine Release Button | 1 | ||
| 25 | Striker Safety Lever | 1 | ||
| 45 | Magazine Follower | 1 | ||
| 46 | Magazine Locking Plate | 1 | ||
| 47 | Magazine Base | 1 | ||
| 48 | Magazine Body | 1 | ||
| 49 | Magazine Spring | 1 | ||
| Slide parts list | ||||
| 2 | Slide | 1 | ||
| 3 | Barrel | 1 | ||
| 26 | Striker Safety Retaining Pin | 1 | ||
| 27 | Striker Locking Plate | 1 | ||
| 28 | Striker Spring Guide | 1 | ||
| 29 | Striker Status Indicator | 1 | ||
| 30 | Striker Dampening Spring | 1 | ||
| 31 | Striker | 1 | ||
| 32 | Striker Spring | 1 | ||
| 33 | Striker Safety | 1 | ||
| 34 | Striker Safety Spring | 1 | ||
| 35 | Striker Retainer Pin | 1 | ||
| 36 | Extractor | 1 | ||
| 37 | Loaded Chamber Indicator | 1 | ||
| 38 | Loaded Chamber Indicator Pin | 1 | ||
| 39 | Loaded Chamber Indicator Spring | 1 | ||
| 40 | Rear Sight | 1 | ||
| 41 | Front Sight | 1 | ||
| 42 | Recoil Spring Assembly (Captive Style On Sub-Compact Models) | 1 | ||
| 43 | Recoil Spring Assembly (Captive Style On Service Models) | 1 | ||
| 44 | Recoil Spring And Guide Rod Assembly (Non-Captive Style On Tactical Models) | 1 | ||
Function check
- Verify the pistol is unloaded with no magazine inserted before each check.
- Without depressing the grip safety, press the trigger. The striker must not release.
- Depress the grip safety and press the trigger. The striker should release.
- Hold the trigger back, rack the slide, release slowly and confirm the reset.
- Confirm the slide locks open on an empty magazine and the magazine drops free.
Maintenance
Lubrication points
- Frame rails where the slide rides
- Barrel hood and locking lug
- Outside of the barrel at the muzzle end
- Rear barrel lug where the recoil spring assembly bears
Cleaning notes
Light lubrication only — a thin film on the rails and barrel. Keep the striker channel dry and free of solvent, since oil there collects fouling and causes light strikes.
Suggested inspection interval: roughly every 5000 rounds. This is a general guideline, not a manufacturer specification.
Wear parts to inspect
Recoil spring assembly · Extractor · Striker spring · Grip safety linkage
Common issues
| Symptom | Likely cause | What to do |
|---|---|---|
| Trigger does nothing | Grip safety not depressed | Take a full firing grip. This is by design. |
| Takedown lever will not rotate | Slide not fully locked to the rear | Lock the slide fully open and try again. |
Also covers
The procedures above are reported to apply to: XD Service, Tactical, and Compact models · HS2000. Verify against the manual for your specific model.
Similar manual of arms
Sourcing
- Confidence
- high — Cross-checked against a primary source such as the manufacturer's manual or an issuing military technical manual.
- Verification
- Checked against the manufacturer manual
- Last updated
- 2026-10-29
References
Every source this page draws on, with its web address so you can read it yourself. Numbers in brackets elsewhere on the page point here.
- [1] XD Operation & Safety Manual — Springfield Armory, Inc. manufacturer manual primary source
https://www.springfield-armory.com/wp-content/uploads/XD-Manual.pdf (checked 2026-09-14) - [2] XD-M Operation & Safety Manual — Springfield Armory, Inc. manufacturer manual primary source
https://www.springfield-armory.com/wp-content/uploads/XD-M-Manual.pdf (checked 2026-09-14) - [3] XD-S Operation & Safety Manual — Springfield Armory, Inc. manufacturer manual primary source
https://www.springfield-armory.com/wp-content/uploads/XD-S-Manual.pdf (checked 2026-09-14) - [4] XD® 4" 9mm Handgun, Low Capacity - XD9101 - Springfield Armory (Specs) — Springfield Armory, Inc. website primary source
https://www.springfield-armory.com/xd-series-handguns/xd-handguns/xd-4-service-model-9mm-handgun-low-capacity/ (checked 2026-10-03) - [5] Trijicon RMR / SRO, Holosun 407c / 507c Mount for Springfield XD, XDM (EGW product page, installation instructions section) — Evolution Gun Works (EGW) website secondary source
https://egwguns.com/trijicon-rmr-sro-holosun-407c-507c-mount-for-springfield-xd-xdm (checked 2026-10-11) - [6] EGW Springfield XD / XDM Sight Mount (fits Burris FastFire, Docter, Viridian RFX25) (EGW product page, installation instructions section) — Evolution Gun Works (EGW) website secondary source
https://egwguns.com/vortex-viper-venom-springfield-xd-xdm-sight-mount-fits-burris-fastfire-and-docter (checked 2026-10-11) - [7] Springfield Armory® Patents — Springfield Armory (patent-marking site linked as "Patents" from the springfield-armory.com footer) website primary source
https://www.sa-ip.com/ (checked 2026-10-13)
Notes: Cleanup on 2026-09-15: when this entry's trigger-press flag was corrected, the stale text asserting the opposite was left behind. The rendered page carried the new warning and the old contradicting one together, and in some cases a 'no trigger pull takedown' tag in the header. Removed. This was caught by screenshotting the built page rather than by any test, which is why a test now covers it. CORRECTED on 2026-09-14 against the factory manual. The entry recorded the XD as not requiring a trigger pull to disassemble; the manual's step 6 is to pull and release the trigger to fully unlock the slide from the frame. The takedown lever also rotates clockwise to vertical, not merely 'upward'. Note that the XD-M manual's own procedure omits the trigger pull — the XD and XD-M differ here, and this entry follows the XD manual. The 5 in Tactical models have a non-captive recoil spring. The XD, XD-M, and XD-S share the takedown pattern but differ in grip safety detail, magazine release, and recoil spring assembly. Confirm against the manual for your model.