← All firearms · Printable work order
Winchester Model 1894
- advanced
- Shop tier 3
- low confidence
- Rifle
- lever action
- tube magazine
- historic
- hunting
- requires tools
- verify before use
field strip ~10 min · reassembly ~15 min · detail strip ~60 min
Specifications
- Manufacturer
- Winchester Repeating Arms
- Origin
- United States
- Category
- Rifle
- Action
- Lever action
- Calibers
- .30-30 Winchester, .32 Winchester Special, .38-55 Winchester, .25-35 Winchester
- Capacity
- 6 rounds in the tube magazine, typical
- Production
- 1894–present (in-production)
- Also known as
- Model 94, Winchester 30-30, Win 94 Angle Eject
Model-specific safety
- Read the sourcing note on this entry before using the disassembly section. The Model 94 has been produced for over 130 years across several substantially different designs, and the takedown sequence is not the same across them.
- A tube magazine is unloaded by cycling rounds through the action one at a time. Cycle until nothing more feeds, then verify the chamber, the carrier, and the magazine tube.
- Pointed bullets must never be loaded in a tube magazine. A spitzer tip rests against the primer of the round ahead of it and recoil can detonate it. Use flat-nose or approved polymer-tip ammunition only.
- Half-cock on older rifles is a hammer rest, not a safety. Pre-1992 rifles have no crossbolt or tang safety at all.
- This action has many small internal parts that come out in a specific order and go back in a specific order. Unlike most modern designs, there is no forgiving way to reassemble it wrong — it simply will not go together, or worse, it will go together badly.
- For routine cleaning, do not disassemble this rifle. Clean the bore from the muzzle with a bore guide and a rod guide, wipe the accessible action surfaces, and leave it at that.
Under spring tension
- Magazine tube spring and follower
- Hammer spring
- Carrier spring
- Cartridge guide springs
Easily lost parts
Locking bolts · Lever pivot screw · Carrier · Cartridge guides · Ejector components
Tools
| Tool | Required | Used for | Substitute |
|---|---|---|---|
| Hollow-ground gunsmith screwdrivers | Yes | Receiver and tang screws. These are visible external screws on a rifle that is often a family heirloom — the wrong screwdriver leaves permanent marks. |
Shop difficulty
Shop tier 3 Tier 3 — hardest among rifles and carbines, for the full job: strip to the parts that get coated and put it back together working. 78 key numbers on Winchester's schematic, in a lever action. The hammer only comes out with the safety held, the trigger pulled and the lower tang slid back together. The carrier, locking bolt, link and lever must be indexed to go back in, and loose locking bolts carry the firing load. Gunsmiths and collectors report the hammer and tang binding. This is the lever-action Tier 3 case.
Parts: 78 numbered parts (Current Model 94 (takedown-capable) schematic, key numbers 1–78 read from the drawing; the printed price list on p. 1 gives only 29 orderable refs), from Winchester Model 94 Parts List (Lever Action Rifle, prices effective January 1, 2024) — Winchester Repeating Arms, p. 2 (schematic) winchesterguns.com [7].
Bench time: about 75 min to strip, 135 min to rebuild (estimate). Full lever strip: tang, hammer and lower tang, lever and link, carrier, locking bolt, breech bolt, spring cover, magazine and forend. Rebuild is driven by the hammer/tang juggling and the carrier/lever/link indexing.
What comes off for coating
- Buttstock / lower tang: upper tang screw, buttstock, hammer screw, hammer, lower tang with trigger and safety, mainspring and strain screw
- Action: finger lever and pin, link and pin, carrier and screws, locking bolt, breech bolt (firing pin, extractor, ejector), spring cover, loading gate
- Barrel / magazine: magazine plug and screw, magazine spring and follower, forend and bands, magazine tube, sights
Special tools
- hollow-ground gunsmith screwdrivers — Receiver and tang screws
- small punch — Finger lever pin and link pin
Known pain points
- The hammer comes out only by holding the safety catch up, pulling the trigger, and lifting the hammer while sliding the lower tang rearward, all at once. (disassembly)
Source: The Winchester Model 94: History & Disassembly — American Rifleman (NRA) americanrifleman.org [8] — “Turn out the hammer screw (24) (Fig. 2), hold the safety catch up, pull the trigger and remove the hammer upward and outward while pulling the lower tang (44) rearward (Fig. 3).” - A gummed sear or safety can lock the hammer into the trigger so neither hammer nor lower tang will come out. (disassembly)
Owners report: 1894 Disassembly Problem — Winchester Collector (WACA forum) winchestercollector.org [9] — “Apparently, the hammer is locked into the trigger assembly and I can not remove the lower tang as the hammer binds on the upper tang.” - Winchester's schematic is for identification only, not an assembly guide, and several parts are marked as needing factory or gunsmith fitting. (reassembly)
Source: Winchester Model 94 Parts List (Lever Action Rifle, prices effective January 1, 2024) — Winchester Repeating Arms winchesterguns.com [7] — “Schematic is provided for parts identification only and should not be used as a guide to assemble guns.”
Fit or check on rebuild
- Locking-bolt lock-up — It must lock positively.
- Winchester-fitted parts — Starred parts must be fitted by Winchester or a gunsmith.
Source: Winchester Model 94 Parts List (Lever Action Rifle, prices effective January 1, 2024) — Winchester Repeating Arms winchesterguns.com [7] — “*Indicates part must be fitted by Winchester Repeating arms Service Department or qualified gunsmith.” - Re-zero sights or scope — Sights and optics come off for coating, and point of impact must be re-confirmed. This is a standard check, so no source.
This is Pew-Takedown's rating, not the manufacturer's. How tiers are rated. Forum reports are owners' experience, not specifications.
Procedures
Clear and Make Safe
Clear & Make SafeThis part is consistent across every Model 94 and is the most important section of this entry.
- Point the muzzle in a safe direction and keep your finger off the trigger.
- If the rifle has a crossbolt or tang safety, engage it. Many do not.
- Work the lever fully open and closed repeatedly, catching each cartridge as it ejects, until no more cartridges feed from the magazine.
- With the lever open, inspect the chamber, the carrier, and the loading gate with a light.WarningThree places to check: the chamber, the carrier, and the magazine tube. A lever gun can hold a cartridge in any of them.
- Physically confirm the chamber is empty with a finger or a chamber flag.
- Lower the hammer to half-cock only after the chamber is confirmed empty, with the muzzle in a safe direction.WarningHalf-cock is a hammer rest, not a safety mechanism. Do not treat it as one.
- Remove all live ammunition from the work area.
Routine Maintenance Without Disassembly
MaintenanceFor almost every owner, this is the correct answer instead of a field strip.
- Complete the Clear and Make Safe procedure.
- Open the lever fully and clean the bore from the muzzle using a coated rod and a muzzle rod guide.WarningA top-eject Model 94 cannot easily be cleaned from the breech. Protecting the crown with a rod guide matters more here than on most rifles — crown wear from a bare rod is a permanent accuracy loss.TipAn angle-eject Model 94 gives better access, but a rod guide is still the right call.
- Wipe the accessible bolt face, chamber mouth, carrier, and the interior surfaces you can reach through the open action.
- Apply a light film of oil to the lever pivot, the bolt, and the exposed action surfaces. Wipe the exterior with an oiled cloth.
- Keep the inside of the magazine tube dry rather than oiled — oil there collects fouling and slows the follower.
Field Strip — Lever and Bolt Removal
Field Strip tools required gunsmith recommendedVerify this sequence against a manual or schematic for your specific rifle before starting. See the sourcing note.
- Complete the Clear and Make Safe procedure and lower the hammer to half-cock.WarningConfirm the chamber, carrier, and magazine tube are all empty.
- Identify your rifle's generation before proceeding: pre-1964, post-1964, angle-eject (1983 onward), and the later Miroku-produced rifles differ in internal detail.WarningDo not assume a procedure written for one generation applies to another.
- Remove the lever pivot screw from the side of the receiver using a correctly fitting hollow-ground screwdriver.Removed at this step:
Lever pivot screw - Rotate the lever downward and withdraw it from the receiver, allowing the locking bolts to drop free as the lever disengages them.WarningThe locking bolts are separate parts that fall out at this stage. Work over a tray so nothing is lost, and note their orientation.Removed at this step:
LeverLocking bolts - Slide the bolt rearward and out of the receiver.Removed at this step:
Bolt - Stop here. The carrier, cartridge guides, and trigger assembly require a specific order and are gunsmith territory.WarningIf the rifle is not functioning correctly, take it to a gunsmith rather than continuing to disassemble it.
Reassembly
Reassembly gunsmith recommended- Slide the bolt into the receiver from the rear and move it most of the way forward.
- Set the locking bolts back into their recesses in the receiver in the orientation they came out.WarningThe locking bolts are what hold the action closed against firing pressure. If they are not correctly seated, the rifle is dangerous. If you are not certain they are right, stop and see a gunsmith.
- Insert the lever and rotate it into position, engaging it with the bolt and the locking bolts.
- Align the pivot hole and install the lever pivot screw, tightening it snugly.
- Cycle the lever through several full strokes and confirm the action locks up solidly with the lever fully closed.WarningIf the action does not lock up positively, do not fire the rifle.
- Perform the function check.
Takedown models (current production)
Field StripThe current Model 1894 Takedown separates into two halves. This is Winchester's own procedure and applies only to that variant.
- Read this first: the barrel and forearm half must only ever be used with the receiver half it was sold with. Winchester states barrels are not interchangeable with any other current or older Model 1894.WarningMixing halves between rifles is a headspace problem, not an inconvenience.
- Complete the Clear and Make Safe procedure with the safety ON SAFE, clearing the chamber, magazine, and action-feed areas.WarningThe rifle cannot be taken down with a cartridge in the magazine, and trying will damage it.
- Open the action completely by working the finger lever fully downward.WarningThe rifle cannot be taken down with the action closed. Forcing it damages the bolt components.
- Lift the takedown lever on the end of the magazine tube fully outward, away from the magazine.
- Rotate the takedown lever counter-clockwise to disengage the magazine tube and magazine follower from the receiver.
- Grasp the grip in one hand and the barrel and forearm half in the other, and rotate the barrel/forearm half clockwise 90 degrees to unlock it from the receiver.WarningIf it will not rotate, do not add force. Confirm the action is open and the takedown lever has been turned far enough to clear the magazine tube and follower.TipThe takedown uses an interrupted thread. It either lines up or it does not; force is never the answer.
- Pull the barrel and forearm half away from the receiver. The rifle is now taken down.Removed at this step:
Barrel and forearm half - For storage, return the finger lever to closed and fold the takedown lever down flush along the bottom of the magazine tube, centred.
- To reassemble, open the action fully first, lift the takedown lever out and rotate it counter-clockwise so the magazine tube and follower do not protrude, present the barrel half at 90 degrees to the left of the receiver, insert the threaded barrel extension until the receiver extension and receiver are lightly in contact, then rotate the barrel half clockwise 90 degrees.TipVery little force should be needed. If it resists, clean and lightly oil the mating faces — grit between them is the usual cause.
- Extend the takedown lever, turn it clockwise to secure the magazine tube snug without over-tightening, then fold it flat and centred on the magazine tube.
Patent drawings
not under copyrightDrawings from US patents on this design. A patent shows the invention as the inventor filed it; the firearm that shipped can differ in detail, and later production often does. Use them to see how the parts relate, not as a parts reference or a procedure. Per the USPTO, the text and drawings of a patent are typically not subject to copyright; each patent here was checked for a copyright notice.
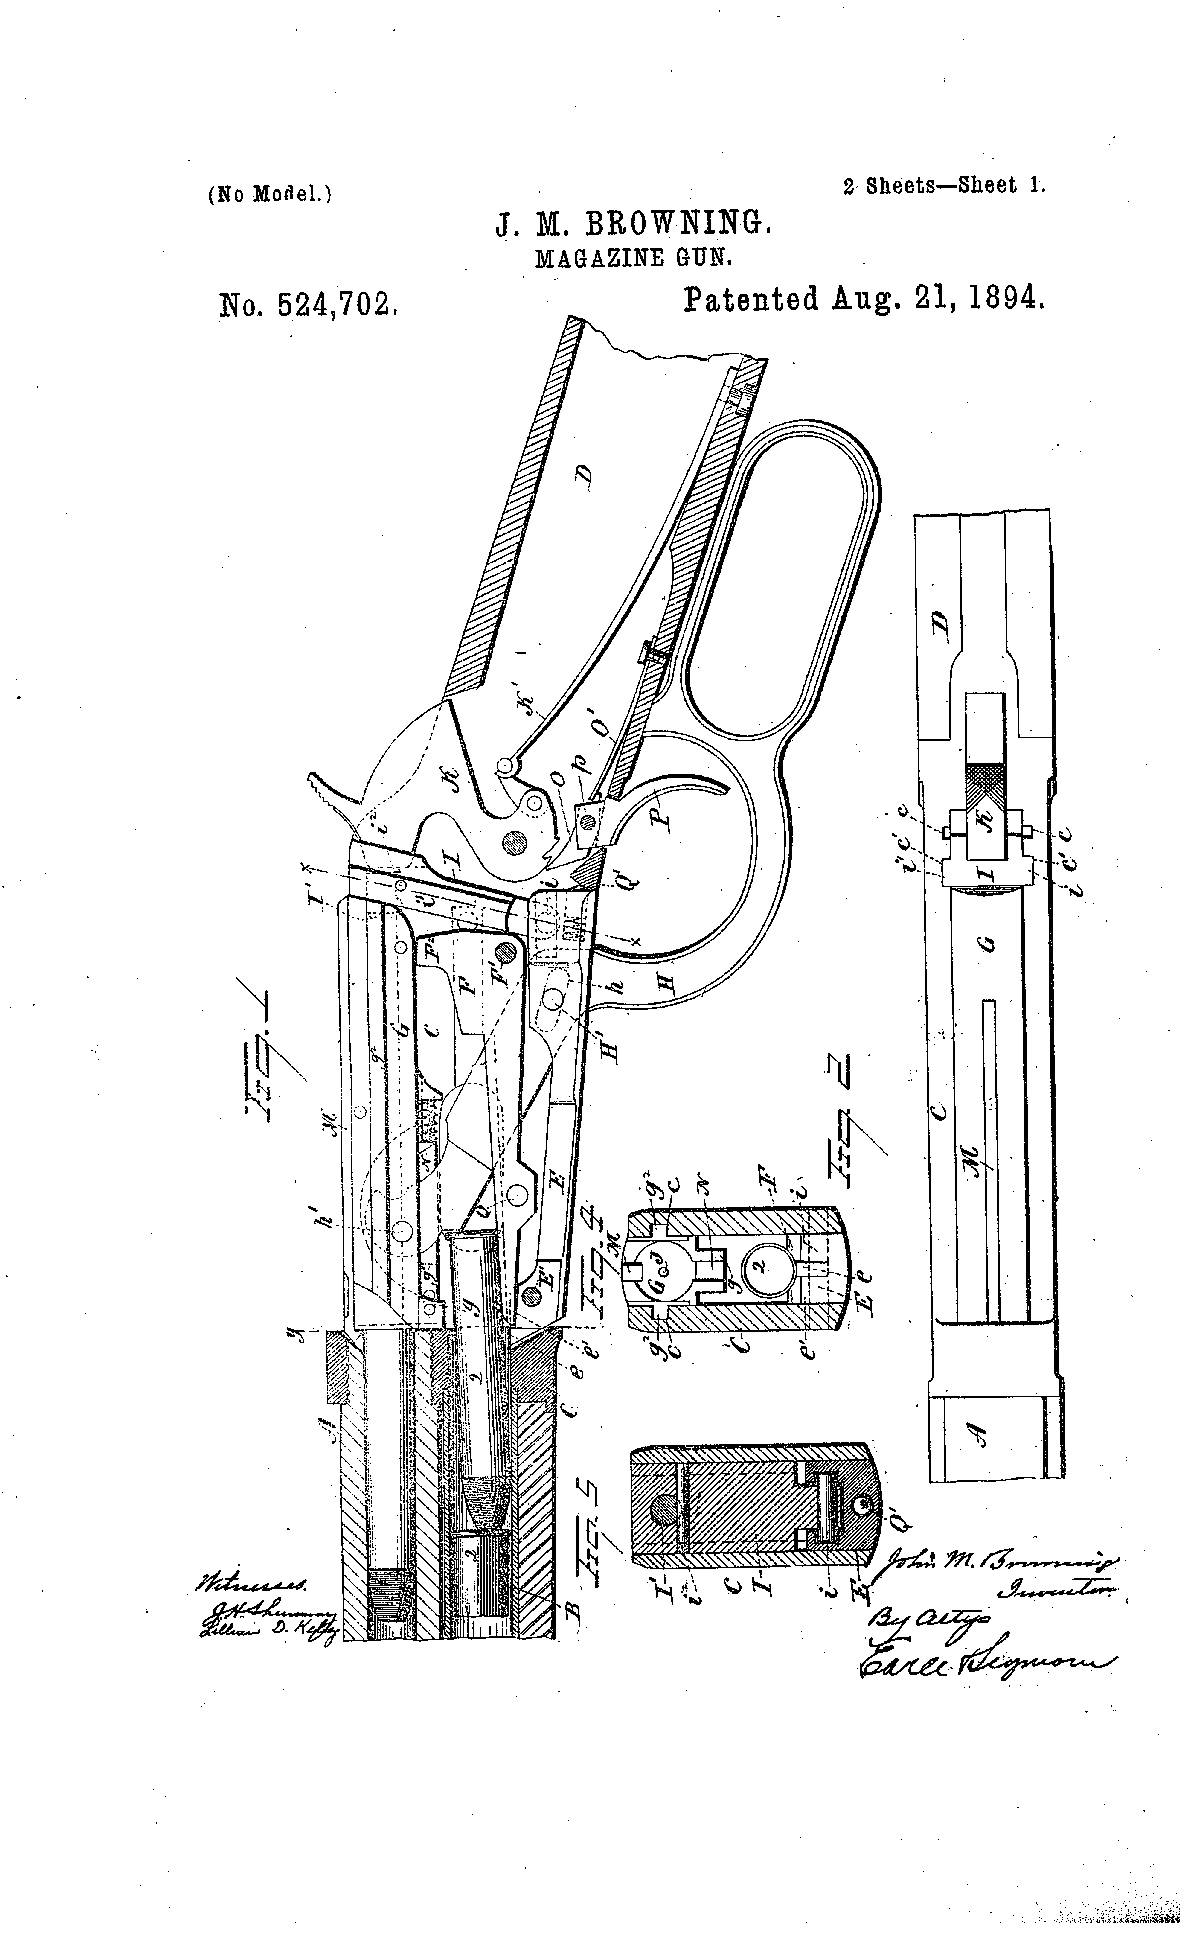
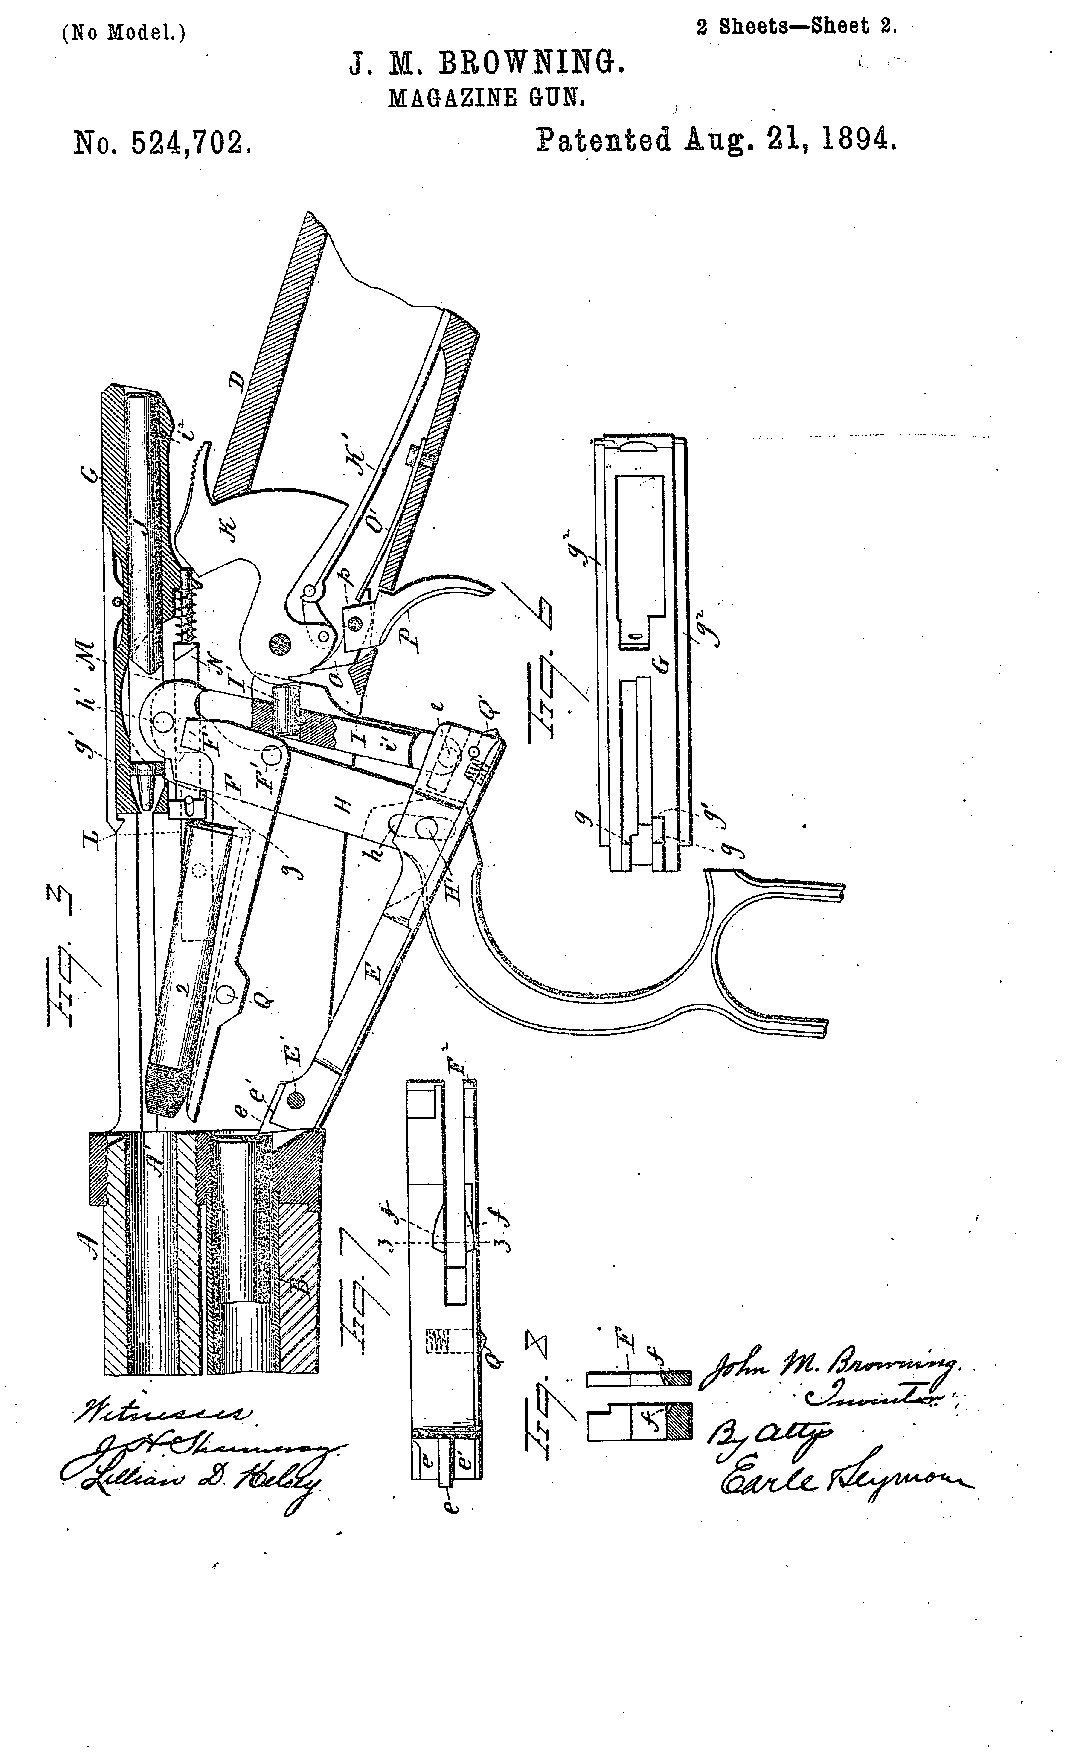
US Patent 524,702 — Magazine-Gun
John M. Browning · assigned to Winchester Repeating Arms Company · filed 1894-01-19 · granted 1894-08-21. Full patent (USPTO)
Browning's lever-action design for the Winchester Model 1894: the finger lever and operating plate, sliding breech-block, vertically moving locking-block, carrier and magazine cut-off inside the receiver, shown closed and open.
Why this is the Winchester Model 1894’s patent: named by a historical source — The Winchester Model 94: History & Disassembly — American Rifleman (National Rifle Association) americanrifleman.org [6]: “the Winchester Model 94 rifle was designed by John M. Browning who sold his Model 94 patent (No. 524702 of August 1894) to Winchester.”
Torque specifications
No sourced torque values from the manufacturer are recorded for this firearm. Where a fastener has a specified torque — action screws, scope bases, muzzle devices, barrel nuts — get it from the manufacturer or a gunsmith rather than estimating it.
What the manufacturer does say: The manufacturer's documents give no torque value. They say: "Tighten the magazine tube until it is snug. Do not overtighten." (Winchester Model 1894 Rifle Owner's Manual) "IMPORTANT: Do not use tools to tighten the hammer extension, you may damage it." (Winchester Model 1894 Rifle Owner's Manual)
Reported by other sources — not the manufacturer
| Fastener | Torque | Who says so, and their words | Where it comes from |
|---|---|---|---|
| Lever scout mount attaching screws XS Sights Lever Scout Mount on a Winchester 94 AE (Angle Eject) with rear sight dovetail 4" from receiver |
20 in-lb 2.3 N·m · 1.7 ft-lb |
Reported by XS Sights After the epoxy bedding has cured 24 hours. “After the epoxy has cured, tighten all attaching screws. Torque to 20 inch pounds” |
XS Sights Winchester 94 AE Lever Scout Mount — Installation — XS Sights, PDF p. 2 of 2 xssights.com [5] |
Materials and factory finish
As stated by Winchester Repeating Arms. Prep, masking and cure depend on these; a polymer or aluminium part, a nitrided or anodised finish, and a blued steel part are each a different job. Variants with other finishes may exist — check the maker's page for the exact SKU on the bench.
| Component | Material | Factory finish | Where it comes from |
|---|---|---|---|
| Receiver Model 94 Carbine, 30-30 WIN, item 534199114 | Steel | — | Model 94 Carbine — Specifications (Winchester Repeating Arms) — Winchester Repeating Arms winchesterguns.com [4] “Receiver Material Steel” |
| Receiver Model 94 Carbine, 30-30 WIN, item 534199114 | — | Brushed Polish | Model 94 Carbine — Specifications (Winchester Repeating Arms) — Winchester Repeating Arms winchesterguns.com [4] “Receiver Finish Brushed Polish” |
| Barrel Model 94 Carbine, 30-30 WIN, item 534199114 | Steel | — | Model 94 Carbine — Specifications (Winchester Repeating Arms) — Winchester Repeating Arms winchesterguns.com [4] “Barrel Material Steel” |
| Barrel Model 94 Carbine, 30-30 WIN, item 534199114 | — | Brushed Polish | Model 94 Carbine — Specifications (Winchester Repeating Arms) — Winchester Repeating Arms winchesterguns.com [4] “Barrel Finish Brushed Polish” |
| Stock Model 94 Carbine, 30-30 WIN, item 534199114 | Black Walnut | — | Model 94 Carbine — Specifications (Winchester Repeating Arms) — Winchester Repeating Arms winchesterguns.com [4] “Stock Material Black Walnut” |
| Stock Model 94 Carbine, 30-30 WIN, item 534199114 | — | Satin | Model 94 Carbine — Specifications (Winchester Repeating Arms) — Winchester Repeating Arms winchesterguns.com [4] “Stock Finish Satin” |
| Trigger guard Model 94 Carbine, 30-30 WIN, item 534199114 | Steel | — | Model 94 Carbine — Specifications (Winchester Repeating Arms) — Winchester Repeating Arms winchesterguns.com [4] “Trigger Guard Material Steel” |
| Buttplate Model 94 Carbine | steel | Blued | Model 94 Carbine — Specifications (Winchester Repeating Arms) — Winchester Repeating Arms winchesterguns.com [4] “Blued steel carbine strap buttplate” |
Function check
- Verify the rifle is unloaded — chamber, carrier, and magazine tube — before each step.
- Cycle the lever fully and confirm the bolt locks up solidly with the lever closed. There should be no perceptible play at the breech.
- With the hammer cocked, engage the safety if the rifle has one and press the trigger. The hammer must not fall.
- Disengage the safety and press the trigger. The hammer should fall.
- Confirm the lever safety, where fitted, prevents firing with the lever not fully closed.
- Load dummy rounds and cycle them through, confirming they feed from the carrier and eject cleanly.
- If the action does not lock up solidly, or anything feels different from before disassembly, stop and see a gunsmith before firing.
Maintenance
Lubrication points
- Lever pivot
- Bolt body
- Locking bolt surfaces
- Carrier pivot
- Hammer and sear pivots
Cleaning notes
Clean from the muzzle with a rod guide on top-eject rifles. Keep the magazine tube dry inside. On an older rifle with a case-colored or blued receiver, avoid aggressive solvents on exterior finishes.
Suggested inspection interval: roughly every 500 rounds. This is a general guideline, not a manufacturer specification.
Wear parts to inspect
Locking bolts · Extractor · Carrier · Magazine spring · Firing pin
Common issues
| Symptom | Likely cause | What to do |
|---|---|---|
| Action feels loose at the breech with the lever closed | Locking bolts worn or incorrectly seated | Do not fire the rifle. This is the action's primary locking system. see a gunsmith |
| Rounds jam on the carrier | Short-stroking the lever, or worn cartridge guides | Work the lever fully. If it persists, have the carrier and guides inspected. see a gunsmith |
| Scope will not mount | Top-eject receiver on pre-1983 rifles | Top-eject rifles need a side mount or a scout-style forward mount. |
Also covers
The procedures above are reported to apply to: Winchester Model 94 in its many variants — but see the sourcing note about generational differences. Verify against the manual for your specific model.
Similar manual of arms
Sourcing
- Confidence
- low — Compiled from limited or non-authoritative sources. Treat this entry as a starting point and verify before acting on it.
- Verification
- Unverified — treat with caution
- Last updated
- 2026-10-29
References
Every source this page draws on, with its web address so you can read it yourself. Numbers in brackets elsewhere on the page point here.
- [1] Winchester Model 1894 Rifle Owner's Manual — Winchester Repeating Arms manufacturer manual primary source
https://www.winchesterguns.com/support/owners-manuals/model-94.html (checked 2026-09-14) - [2] Winchester Model 94 Lever Action Rifle Owner's Manual — Winchester Repeating Arms manufacturer manual primary source
- [3] The Winchester Model 94: The First 100 Years — Krause Publications book secondary source
- [4] Model 94 Carbine — Specifications (Winchester Repeating Arms) — Winchester Repeating Arms website primary source
https://www.winchesterguns.com/products/rifles/model-94/model-94-carbine.html (checked 2026-10-03) - [5] XS Sights Winchester 94 AE Lever Scout Mount — Installation — XS Sights manufacturer manual secondary source
https://xssights.com/content/Install%20Instructions/Winchester%2094%20AE%20Lever%20Scout%20Installation.pdf (checked 2026-10-11) - [6] The Winchester Model 94: History & Disassembly — American Rifleman (National Rifle Association) periodical secondary source
https://americanrifleman.org/content/the-winchester-model-94-history-disassembly (checked 2026-10-13) - [7] Winchester Model 94 Parts List (Lever Action Rifle, prices effective January 1, 2024) — Winchester Repeating Arms manufacturer manual primary source
https://www.winchesterguns.com/content/dam/winchester-repeating-arms/support/parts-and-service/parts/2025/Winchester-Model-94-Parts-List.pdf (checked 2026-10-29) - [8] The Winchester Model 94: History & Disassembly — American Rifleman (NRA) website secondary source
https://www.americanrifleman.org/content/the-winchester-model-94-history-disassembly (checked 2026-10-29) - [9] 1894 Disassembly Problem — Winchester Collector (WACA forum) community anecdotal source
https://winchestercollector.org/forum/restoration-repair-and-maintenance/1894+Disassembly+Problem/ (checked 2026-10-29)
Notes: Winchester's current Model 1894 manual was read on 2026-09-14. It documents only the current Miroku-produced rifle, and the only disassembly it gives is the two-half takedown of the Takedown variant — which is now recorded here as its own procedure with Winchester's warnings intact. It says nothing about the lever-pivot-screw strip used on older Model 94s, so that procedure stays at low confidence and keeps its generation caveat. This is the honest position: the manufacturer no longer publishes a procedure for most of the rifles this entry covers. This entry is deliberately rated low confidence. The Model 94 has been in production since 1894 across pre-1964, post-1964, angle-eject, and Miroku-produced generations, with real differences in internal parts and disassembly sequence. The clear-and-make-safe and routine-maintenance procedures here are reliable and generation-independent; the field strip section describes the general approach but has not been verified step by step against a specific generation's factory manual. Verify against a manual or exploded schematic for your exact rifle before disassembling it, and treat a Model 94 you value as a gunsmith job. A contributor with a specific generation's manual in hand should split this entry per generation and raise the rating.