← All firearms · Printable work order
AR-10 / .308 AR
- easy
- Shop tier 2
- medium confidence
- Rifle
- direct impingement
- battle rifle
- large frame ar
- precision
field strip ~2 min · reassembly ~3 min · detail strip ~25 min
Specifications
- Manufacturer
- AR-15 Pattern (multiple manufacturers)
- Origin
- United States
- Category
- Rifle
- Action
- Gas, direct impingement
- Calibers
- 7.62x51mm NATO, .308 Winchester, 6.5 Creedmoor
- Capacity
- 20+1 with the standard magazine
- Production
- 1956–present (in-production)
- Also known as
- LR-308, SR-25 pattern, Large-frame AR
Model-specific safety
- The bolt cam pin MUST be installed. The firing pin retaining pin will not install without it, which is a designed safeguard — if it will not go in, stop and find out why.
- There is no single AR-10 standard. DPMS/LR-308 pattern and Armalite pattern rifles differ in upper receiver dimensions, barrel extension, handguard, and magazine. Parts are frequently not interchangeable between patterns, and neither are magazines. Identify your pattern before ordering any part.
- Large-frame AR bolts and barrel extensions are under substantially higher pressure and bolt thrust than a 5.56 AR. Inspect the bolt lugs and cam pin hole for cracks more often.
- The buffer and buffer spring are under compression. Control the buffer when the retainer is depressed.
Under spring tension
- Buffer and buffer spring
- Extractor spring
- Magazine springs
Easily lost parts
Bolt cam pin · Firing pin retaining pin · Buffer retainer and spring
Tools
No tools required for the field strip.
Shop difficulty
Shop tier 2 Tier 2 — moderate among rifles and carbines, for the full job: strip to the parts that get coated and put it back together working. A large-frame AR with 63 key numbers (18 upper, 37 lower, 8 bolt carrier), so it strips like an AR-15 with heavier springs. It has the same detent and roll-pin traps, a highly compressed operating spring, and a barrel nut that needs the armorer's wrench, vise block and torque wrench. ArmaLite has headspace checked by a gunsmith if the barrel or bolt changes.
Parts: 63 numbered parts (ArmaLite AR-10 (7.62 NATO): upper 1-18, lower 1-37, bolt carrier 1-8; bolt and charging handle as assemblies; variant rows marked * not counted), from ArmaLite AR-10 / AR-10B Owner's Guide — ArmaLite, Inc., pp. 12-17 (6. Exploded Drawings and Part s3.amazonaws.com [11].
Bench time: about 45 min to strip, 65 min to rebuild (estimate). Estimate: as the AR-15, with heavier springs and a larger barrel nut; rebuild adds barrel-nut torque/indexing and the function check.
Small parts: 9 pins, 10 springs, 4 detents or plungers (counted from the ArmaLite AR-10 parts lists in partCount)
What comes off for coating
- Lower receiver: pistol grip and screw (selector detent and spring), safety selector, takedown pin, detent and spring, pivot pin, detent and spring, hammer, hammer spring and pin, trigger, trigger spring, disconnector and spring, pin, bolt catch, plunger, spring and roll pin, magazine catch, spring and button, trigger guard and roll pin, buffer, buffer spring, buffer retainer and spring, stock, castle nut, end plate, receiver extension — roll-pin punches/starters, pivot pin detent tool, castle nut wrench
- Upper receiver: charging handle, bolt carrier group (firing pin, retaining pin, cam pin, bolt, extractor, spring, insert, ejector, ejector spring and pin, ejection port cover, pin, spring and clip, forward assist, spring and pin, rear sight, handguard/rail, gas block or front sight base and pins, gas tube and pin, barrel nut and barrel, muzzle device and crush washer — upper receiver vise block, armorer's/barrel nut wrench, torque wrench, bench block, taper-pin punch
Special tools
- Upper receiver vise block / reaction rod — Holding the upper for barrel nut and muzzle device work
- AR armorer's wrench (barrel nut/castle nut) — Barrel nut and receiver extension castle nut
- Torque wrench (ft-lb and in-lb) — Barrel nut, castle nut, muzzle device
- Pivot pin detent installation tool (or 3/32" punch) — Holding the pivot pin detent while the pin goes in
- Roll-pin starter punches (1/16", 3/32", 1/8") and a bench block — Bolt catch, trigger guard, forward assist and ejection port cover pins
- Lower receiver vise block — Supporting the trigger guard ears and bolt catch boss
Known pain points
- The large-frame operating spring is under high compression and can get away during disassembly or reassembly. (both)
Source: ArmaLite AR-10 / AR-10B Owner's Guide — ArmaLite, Inc. s3.amazonaws.com [11] — “OPERATING SPRING IS UNDER HIGH COMPRESSION. IF IT SLIPS FROM YOUR GRASP, IT COULD CAUSE INJURY.” - The front pivot pin and rear takedown pin each sit on a spring-loaded detent that launches when the pin comes out; reinstalling the pivot pin means holding the detent down while the pin goes in, which is the classic AR lower trap. (both)
Source: AR Lower Receiver Build: Pivot Pin Installation — Shooting Illustrated (NRA) shootingillustrated.com [12] — “The detent and spring will fly out and you will be spending a lot of time on your knees looking for them.” - The TM has the armorer use a pivot pin tool to compress the detent, and warns to catch the detent and spring as the pin comes out. (both)
Source: TM 9-1005-249-23&P, Rifle, 5.56mm, M16 and M16A1 (unit and direct support, incl. RPSTL) — Department of the Army archive.org [13] — “Catch detent and spring as pivot pin is” - The bolt catch and trigger guard roll pins mar the receiver unless the receiver is taped and supported and a roll-pin starter punch is used. (both)
Source: TFB Armorer's Bench: Complete AR15 Assembly - Lower Receiver — The Firearm Blog thefirearmblog.com [14] — “Installing the bolt catch roll pin can be cumbersome and in the wrong hands, aesthetically destructive.”
Fit or check on rebuild
- Headspace after barrel or bolt change — ArmaLite: headspace must be checked by a qualified gunsmith if the bolt carrier assembly or barrel is replaced (printed on the upper parts list image)
- Barrel nut torque and gas tube alignment — The barrel nut is torqued within a range and indexed for the gas tube
Source: TM 9-1005-249-23&P, Rifle, 5.56mm, M16 and M16A1 (unit and direct support, incl. RPSTL) — Department of the Army archive.org [13] — “torque barrel nut assembly (8) to 30 ft-lb.” - Function check (safety, hammer reset, disconnector) — The hammer spring orientation and disconnector seating are checked with a function check
- Sight/optic re-zero — The front sight base, rail or optic moves when the barrel/handguard comes off
This is Pew-Takedown's rating, not the manufacturer's. How tiers are rated. Forum reports are owners' experience, not specifications.
Procedures
Clear and Make Safe
Clear & Make Safe- Point the muzzle in a safe direction and keep your finger off the trigger.
- Press the magazine release and remove the magazine.Removed at this step:
Magazine - Pull the charging handle fully rearward and lock the bolt back.
- Inspect the chamber and magazine well with a light, then physically confirm the chamber is empty.
- Place the selector on SAFE if the hammer is cocked, and remove all live ammunition from the work area.
Field Strip
Field Strip- Complete the Clear and Make Safe procedure and release the bolt forward.
- Push the rear takedown pin from the left side to its captured position.
- Pivot the upper receiver forward on the front pivot pin.
- Push the front pivot pin out and separate the upper from the lower receiver.Removed at this step:
Upper receiver assembly - Pull the charging handle partway rearward and withdraw the bolt carrier group.Removed at this step:
Bolt carrier group - Pull the charging handle down and out of its channel.WarningCarrier first, then charging handle.Removed at this step:
Charging handle - Remove the firing pin retaining pin, tip out the firing pin, rotate and lift the cam pin, and withdraw the bolt.WarningKeep the cam pin with the rifle. A rifle assembled without it is dangerous.Removed at this step:
Firing pinCam pinBolt
Reassembly
Reassembly- Insert the bolt into the carrier, push it fully in, drop the cam pin into its hole and rotate it 90 degrees.
- Drop the firing pin in tail first and install the firing pin retaining pin.WarningIf the retaining pin will not go in, the cam pin is missing or unrotated.
- Insert the charging handle, then the carrier, and slide both fully home.
- Mate the upper to the lower, press both pins home.
- Charge the rifle and perform the function check.
Diagrams
public domainThese are reproduced from government technical manuals, which are not subject to copyright. Manufacturer manual diagrams are not reproduced here — the entry links to the manual instead.
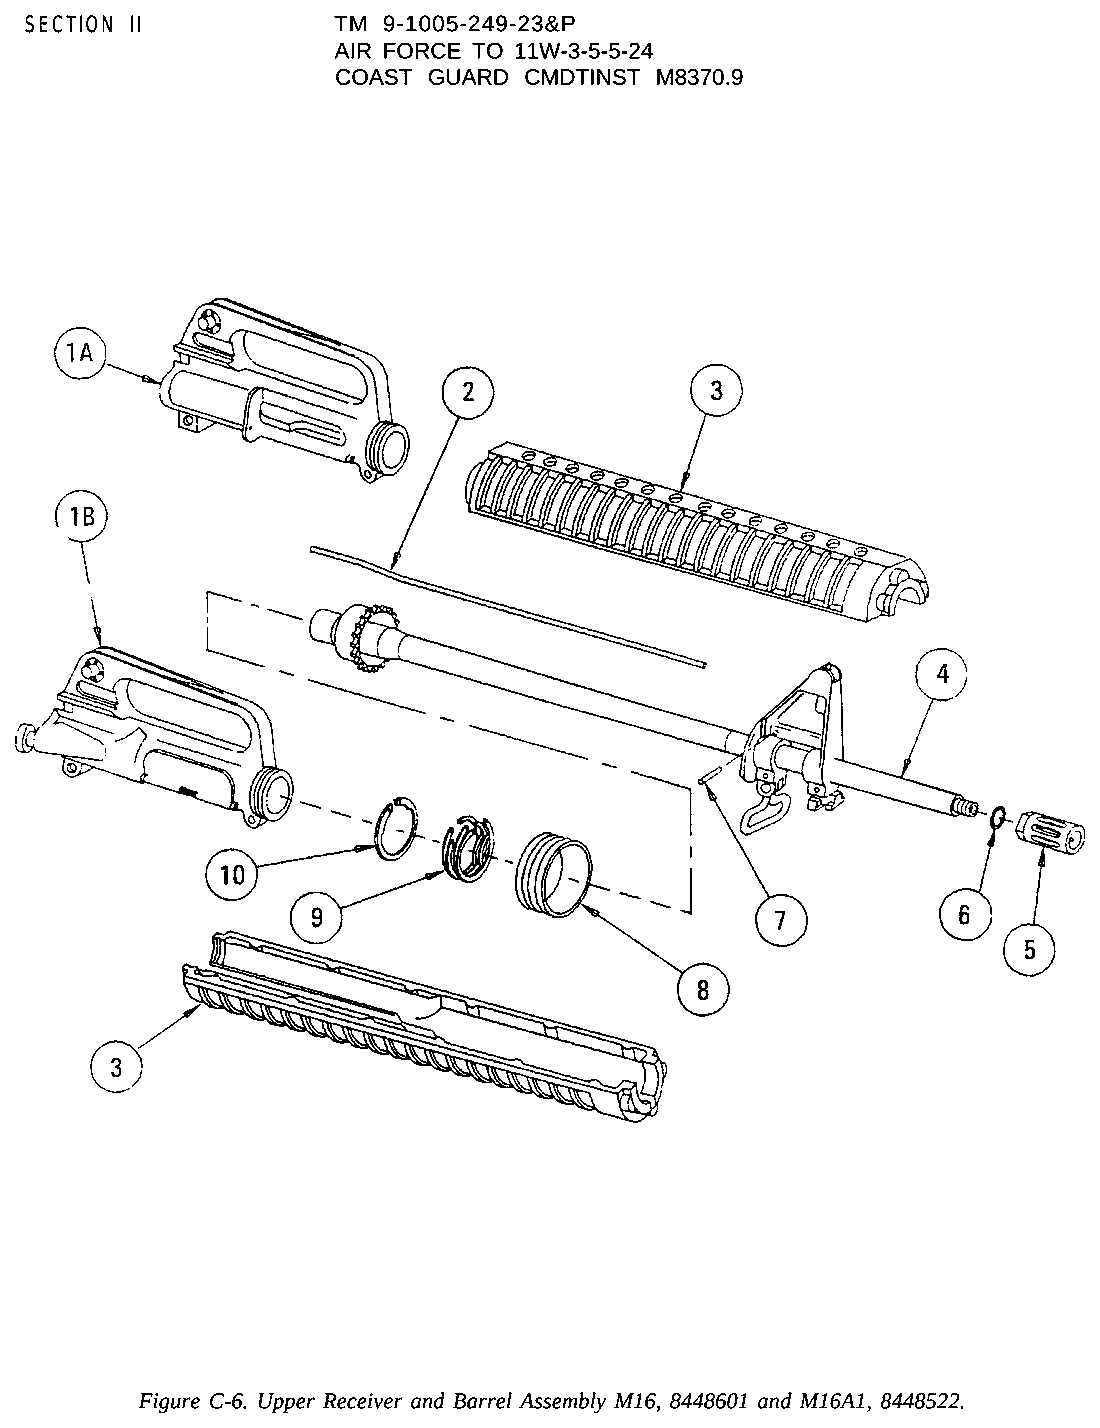
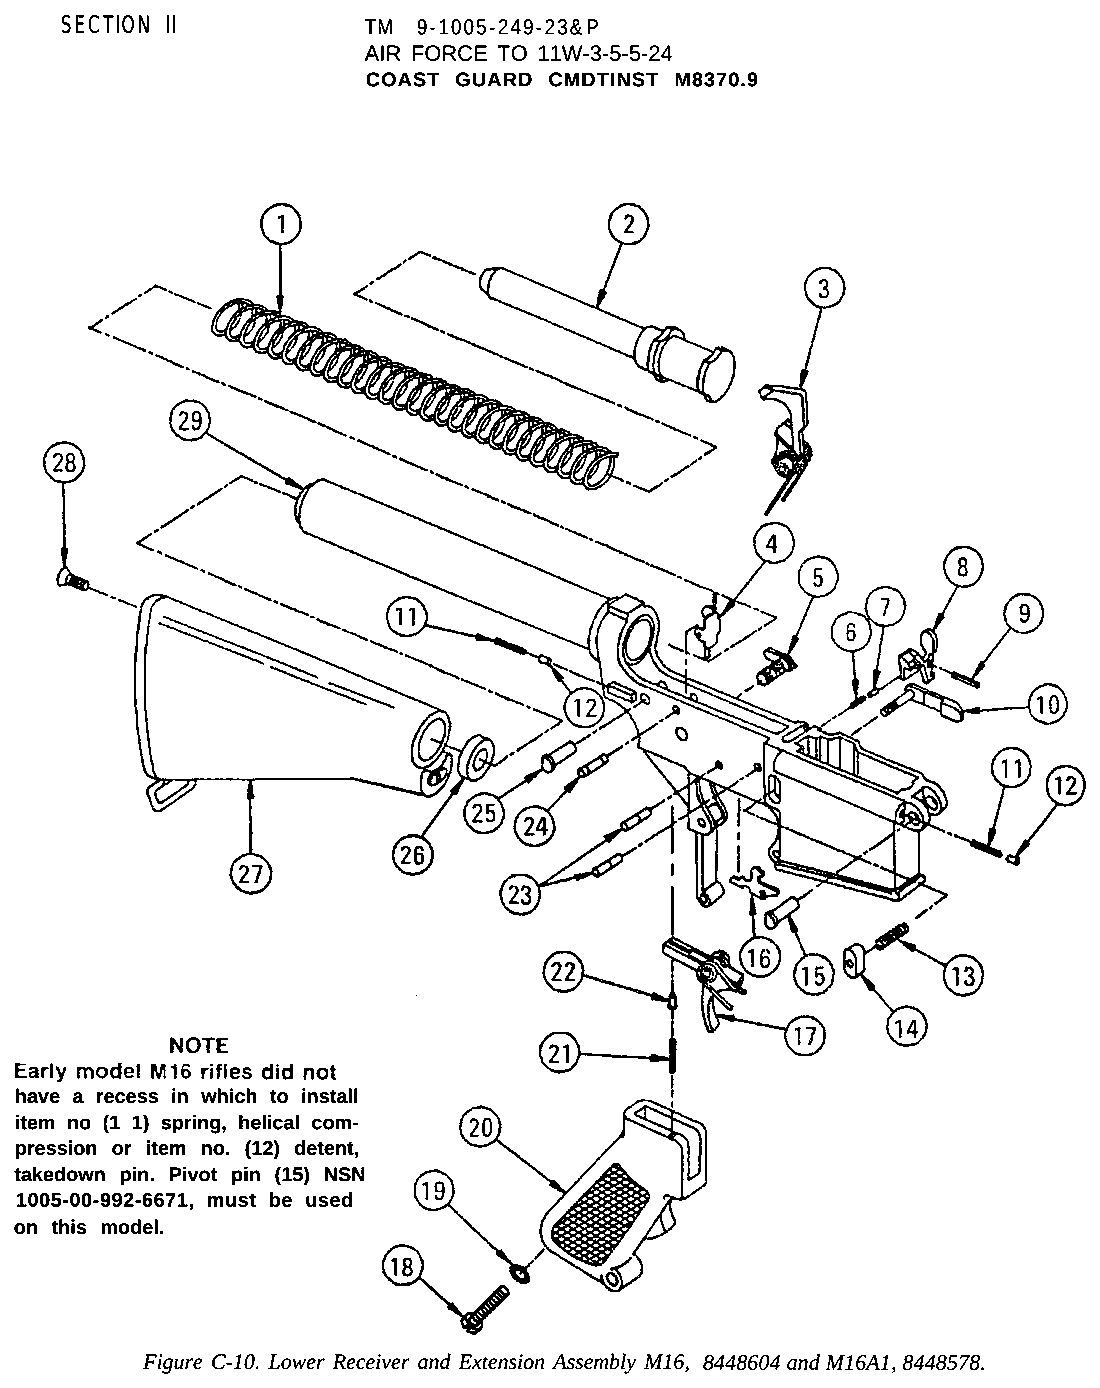
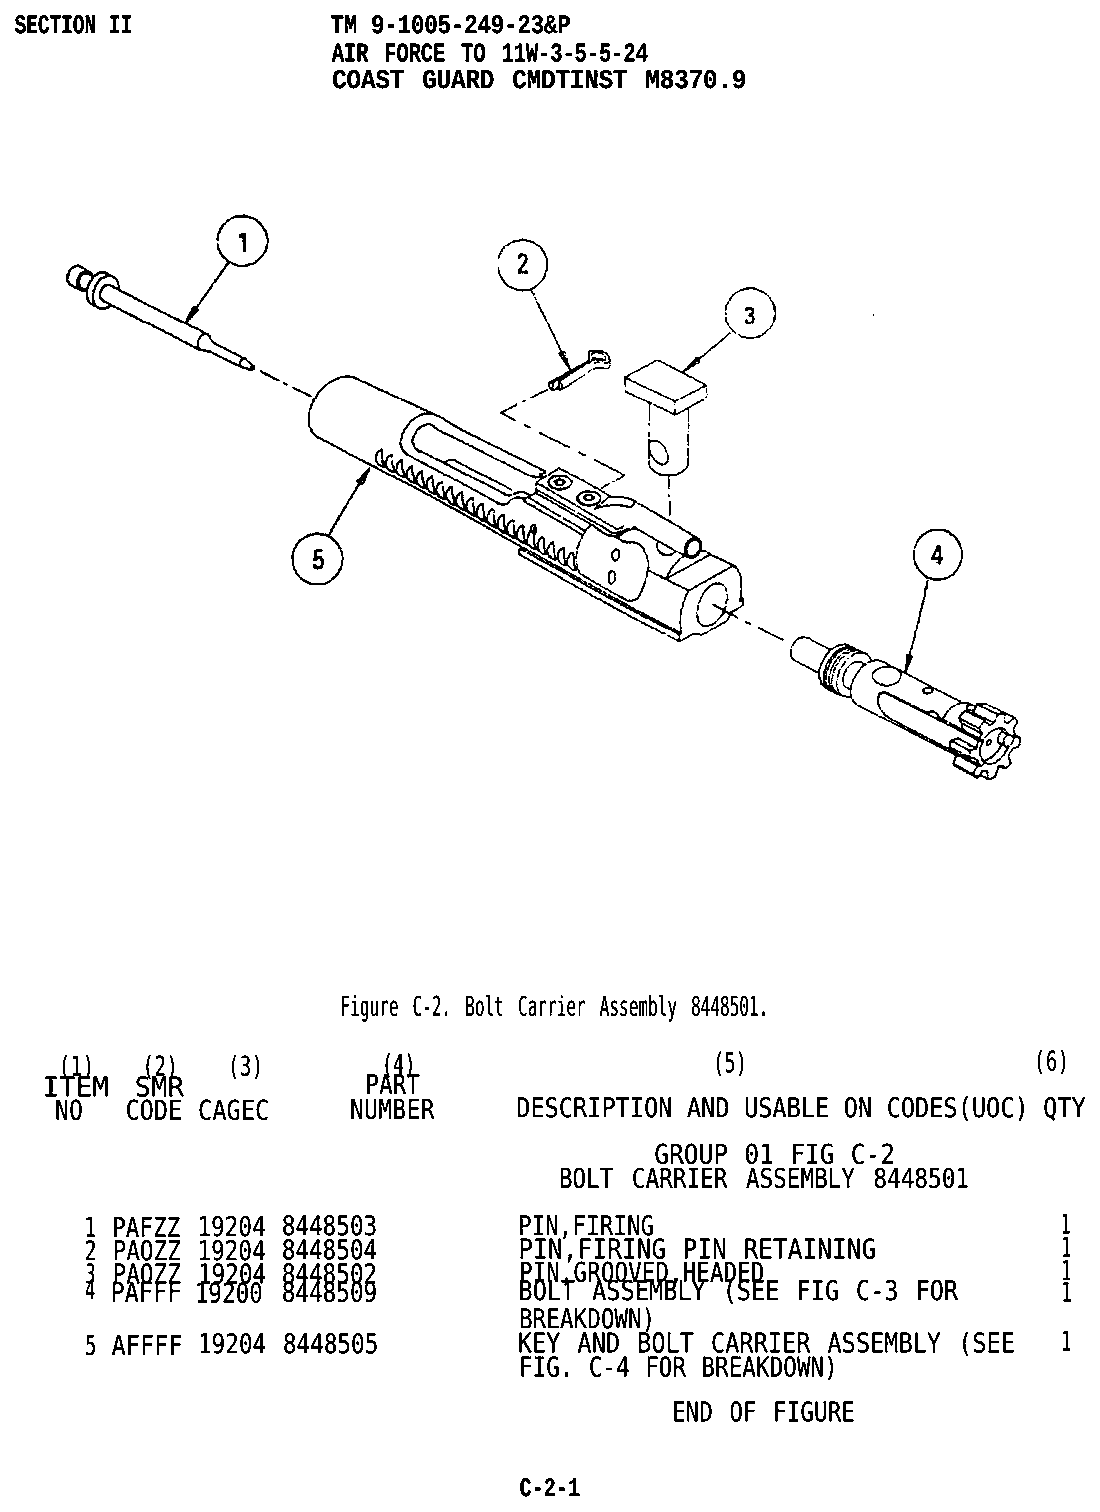
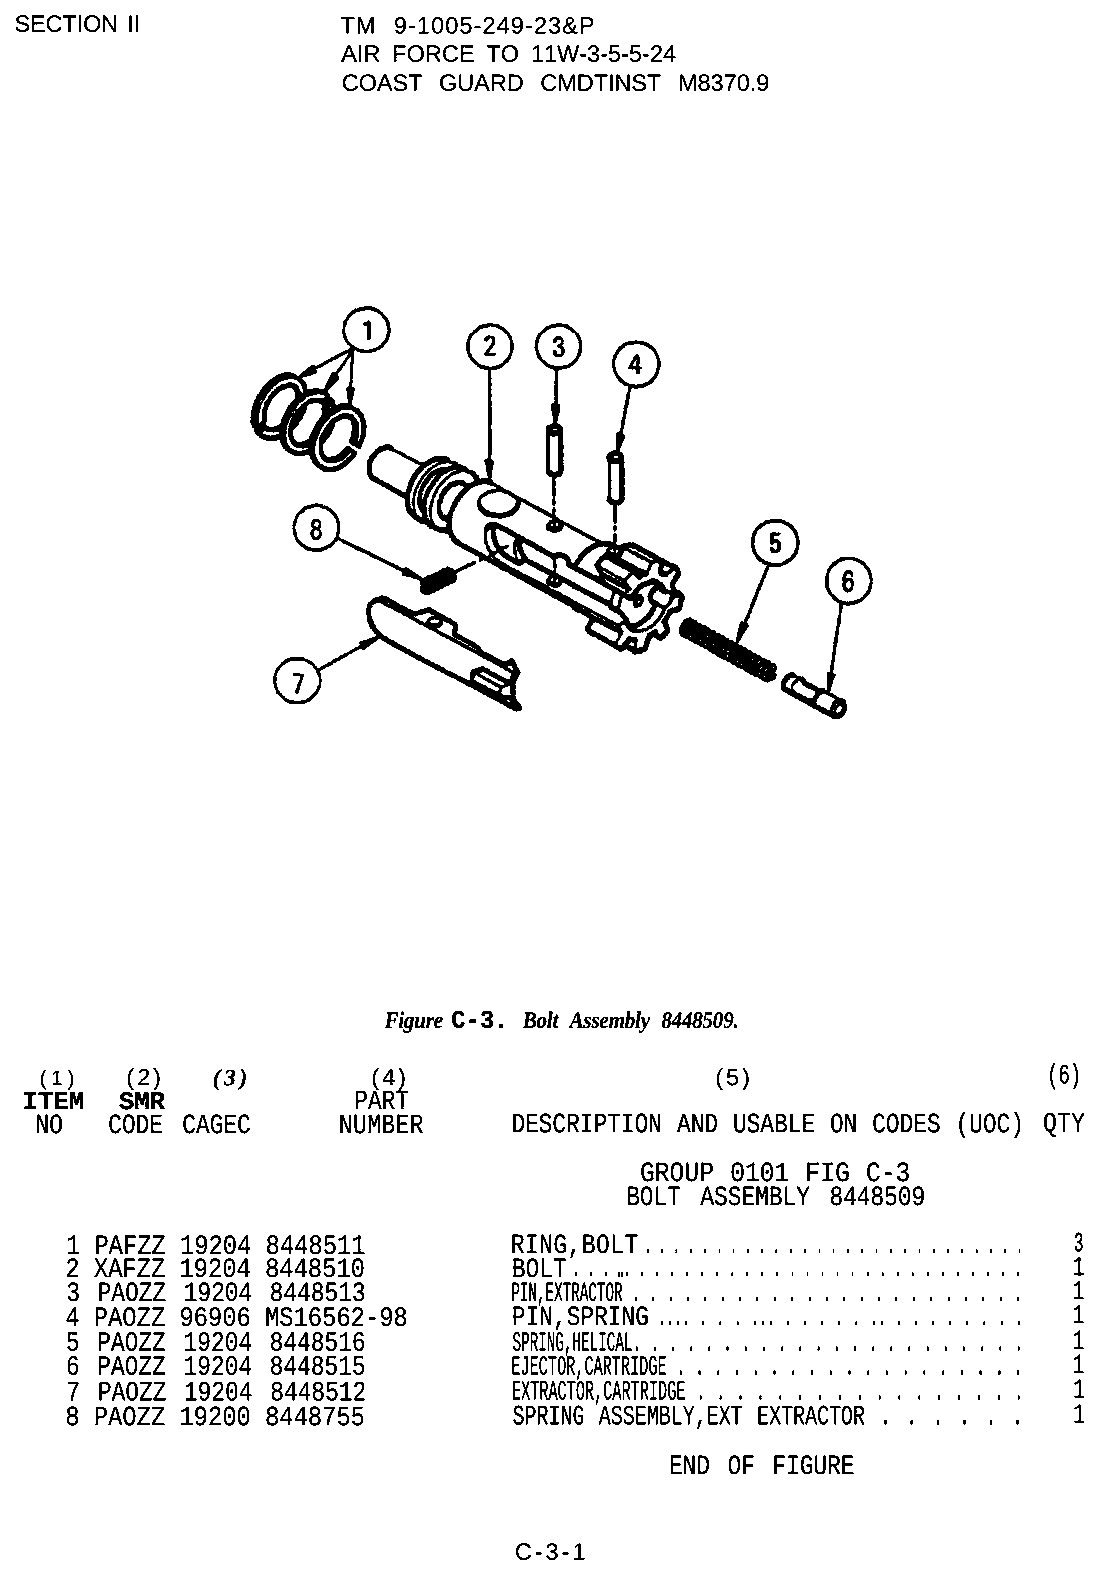
Patent drawings
not under copyrightDrawings from US patents on this design. A patent shows the invention as the inventor filed it; the firearm that shipped can differ in detail, and later production often does. Use them to see how the parts relate, not as a parts reference or a procedure. Per the USPTO, the text and drawings of a patent are typically not subject to copyright; each patent here was checked for a copyright notice.
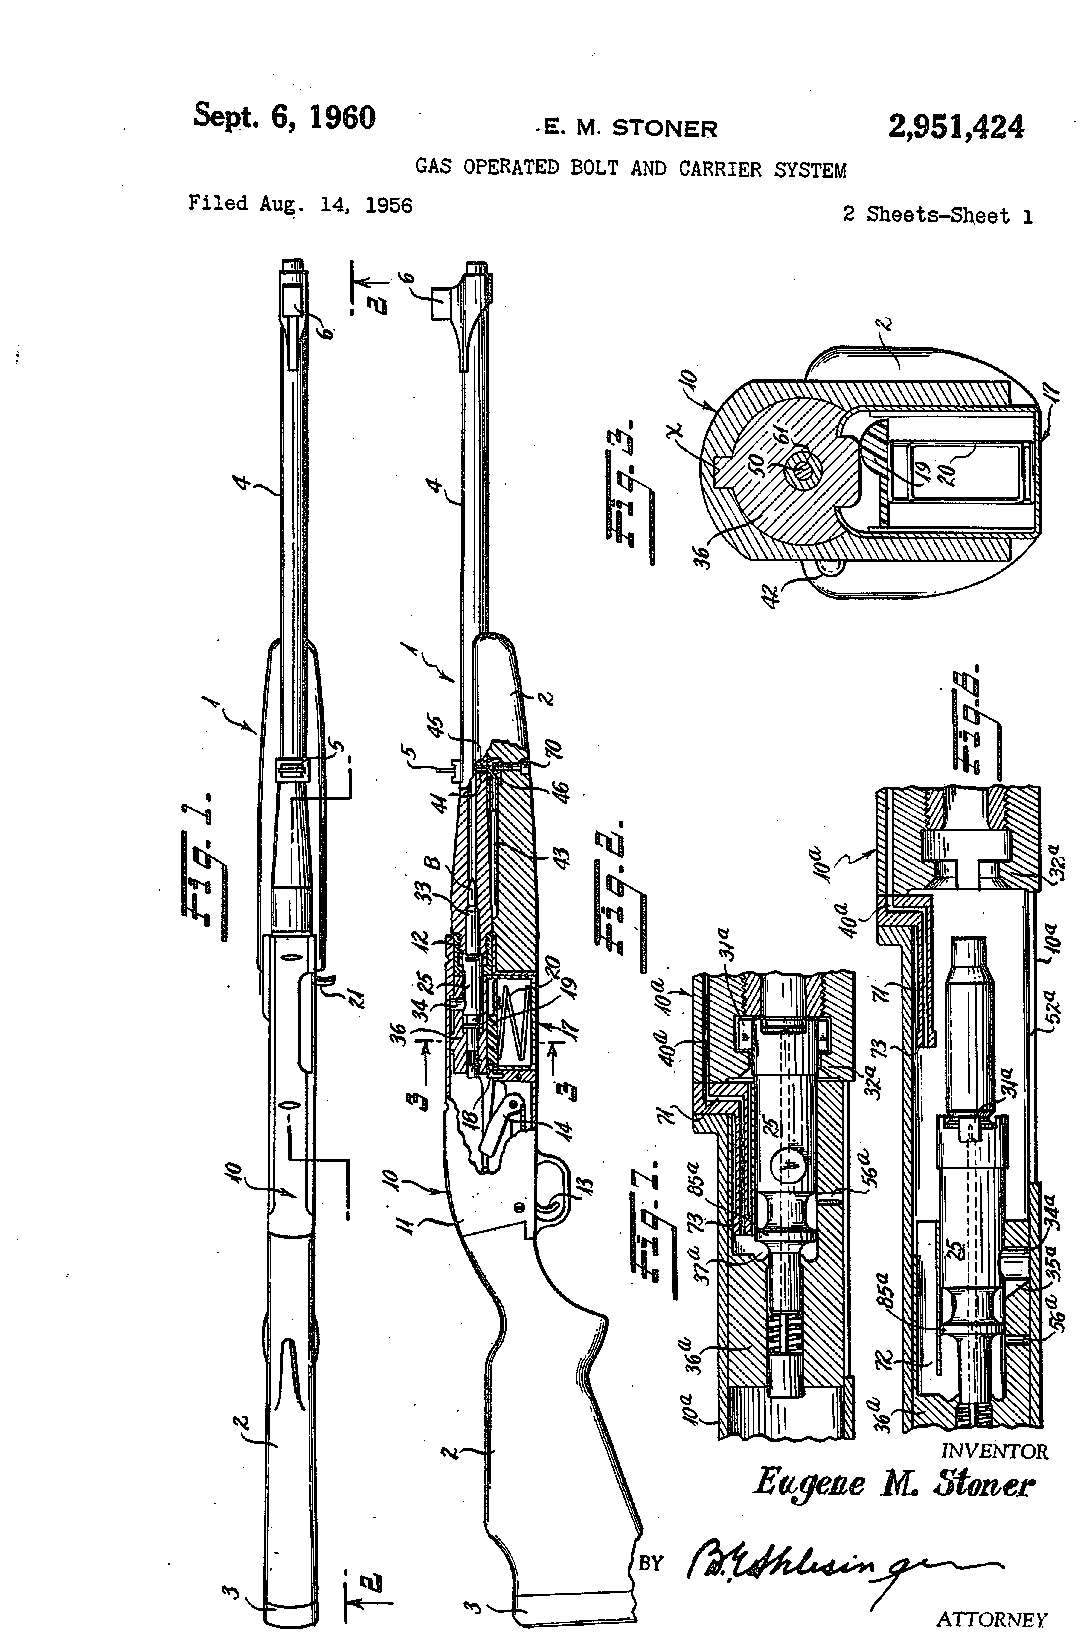
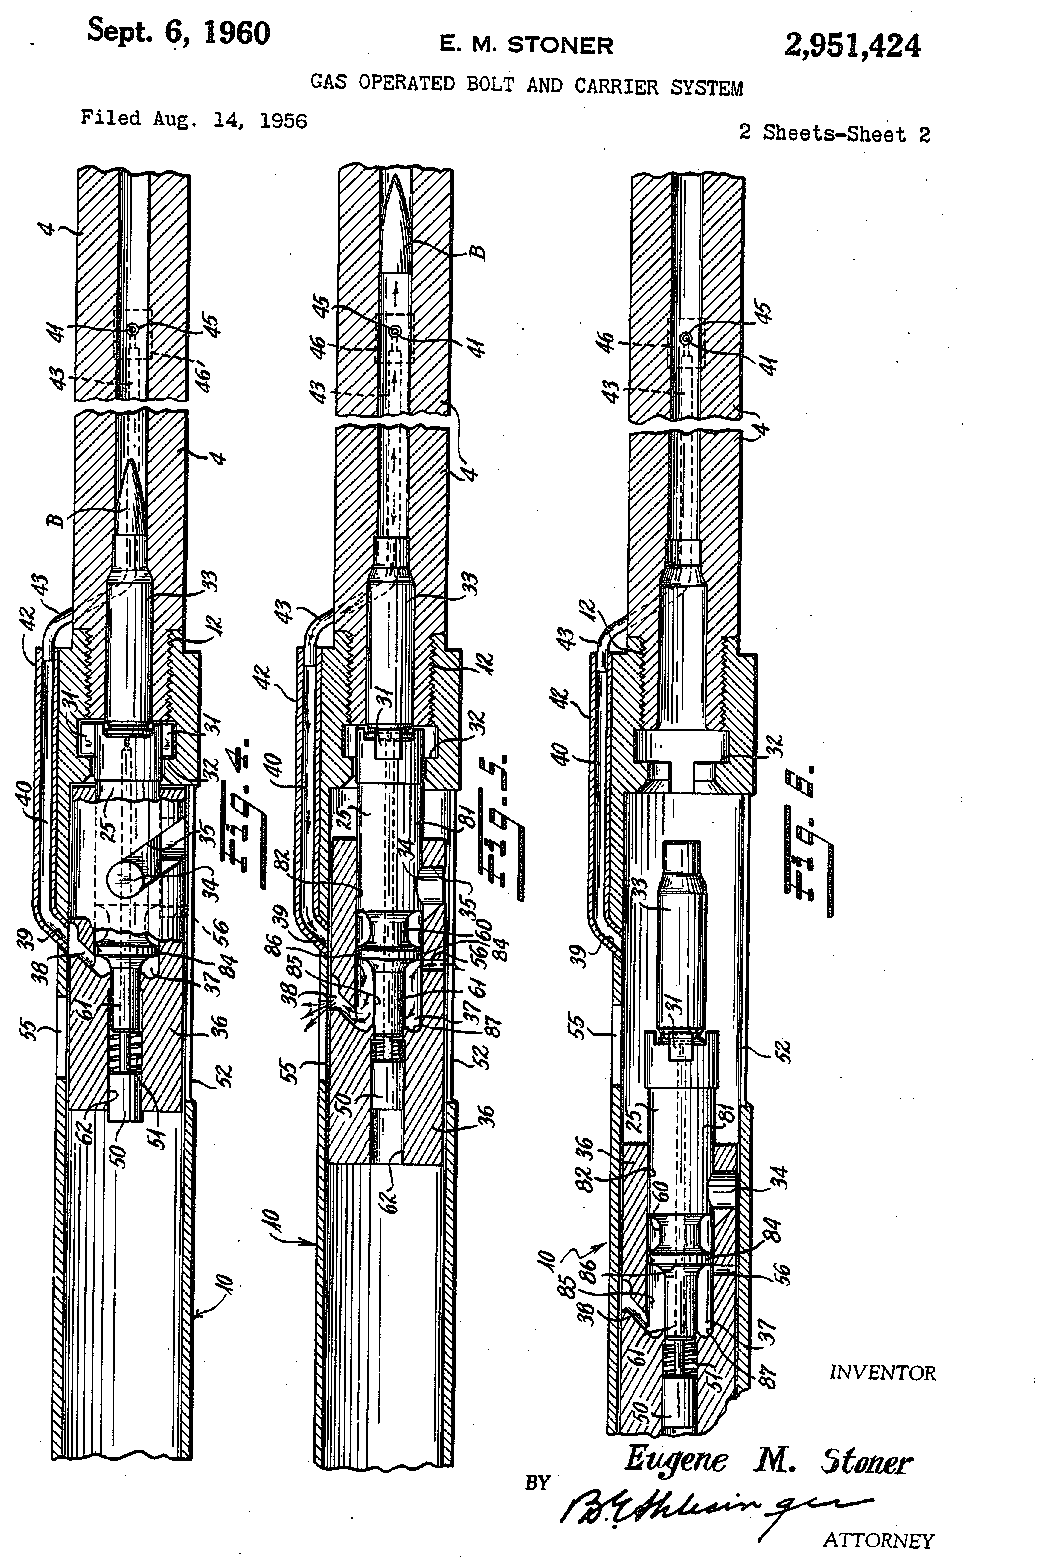
US Patent 2,951,424 — Gas operated bolt and carrier system
Eugene M. Stoner · assigned to Fairchild Engine and Airplane Corporation · filed 1956-08-14 · granted 1960-09-06. Full patent (USPTO)
Stoner's gas system in which the bolt carrier acts as a moving cylinder and the bolt as a stationary piston, with the rotating multi-lug bolt locking into the barrel extension - the bolt, bolt carrier and gas tube arrangement of the AR-10/AR-15 family.
Why this is the AR-10 / .308 AR’s patent: named by a historical source — The AR-10 Story — American Rifleman (National Rifle Association) americanrifleman.org [10]: “In August 1956, Stoner patented his direct impingement and rotating bolt and carrier concept, with the patent (US #2,951,424) being granted later in 1960.”
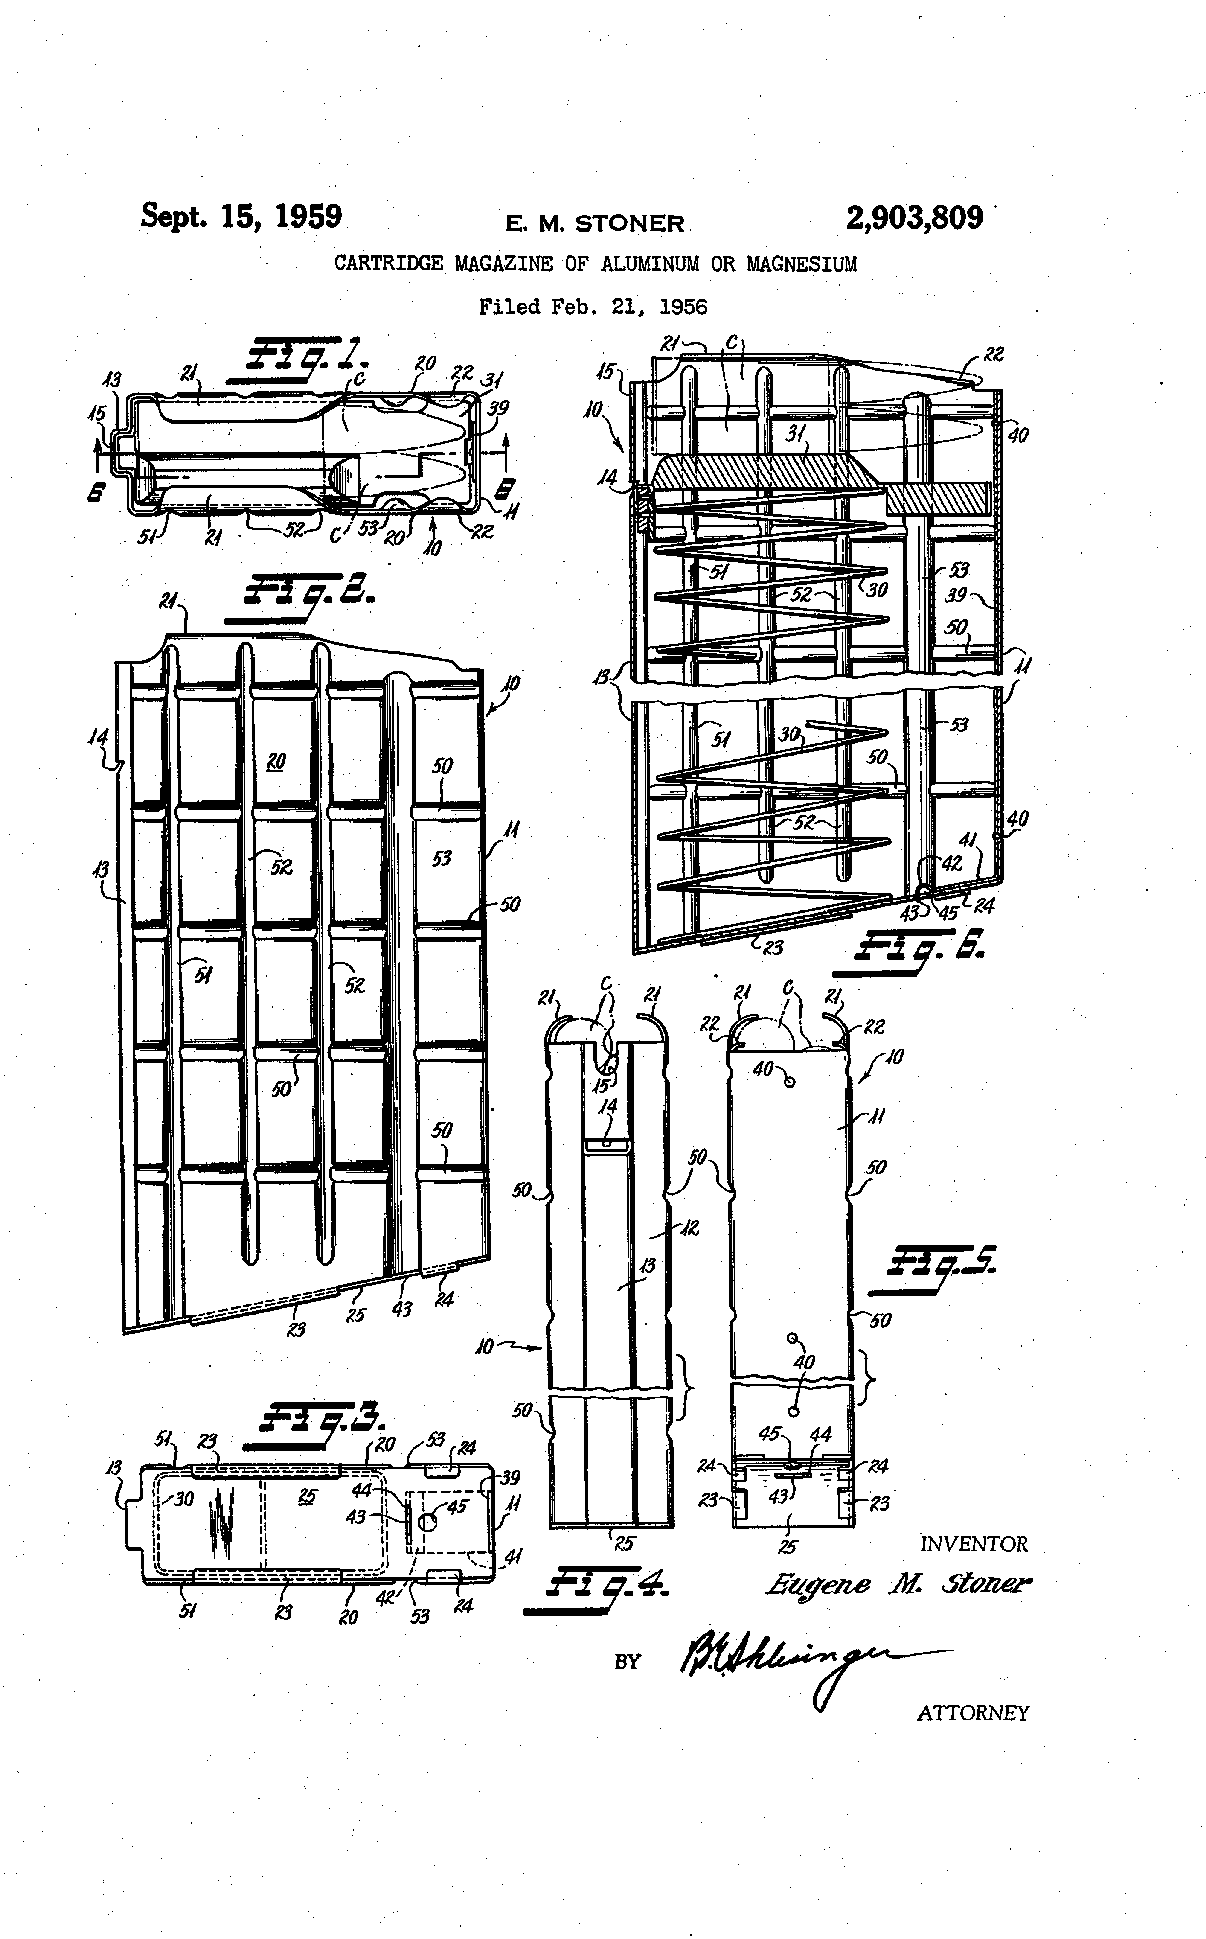
US Patent 2,903,809 — Cartridge magazine of aluminum or magnesium
Eugene M. Stoner · assigned to Fairchild Engine and Airplane Corporation · filed 1956-02-21 · granted 1959-09-15. Full patent (USPTO)
The ribbed ('waffle') light-alloy box magazine of the early AR-10: casing, follower, spring, floorplate and the catch and bolt-stop slots.
Why this is the AR-10 / .308 AR’s patent: named by a historical source — The AR-10 Story — American Rifleman (National Rifle Association) americanrifleman.org [10]: “in 1956, Stoner patented the aluminium “waffle” magazines (US #2,903,809) that would come to be used by future production AR-10s.”
Torque specifications
No sourced torque values from the manufacturer are recorded for this firearm. Where a fastener has a specified torque — action screws, scope bases, muzzle devices, barrel nuts — get it from the manufacturer or a gunsmith rather than estimating it.
What the manufacturer does say: The manufacturer's documents give no torque value. They say: "WARNING: EXCESSIVE TIGHTENING OF THE LOCK RING WITH A STRAP WRENCH CAN LOOSEN THE BARREL NUT OR DEFORM THE GAS TUBE." (Operator's Manual — Rifle, 7.62mm SuperSASS / Carbine, 7.62mm SuperSASS (ArmaLite AR-10 SuperSASS), PDF p. 48) "To install the backup sights, slip the base over the receiver or gas block, and tighten down until firm by using a 7/32" hex head wrench" (Operator's Manual — Rifle, 7.62mm SuperSASS / Carbine, 7.62mm SuperSASS (ArmaLite AR-10 SuperSASS), PDF p. 11 (section 5.1))
Reported by other sources — not the manufacturer
| Fastener | Torque | Who says so, and their words | Where it comes from |
|---|---|---|---|
| Barrel nut (MI-CR308 barrel nut, replacing factory barrel nut and delta ring) .308 AR (AR-308) fitted with a Midwest Industries MI-CR308 handguard |
max. 50 ft-lb 67.8 N·m · 600 in-lb |
Reported by Midwest Industries, Inc. Grease the receiver threads, install the MI-CR308 barrel nut hand tight, then torque with the provided ½" drive barrel nut wrench to 50 ft lbs (DO NOT EXCEED). “Torque the barrel nut with the provided ½” drive barrel nut wrench to 50 ft lbs (DO NOT EXCEED).” |
MI-CR308 Installation Instructions — Midwest Industries, Inc., PDF p. 1 midwestindustriesinc.com [2] |
| Handguard clamp bolts (2) with torque plate .308 AR fitted with a Midwest Industries MI-CR308 handguard |
40 in-lb 4.5 N·m · 3.3 ft-lb |
Reported by Midwest Industries, Inc. Drop the torque plate in the handguard clamp; install screws; tighten the receiver-end bolt first; torque while ensuring proper alignment. 'DO NOT INSTALL AND TIGHTEN THESE SCREWS WITH OUT THE TORQUE PLATE.' “Tighten the receiver end bolt first. Torque bolts to 40 in lbs while ensuring proper alignment.” |
MI-CR308 Installation Instructions — Midwest Industries, Inc., PDF p. 1 midwestindustriesinc.com [2] |
| Barrel nut (Aero Precision M5E1 barrel nut) Aero Precision M5E1 (AR-10/.308) upper receiver |
65 ft-lb 88.1 N·m · 780 in-lb |
Reported by Aero Precision AR15 mil-spec barrel-nut wrench. “M5E1 Barrel Nut: 65 ft. lbs (AR15 Mil-Spec Barrel Nut Wrench)” |
Aero Precision Support Center — Torque Specifications (article updated 2024-04-01; read via the help centre's Zendesk API because support.aeroprecisionusa.com refused the TLS handshake from this environment) — Aero Precision, p. Barrel Nut Torque Specifications support.aeroprecisionusa.com [4] |
| Handguard screws (Aero Precision M5 Enhanced Gen 2, Torx T15) AR-10/.308 (Aero M5) with an Aero Precision M5 Enhanced Gen 2 handguard |
25 in-lb 2.8 N·m · 2.1 ft-lb |
Reported by Aero Precision “M5 Enhanced Gen 2 hand guard screws: 25 in lbs. (Torx T15)” |
Aero Precision Support Center — Torque Specifications (article updated 2024-04-01; read via the help centre's Zendesk API because support.aeroprecisionusa.com refused the TLS handshake from this environment) — Aero Precision, p. Screw Torque Specifications support.aeroprecisionusa.com [4] |
| Barrel nut (Aero Precision M5 R-ONE / S-ONE handguard barrel nut) Aero M5 (AR-10/.308) upper with an Aero Precision ATLAS R-ONE or S-ONE M5 handguard |
35–65 ft-lb 47.5–88.1 N·m · 420–780 in-lb |
Reported by Aero Precision The article gives one torque range for R-ONE/S-ONE and notes the M5 versions use a standard armorer's wrench instead of the wrench extension; shims to reach gas-tube alignment. “Next, you will need to tighten your barrel nut to 35-65 ft lbs. using the supplied wrench extension.” |
Aero Precision Support Center — How to install a R-ONE/S-ONE Handguard (updated 2025-01-09; read via the help centre's Zendesk API) — Aero Precision, p. article body support.aeroprecisionusa.com [5] |
| M-LOK rail-section screws on the handguard (MI-CR308) AR-308 / AR-10 with a Midwest Industries MI-CR308 handguard |
15 in-lb 1.7 N·m · 1.2 ft-lb |
Reported by Midwest Industries, Inc. “torque the M-Lok screws to 15 in lbs.” |
MI-CR308 Installation Instructions — Midwest Industries, Inc., PDF p. 1, step 11 midwestindustriesinc.com [2] |
| Barrel nut (ODIN Works 308 M-LOK forend barrel nut) AR-10 with an ODIN Works 308 M-LOK forend (installed with the 1 3/8" jumbo crowfoot) |
40–50 ft-lb 54.2–67.8 N·m · 480–600 in-lb |
Reported by ODIN Works “Use this crowfoot wrench to torque the barrel nut to 40-50 ft lbs” |
ODIN Works 1 3/8" Jumbo Crowfoot Wrench (for ODIN Works 308 MLOK Forend installation) — product page — ODIN Works, p. Features odinworks.com [6] |
| Barrel nut (Faxon Streamline AR10 handguard, DPMS high profile) AR10 (DPMS high-profile .308 upper) with a Faxon Streamline Aluminum M-LOK AR10 handguard |
max. 50 ft-lb 67.8 N·m · 600 in-lb |
Reported by Faxon Firearms 1-3/8" wrench. Faxon: 'DO NOT OVER-TIGHTEN.' “Torque barrel nut to industry specs using 1-3/8 wrench to no more than 50 foot/lbs.” |
Faxon Streamline Aluminum M-LOK 15" AR10 Handguard (DPMS High Profile) — product page 'Installation Instructions' (same text on the 6.5" and 10.5" pages) — Faxon Firearms, p. Installation Instructions faxonfirearms.com [7] |
| Handguard clamp screws (Faxon Streamline AR10) AR10 (DPMS high-profile) with a Faxon Streamline Aluminum M-LOK AR10 handguard |
32 in-lb 3.6 N·m · 2.7 ft-lb |
Reported by Faxon Firearms Re-check torque after the first live-fire test. “Install handguard, locking block and clamp screws. torque to 32 inch/lbs.” |
Faxon Streamline Aluminum M-LOK 15" AR10 Handguard (DPMS High Profile) — product page 'Installation Instructions' (same text on the 6.5" and 10.5" pages) — Faxon Firearms, p. Installation Instructions faxonfirearms.com [7] |
| Barrel nut — final torque (BATTLEARMS RIGIDRAIL) AR-10 with a BATTLEARMS RIGIDRAIL free-float handguard |
45 ft-lb 61 N·m · 540 in-lb |
Reported by Battle Arms Development, Inc. (BAD / BATTLEARMS) After the 40 ft-lb pass and loosening one-half turn; ceiling 50 ft-lb. “Loosen the barrel nut one-half turn and re-torque to 45 ft-lbs. (Do not exceed 50 ft-lbs.” |
BATTLEARMS RIGIDRAIL Free Float Rail Handguards for the M16 . M4 . AR-15 or AR-10 Weapon Platforms — Instructions (maker's PDF re-hosted by distributor OpticsPlanet; no copy found on battlearmsdevelopment.com) — Battle Arms Development, Inc. (BAD / BATTLEARMS), PDF p. 2, step 8 opticsplanet.com [8] |
| Rail retention clamp hex bolts (2) (BATTLEARMS RIGIDRAIL) AR-10 with a BATTLEARMS RIGIDRAIL free-float handguard |
30 in-lb 3.4 N·m · 2.5 ft-lb |
Reported by Battle Arms Development, Inc. (BAD / BATTLEARMS) Alternate between the two bolts until both stop rotating at the set torque. Threadlocker: Blue Loctite recommended on the hex bolts. “Insert the rail retention clamp into the the RIGIDRAIL™ and tighten the hex bolts to 30 in-lbs.” |
BATTLEARMS RIGIDRAIL Free Float Rail Handguards for the M16 . M4 . AR-15 or AR-10 Weapon Platforms — Instructions (maker's PDF re-hosted by distributor OpticsPlanet; no copy found on battlearmsdevelopment.com) — Battle Arms Development, Inc. (BAD / BATTLEARMS), PDF p. 3, step 13 opticsplanet.com [8] |
| Receiver extension (Magpul UBR GEN2 buffer tube) into the lower receiver SR25/M110-pattern (AR-10) lower with a Magpul UBR GEN2 stock |
35–39 ft-lb 47.5–52.9 N·m · 420–468 in-lb |
Reported by Magpul Industries Corp. Hold the buffer retaining pin depressed while threading the tube in; 1/2" torque driver in the square recess. Magpul cites US Army TM 9-1005-319-23&P for the value. Threadlocker: None — 'DO NOT USE LOCTITE OR OTHER LOCKING COMPOUND ON RECEIVER EXTENSION THREADS.' “tighten with a ½” torque driver and torque to 35-39 ft-lb.” |
Magpul UBR GEN2 Collapsible Stock — Installation & Usage Instructions for the AR15/M4 & SR25/M110 (072-0105-B) — Magpul Industries Corp., PDF p. 4 magpul.com [9] |
| UBR GEN2 Main Tube Nut SR25/M110-pattern (AR-10) with a Magpul UBR GEN2 stock |
20–25 ft-lb 27.1–33.9 N·m · 240–300 in-lb |
Reported by Magpul Industries Corp. Included adapter tool plus an armorer's (castle-nut) wrench. “tighten the Main Tube Nut to 20-25 ft-lb.” |
Magpul UBR GEN2 Collapsible Stock — Installation & Usage Instructions for the AR15/M4 & SR25/M110 (072-0105-B) — Magpul Industries Corp., PDF p. 5, step 7 magpul.com [9] |
Function check
- Verify the rifle is unloaded with no magazine inserted before each step.
- Charge the rifle, place the selector on SAFE, and press the trigger. The hammer must not fall.
- Move to SEMI and press the trigger. The hammer should fall.
- Hold the trigger back, charge the rifle, release slowly and listen for the disconnector.
- Confirm the bolt locks back on an empty magazine.
Maintenance
Lubrication points
- Bolt locking lugs and body
- Cam pin and track
- Carrier exterior
- Gas rings
- Charging handle rails
Cleaning notes
Run it wet like a 5.56 AR. Inspect the bolt more frequently than on a small-frame AR — the higher bolt thrust of .308-class cartridges works the lugs and cam pin hole harder.
Suggested inspection interval: roughly every 1000 rounds. This is a general guideline, not a manufacturer specification.
Wear parts to inspect
Bolt lugs and cam pin hole (crack inspection) · Gas rings · Extractor and spring · Buffer spring · Gas key staking
Common issues
| Symptom | Likely cause | What to do |
|---|---|---|
| A part ordered for an AR-10 does not fit | DPMS/LR-308 versus Armalite pattern mismatch | Identify your pattern before ordering. There is no universal AR-10 standard. |
| Firing pin retaining pin will not install | Cam pin missing or unrotated | Install and rotate the cam pin. |
Also covers
The procedures above are reported to apply to: DPMS LR-308 pattern rifles · Armalite AR-10 pattern rifles · SR-25 pattern rifles. Verify against the manual for your specific model.
Similar manual of arms
Legal notes
Sourcing
- Confidence
- medium — Drawn from reliable secondary sources and consistent across references, but not confirmed against a primary source.
- Verification
- Community reviewed only
- Last updated
- 2026-10-29
References
Every source this page draws on, with its web address so you can read it yourself. Numbers in brackets elsewhere on the page point here.
- [1] AR-10 / LR-308 Pattern Rifle Owner’s Manuals (various manufacturers) — Various manufacturer manual primary source
- [2] MI-CR308 Installation Instructions — Midwest Industries, Inc. manufacturer manual secondary source
https://midwestindustriesinc.com/content/installation-instructions/AR308-MI-CR308-Instructions.pdf (checked 2026-09-27) - [3] Operator's Manual — Rifle, 7.62mm SuperSASS / Carbine, 7.62mm SuperSASS (ArmaLite AR-10 SuperSASS) — ArmaLite, Inc. (© 2006) — scan hosted on archive.org manufacturer manual primary source
https://archive.org/details/gunmanual_Armalite_AR10_Super_Sass (checked 2026-09-27) - [4] Aero Precision Support Center — Torque Specifications (article updated 2024-04-01; read via the help centre's Zendesk API because support.aeroprecisionusa.com refused the TLS handshake from this environment) — Aero Precision website secondary source
https://support.aeroprecisionusa.com/hc/en-us/articles/14130432684951-Torque-Specifications (checked 2026-10-11) - [5] Aero Precision Support Center — How to install a R-ONE/S-ONE Handguard (updated 2025-01-09; read via the help centre's Zendesk API) — Aero Precision website secondary source
https://support.aeroprecisionusa.com/hc/en-us/articles/14130449931671-How-to-install-a-R-ONE-S-ONE-Handguard (checked 2026-10-11) - [6] ODIN Works 1 3/8" Jumbo Crowfoot Wrench (for ODIN Works 308 MLOK Forend installation) — product page — ODIN Works website secondary source
https://www.odinworks.com/1-3-8-Jumbo-Crow-Foot-Wrench-p/acc-1-3-8-crowfoot-308.htm (checked 2026-10-11) - [7] Faxon Streamline Aluminum M-LOK 15" AR10 Handguard (DPMS High Profile) — product page 'Installation Instructions' (same text on the 6.5" and 10.5" pages) — Faxon Firearms website secondary source
https://faxonfirearms.com/FFHGMLOK15G310 (checked 2026-10-11) - [8] BATTLEARMS RIGIDRAIL Free Float Rail Handguards for the M16 . M4 . AR-15 or AR-10 Weapon Platforms — Instructions (maker's PDF re-hosted by distributor OpticsPlanet; no copy found on battlearmsdevelopment.com) — Battle Arms Development, Inc. (BAD / BATTLEARMS) manufacturer manual secondary source
https://www.opticsplanet.com/i/pdf/opplanet-battle-arms-development-rigidrail-ar15-m16-free-float-rail-handguards-installation-pdf.pdf (checked 2026-10-11) - [9] Magpul UBR GEN2 Collapsible Stock — Installation & Usage Instructions for the AR15/M4 & SR25/M110 (072-0105-B) — Magpul Industries Corp. manufacturer manual secondary source
https://magpul.com/media/wysiwyg/Instructions/MAG482_UBR_GEN2_Stock%20INSRT.pdf (checked 2026-10-11) - [10] The AR-10 Story — American Rifleman (National Rifle Association) periodical secondary source
https://www.americanrifleman.org/content/the-ar-10-story/ (checked 2026-10-13) - [11] ArmaLite AR-10 / AR-10B Owner's Guide — ArmaLite, Inc. manufacturer manual primary source
https://s3.amazonaws.com/files.ammunitiondepot.com/armalite-rifles/owners-manuals/armalite-ar10-ar10b-owners-guide.pdf (checked 2026-10-29) - [12] AR Lower Receiver Build: Pivot Pin Installation — Shooting Illustrated (NRA) website secondary source
https://www.shootingillustrated.com/content/ar-lower-receiver-build-pivot-pin-installation/ (checked 2026-10-29) - [13] TM 9-1005-249-23&P, Rifle, 5.56mm, M16 and M16A1 (unit and direct support, incl. RPSTL) — Department of the Army military technical manual primary source
https://archive.org/download/ArmyTechnicalManualforM16Rifle-Tm9-1005-249-23p/Manual-Tm9-1005-249-23p_djvu.txt (checked 2026-10-29) - [14] TFB Armorer's Bench: Complete AR15 Assembly - Lower Receiver — The Firearm Blog website secondary source
https://www.thefirearmblog.com/blog/2022/07/31/tfb-armorers-bench-complete-ar15-assembly-lower-receiver/ (checked 2026-10-29)
Notes: Illustrated on 2026-09-14 with M16 figures from TM 9-1005-249-23&P (public domain, US Government work). The AR-10 is dimensionally larger throughout and its bolt has seven lugs rather than eight, so treat these as showing the arrangement, not the exact parts. Rated medium because "AR-10" describes a family rather than a standard. The field strip is consistent across patterns, but parts compatibility is not, and that is the thing most likely to cause a problem for an owner.