← All firearms · Printable work order
Browning X-Bolt
- easy
- Shop tier 1
- high confidence
- Rifle
- bolt action
- hunting
- rotary magazine
- tang safety
- four screw bedding
field strip ~2 min · reassembly ~3 min · detail strip ~30 min
Specifications
- Manufacturer
- Browning Arms Company
- Origin
- Japan / United States
- Category
- Rifle
- Action
- Bolt action
- Calibers
- .308 Winchester, .30-06 Springfield, 6.5 Creedmoor, .300 Winchester Magnum
- Capacity
- 3 to 5 rounds in the rotary magazine
- Production
- 2008–present (in-production)
- Also known as
- X-Bolt Hunter, X-Bolt Pro
Model-specific safety
- Removing the magazine does not clear the chamber. Cycle the bolt and check the chamber directly.
- The bolt release must be operated to withdraw the bolt. Do not force the bolt out — if it will not come, the release is not engaged or the safety is blocking it.
- Clean from the breech with a bore guide. Cleaning a bolt rifle from the muzzle without a guide wears the crown and costs accuracy permanently.
- Removing the barrelled action from the stock changes the bedding relationship. Reinstall the action screws to a consistent torque or the rifle will shift its zero.
- The X-Bolt uses a top-tang safety with a bolt unlock button that allows the bolt to be opened with the safety engaged. That is a genuine safety advantage for unloading — use it rather than moving the safety to fire to open the bolt.
- The rotary magazine is a fitted assembly. Do not disassemble it.
If it will not go back together
Common ways this firearm resists reassembly, and what is actually wrong. Forcing a part that will not seat is how firearms get damaged.
-
The bolt will not come out of the receiver.
Why The safety is off. The X-Bolt releases its bolt with the safety ON.
Fix Leave the safety ON SAFE, press the bolt unlock button, rotate the handle up, then press the rear of the bolt stop on the left of the receiver.
Under spring tension
- Firing pin spring inside the bolt (detail strip)
- Magazine follower spring
Easily lost parts
Bolt release · Action screws · Magazine or floorplate components
Tools
| Tool | Required | Used for | Substitute |
|---|---|---|---|
| Bore guide | Yes | Cleaning from the breech without damaging the throat or the crown. | There is no good substitute. A rod run into an unguided chamber scrapes the throat. |
| Hex key or screwdriver matching the action screws | Optional | Removing the barrelled action from the stock. Not needed for routine cleaning. | |
| Torque wrench | Optional | Reinstalling action screws to a consistent value, which is an accuracy variable on every bolt rifle. |
Shop difficulty
Shop tier 1 Tier 1 — easy among rifles and carbines, for the full job: strip to the parts that get coated and put it back together working. A modern bolt action: the stock comes off on two screws, the bolt comes out on the release button, and the trigger and rotary magazine stay as units. The one trap is the bolt shroud/striker, which has no hole for a holding pin, so getting it out takes a vise or a shop-made wedge tool.
No sourced part count yet.
Bench time: about 25 min to strip, 35 min to rebuild (estimate). Estimate: like the Howa/Bergara plus the striker/shroud with a vise or wedge tool, the bolt release button and the rotary magazine/bottom metal; trigger stays a unit.
What comes off for coating
- Bolt: bolt shroud/striker assembly (vise or wedge tool), extractor, ejector — A-Bolt/X-Bolt striker tool or vise with soft jaws
- Receiver: trigger unit (not stripped), bolt unlock button/bolt release
- Stock and bottom metal: action screws, bottom metal and magazine latch, rotary magazine, recoil pad, sling studs
Special tools
- Shop-made A-Bolt/X-Bolt striker wedge or soft-jaw vise — Holding the cocking piece while the shroud unscrews
- Torque driver — Action screws
Known pain points
- The striker/shroud assembly cannot be pinned back like a Remington. Getting it out of the bolt means clamping the cocking piece or using a shop-made wedge tool, and Browning's manual does not cover it. (both)
Owners report: How to remove Browning X Bolt striker from bolt — AccurateReloading.com Gunsmithing forum forums.accuratereloading.com [5] — “Unlike most bolt guns, I can't find a place to insert a pin to hold it back when unscrewing it from the bolt.” - Gunsmiths file up a dedicated A-Bolt/X-Bolt firing assembly tool sized by screwing the shroud all the way in. (both)
Owners report: How to remove Browning X Bolt striker from bolt — AccurateReloading.com Gunsmithing forum forums.accuratereloading.com [5] — “Then you grab the A Bolt / X Bolt fire array disassembly tool out of the top drawer in the brown tool box and jam it in the shroud with the flat toward the pin in the cocking piece and the wedge part forward.”
See also 1 documented reassembly problem and their fixes.
Fit or check on rebuild
- Action screw torque — Bedding and zero depend on consistent action screw torque
- Trigger/safety function — The Feather trigger stays assembled; check safety and let-off after the striker goes back
This is Pew-Takedown's rating, not the manufacturer's. How tiers are rated. Forum reports are owners' experience, not specifications.
Manufacturer videos
Official videos from Browning Arms Company's own channels, linked rather than copied. Where a video and the steps on this page differ, follow the manufacturer's manual and video.
- X-Bolt - The way it works: Unlock Button and Safety - 3:53 HD Browning
operation, clearing · 2010-09-07
Covers: Browning X-Bolt (original, 2008 era)
Procedures
Clear and Make Safe
Clear & Make SafeManufacturer’s video: X-Bolt - The way it works: Unlock Button and Safety - 3:53 HD Browning
- Point the muzzle in a safe direction and keep your finger off the trigger.
- Place the safety in the on position.
- Lift the bolt handle and draw the bolt fully rearward, extracting and ejecting any chambered round.
- Press the magazine latch and remove the detachable rotary magazine.Removed at this step:
Magazine contents - Inspect the chamber and magazine well with a light and physically confirm the chamber is empty.WarningLook and feel. Both, every time.
- Remove all live ammunition from the work area.
Field Strip
Field StripBolt removal is the whole of routine maintenance on a bolt rifle. The bore cleans from the breech with the bolt out.
- Complete the Clear and Make Safe procedure.
- Leave the safety in the ON SAFE position. The X-Bolt's bolt comes out with the safety on, which is the point of the bolt unlock button.TipThis is unusual and worth knowing: most bolt rifles need the safety off. This one does not.
- Press the bolt unlock button and rotate the bolt handle upward.
- Press inward on the rear end of the bolt stop — the horizontal bar on the left side of the receiver — and carefully draw the bolt to the rear and out of the receiver.TipTake care that the cocking indicator does not strike and damage the comb of the stock on its way out. Browning calls this out specifically.Removed at this step:
Bolt - Clean the bore from the breech using a bore guide, and clean the bolt face, lugs, and chamber.
- Stop here for routine maintenance.WarningBrowning's standing notice: never take the firearm apart further than the owner's manual explains. It is a finely fitted mechanism and you may permanently damage it by disassembling the inner mechanism assemblies. If more is needed, it goes to a qualified gunsmith or Browning's service facility.
Reassembly
Reassembly- Align the bolt with the receiver raceway and slide it in.TipYou do not have to depress the bolt stop to insert the bolt, though you may, and it makes it easier.
- Push the bolt completely forward and rotate the handle down to lock it.
- Immediately place the safety in the ON SAFE position.
- Cycle the bolt several times to confirm smooth travel and correct cocking, then perform the function check.
Remove the Barrelled Action from the Stock
Detail Strip tools requiredFor a deep clean or bedding work. Not routine maintenance.
- Verify the rifle is unloaded and remove the bolt and magazine.
- Remove the action screws from the bottom of the stock, noting which screw came from which hole.TipThey are often different lengths.Removed at this step:
Action screwsFloorplate or magazine assembly - Lift the barrelled action out of the stock.Removed at this step:
Stock - To reinstall, seat the action in the stock, start both screws by hand, then tighten the front screw first and the rear second to a consistent torque.WarningInconsistent action screw torque is one of the most common causes of a rifle that will not hold zero. Consult your stock maker’s specification rather than guessing.
Patent drawings
not under copyrightDrawings from US patents on this design. A patent shows the invention as the inventor filed it; the firearm that shipped can differ in detail, and later production often does. Use them to see how the parts relate, not as a parts reference or a procedure. Per the USPTO, the text and drawings of a patent are typically not subject to copyright; each patent here was checked for a copyright notice.
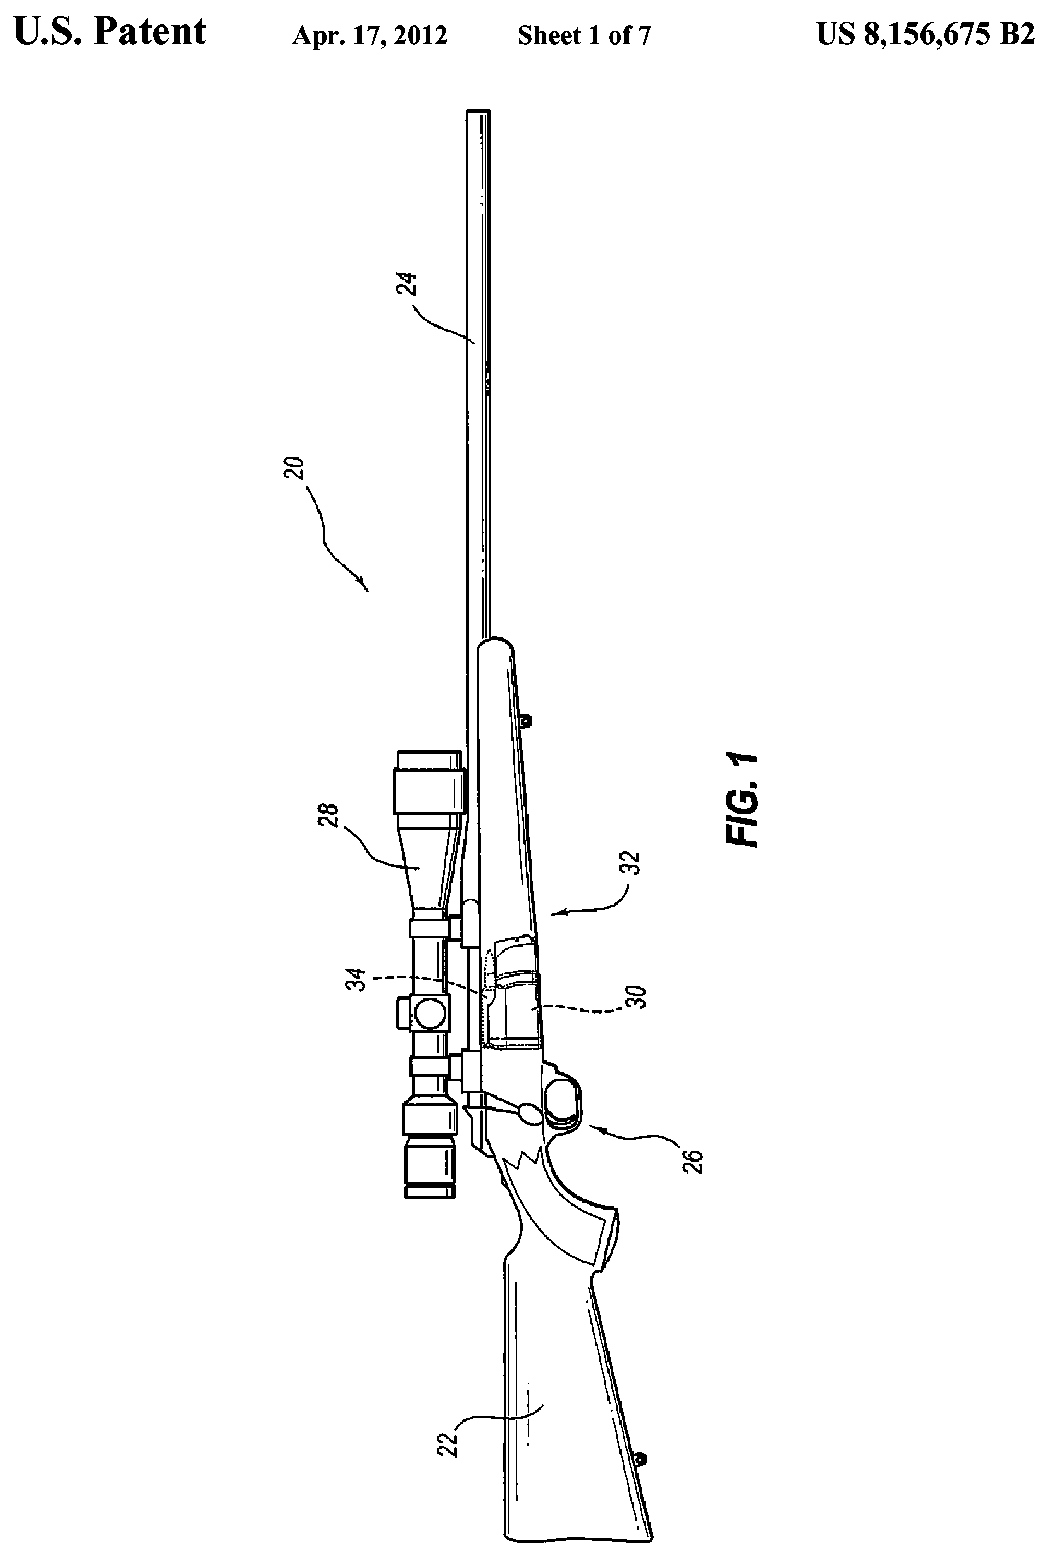
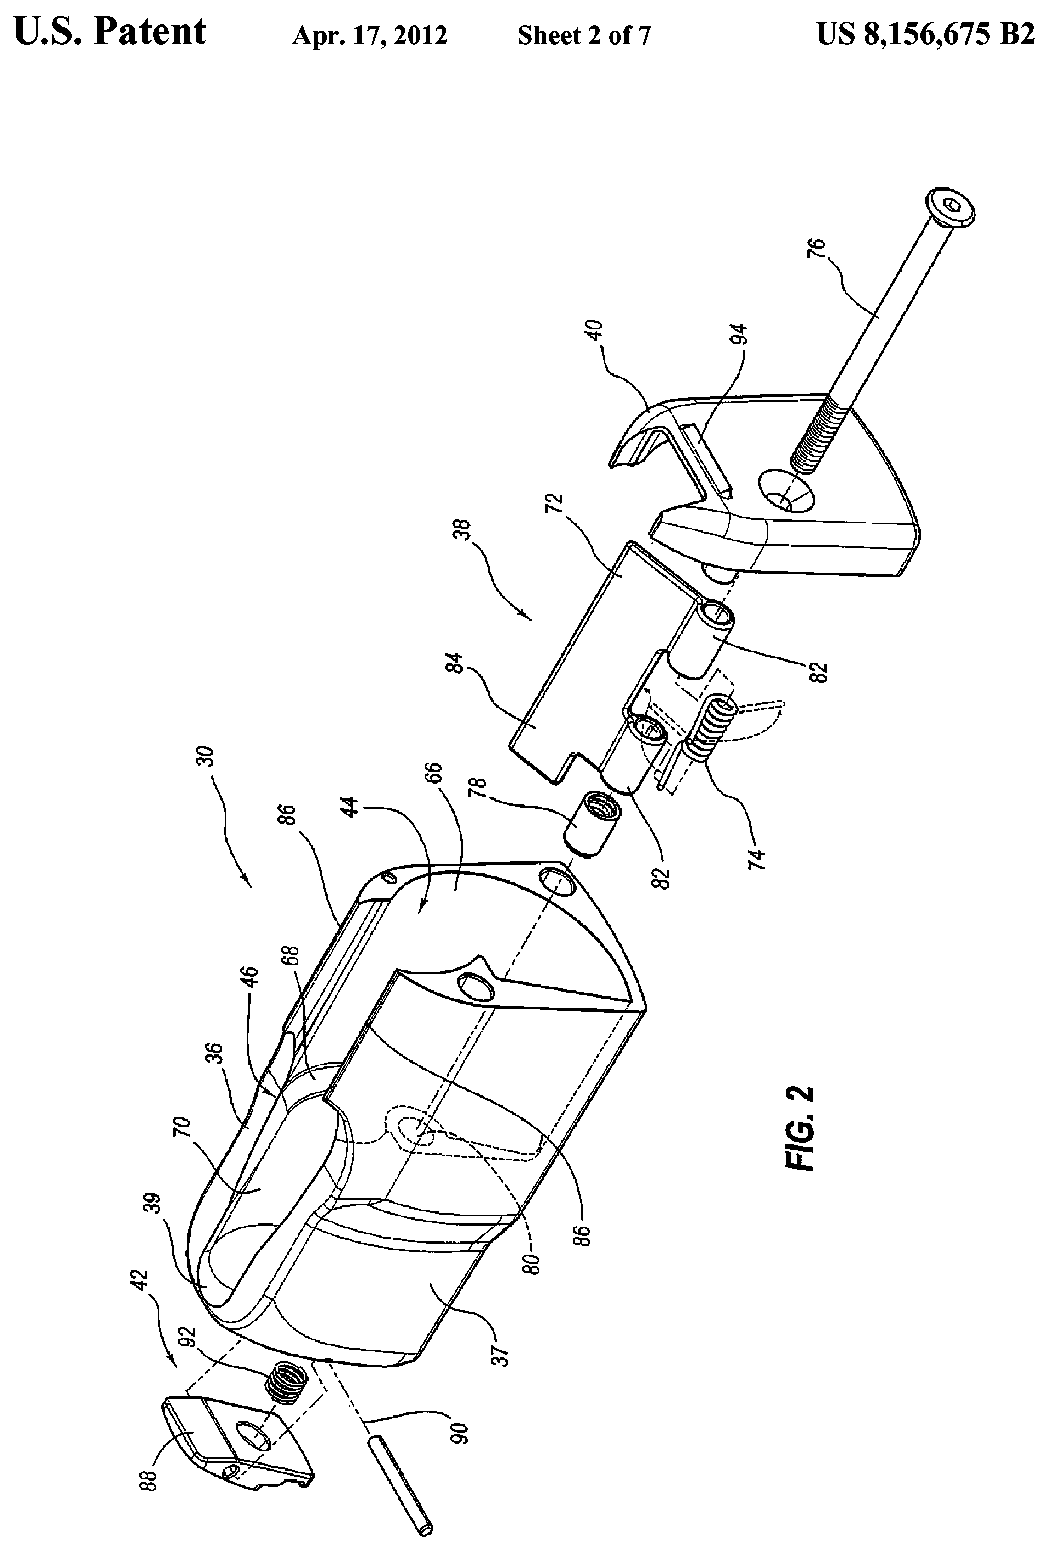
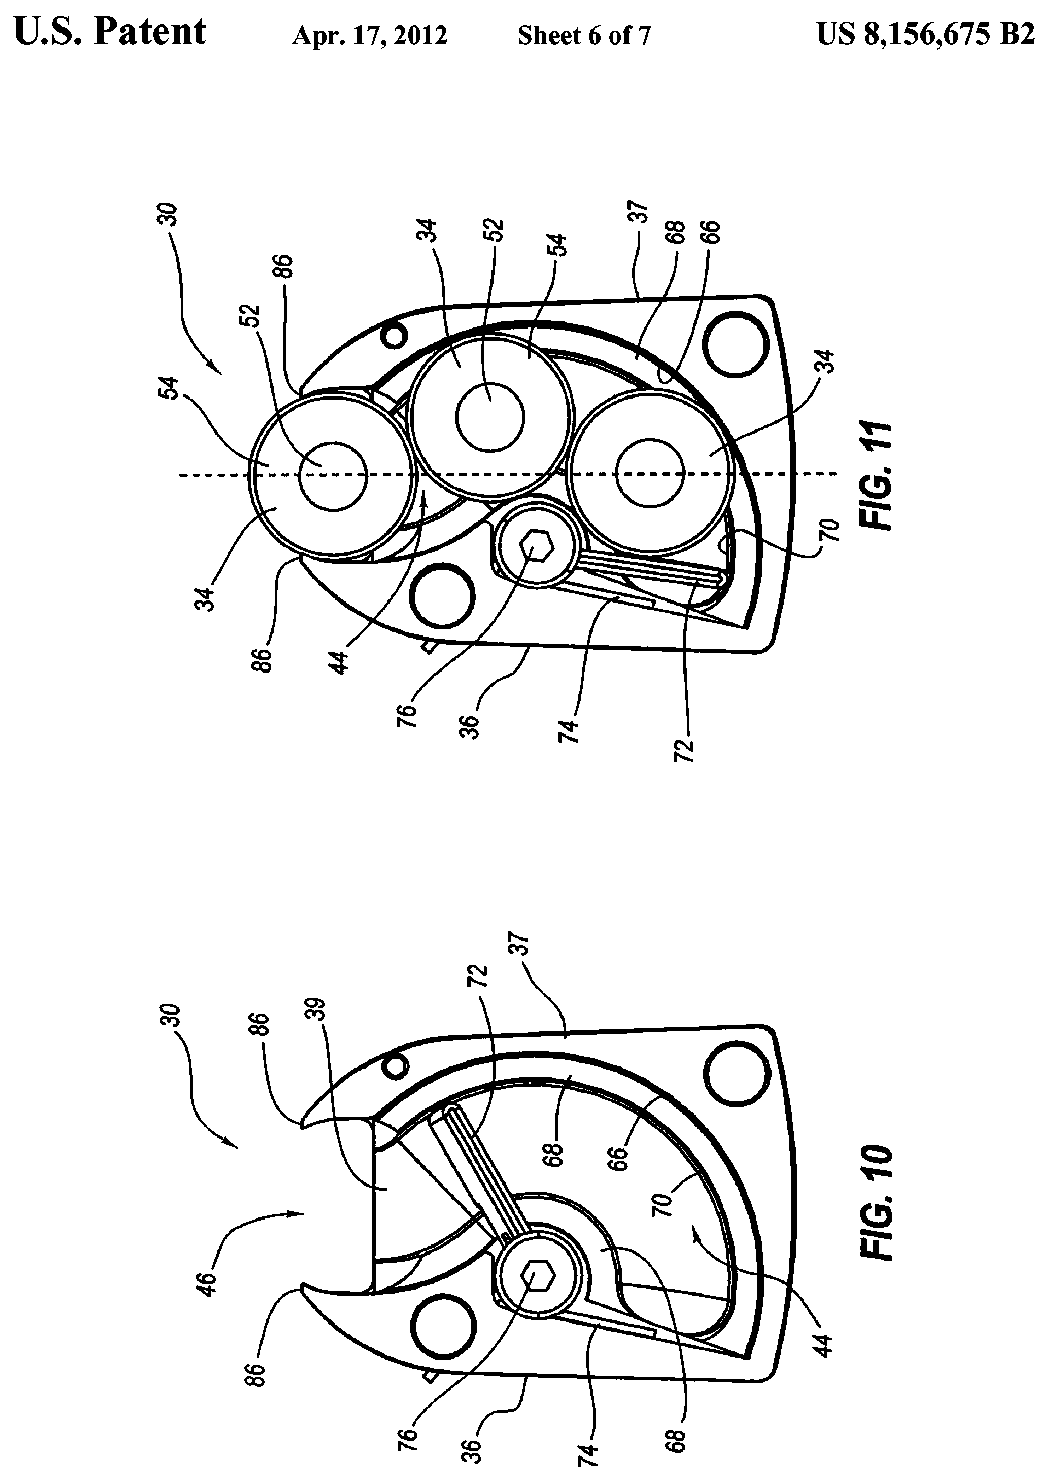
US Patent 8,156,675 — Firearm magazine
Marcus A. Heath · assigned to Browning (Morgan, UT) · filed 2007-03-08 · granted 2012-04-17. Full patent (USPTO)
The X-Bolt's detachable rotary magazine: housing, rotating follower and spring, front and rear catches that hold it in the stock, and how it sits in the underside of the rifle.
Why this is the Browning X-Bolt’s patent: named by the maker — X-Bolt Rifle Overview — Browning browning.com [4]: “ROTARY MAGAZINE The rotary magazine is removeable, durable, easy to load and feeds rounds straight to the chamber from the center line, not off to the side like other rifles. This unique design holds U.S. patent numbers: 8,156,675; 8,484,875 and 8,745,912.”
Torque specifications
| Fastener | Torque | Sequence, notes and the source's words | Where it comes from |
|---|---|---|---|
| Bottom metal (action) screws, front and rear X-Bolt Target rifle (AICS-magazine bottom metal), per Browning's X-Bolt Target owner's manual supplement |
35 in-lb 4 N·m · 2.9 ft-lb |
Replace the bottom metal in the stock. Install the rear screw first and tighten until it is snug. Install the front screw and torque it to 35 in. lb. Torque the rear screw to 35 in. lb. “Install the front screw and torque it to 35 in. lb.” |
X-Bolt Target Rifle Owner's Manual Supplement (21-BFA-371) — Browning browning.com [2] |
| Optics rail screws (factory-installed rail) X-Bolt Target rifle |
25 in-lb 2.8 N·m · 2.1 ft-lb |
Threadlocker: If the mounting screws are loose, remove them and add a drop of removable threadlocker before torquing. “Using a T15 Torx bit, torque the screws to 25 in. lb. (Figure 8).” |
X-Bolt Target Rifle Owner's Manual Supplement (21-BFA-371) — Browning browning.com [2] |
Materials and factory finish
As stated by Browning Arms Company. Prep, masking and cure depend on these; a polymer or aluminium part, a nitrided or anodised finish, and a blued steel part are each a different job. Variants with other finishes may exist — check the maker's page for the exact SKU on the bench.
| Component | Material | Factory finish | Where it comes from |
|---|---|---|---|
| Receiver X-Bolt 2 Hunter, item 036001211 (243 Win, 22") | Steel | Matte Blued | X-Bolt 2 Hunter — Specifications — Browning browning.com [3] “Receiver Material Steel … Receiver Finish Matte Blued” |
| Barrel X-Bolt 2 Hunter, item 036001211 | Steel | Matte Blued | X-Bolt 2 Hunter — Specifications — Browning browning.com [3] “Barrel Material Steel … Barrel Finish Matte Blued” |
| Stock X-Bolt 2 Hunter, item 036001211 | Black Walnut | Satin | X-Bolt 2 Hunter — Specifications — Browning browning.com [3] “Stock Material Black Walnut … Stock Finish Satin” |
| Trigger guard X-Bolt 2 Hunter, item 036001211 | Alloy | — | X-Bolt 2 Hunter — Specifications — Browning browning.com [3] “Trigger Guard Material Alloy” |
| Trigger X-Bolt 2 Hunter, item 036001211 | Alloy | Gold Plated | X-Bolt 2 Hunter — Specifications — Browning browning.com [3] “Trigger Material Alloy … Trigger Finish Gold Plated” |
| Floor plate X-Bolt 2 Hunter, item 036001211 | Composite | — | X-Bolt 2 Hunter — Specifications — Browning browning.com [3] “Floor Plate Material Composite” |
Function check
- Verify the rifle is unloaded and the magazine is empty before each check.
- Cycle the bolt and confirm it cocks and closes fully into battery.
- With the action cocked, engage the safety and press the trigger. The firing pin must not release.
- Disengage the safety without touching the trigger. The firing pin must not release.
- Press the trigger and confirm the firing pin releases cleanly.
- Confirm the bolt release retains the bolt.
- Load dummy rounds and confirm they feed from the magazine and eject cleanly.
Maintenance
Lubrication points
- Bolt lugs and the locking recesses
- Bolt body where it rides in the raceway
- Cocking cam surfaces
- Extractor
Cleaning notes
Clean from the breech with a bore guide. Do not over-lubricate the firing pin assembly — heavy oil there congeals in cold weather and causes light strikes. Keep the chamber dry and free of oil before shooting, since oil in a chamber raises bolt thrust.
Suggested inspection interval: roughly every 500 rounds. This is a general guideline, not a manufacturer specification.
Wear parts to inspect
Extractor · Ejector and spring · Bolt lugs · Firing pin spring · Crown (inspect for cleaning rod wear)
Common issues
| Symptom | Likely cause | What to do |
|---|---|---|
| Group size opens up after cleaning or transport | Action screw torque changed | Retorque the action screws consistently, front first. |
| Light strikes in cold weather | Heavy or congealed oil in the firing pin assembly | Degrease the firing pin assembly and run it dry or with a light synthetic lubricant. |
| Bolt will not withdraw | Bolt release not operated, or the safety is blocking it | Move the safety to fire and operate the release. Do not force the bolt. |
Also covers
The procedures above are reported to apply to: X-Bolt Hunter, Composite Stalker, Pro, and Max variants. Verify against the manual for your specific model.
Similar manual of arms
Sourcing
- Confidence
- high — Cross-checked against a primary source such as the manufacturer's manual or an issuing military technical manual.
- Verification
- Checked against the manufacturer manual
- Last updated
- 2026-10-29
References
Every source this page draws on, with its web address so you can read it yourself. Numbers in brackets elsewhere on the page point here.
- [1] Browning X-Bolt Rifle Owner's Manual — Browning manufacturer manual primary source
https://www.browning.com/support/owners-manuals/x-bolt-rifle.html (checked 2026-09-14) - [2] X-Bolt Target Rifle Owner's Manual Supplement (21-BFA-371) — Browning manufacturer manual primary source
https://www.browning.com/support/owners-manuals/x-bolt-target-rifle.html (checked 2026-09-27) - [3] X-Bolt 2 Hunter — Specifications — Browning website primary source
https://www.browning.com/products/firearms/rifles/x-bolt-2/x-bolt-2-hunter.html (checked 2026-10-03) - [4] X-Bolt Rifle Overview — Browning website primary source
https://www.browning.com/products/firearms/rifles/x-bolt/overview.html (checked 2026-10-13) - [5] How to remove Browning X Bolt striker from bolt — AccurateReloading.com Gunsmithing forum community anecdotal source
https://forums.accuratereloading.com/eve/forums/a/tpc/f/9411043/m/6821078912 (checked 2026-10-29)
Notes: CORRECTED on 2026-09-14 against Browning's own owner's manual. The entry told you to move the safety to fire to release the bolt. The X-Bolt is the opposite: the safety stays ON SAFE and the bolt unlock button is what frees the handle. Added the manual's caution about the cocking indicator striking the stock comb on the way out, and its note that the bolt stop need not be depressed on reinstallation. The X-Bolt uses four action screws rather than the usual two, which changes the torque sequence. Follow the manufacturer’s pattern and specification when reinstalling the action.