← All firearms · Printable work order
Daniel Defense DDM4
- easy
- Shop tier 2
- high confidence
- Rifle
- direct impingement
- modular
- toolless field strip
- free float rail
field strip ~2 min · reassembly ~3 min · detail strip ~25 min
Specifications
- Manufacturer
- Daniel Defense
- Origin
- United States
- Category
- Rifle
- Action
- Gas, direct impingement
- Calibers
- 5.56x45mm NATO
- Capacity
- 30+1
- Production
- 2003–present (in-production)
- Also known as
- DDM4 V7, DDM4 V11
Model-specific safety
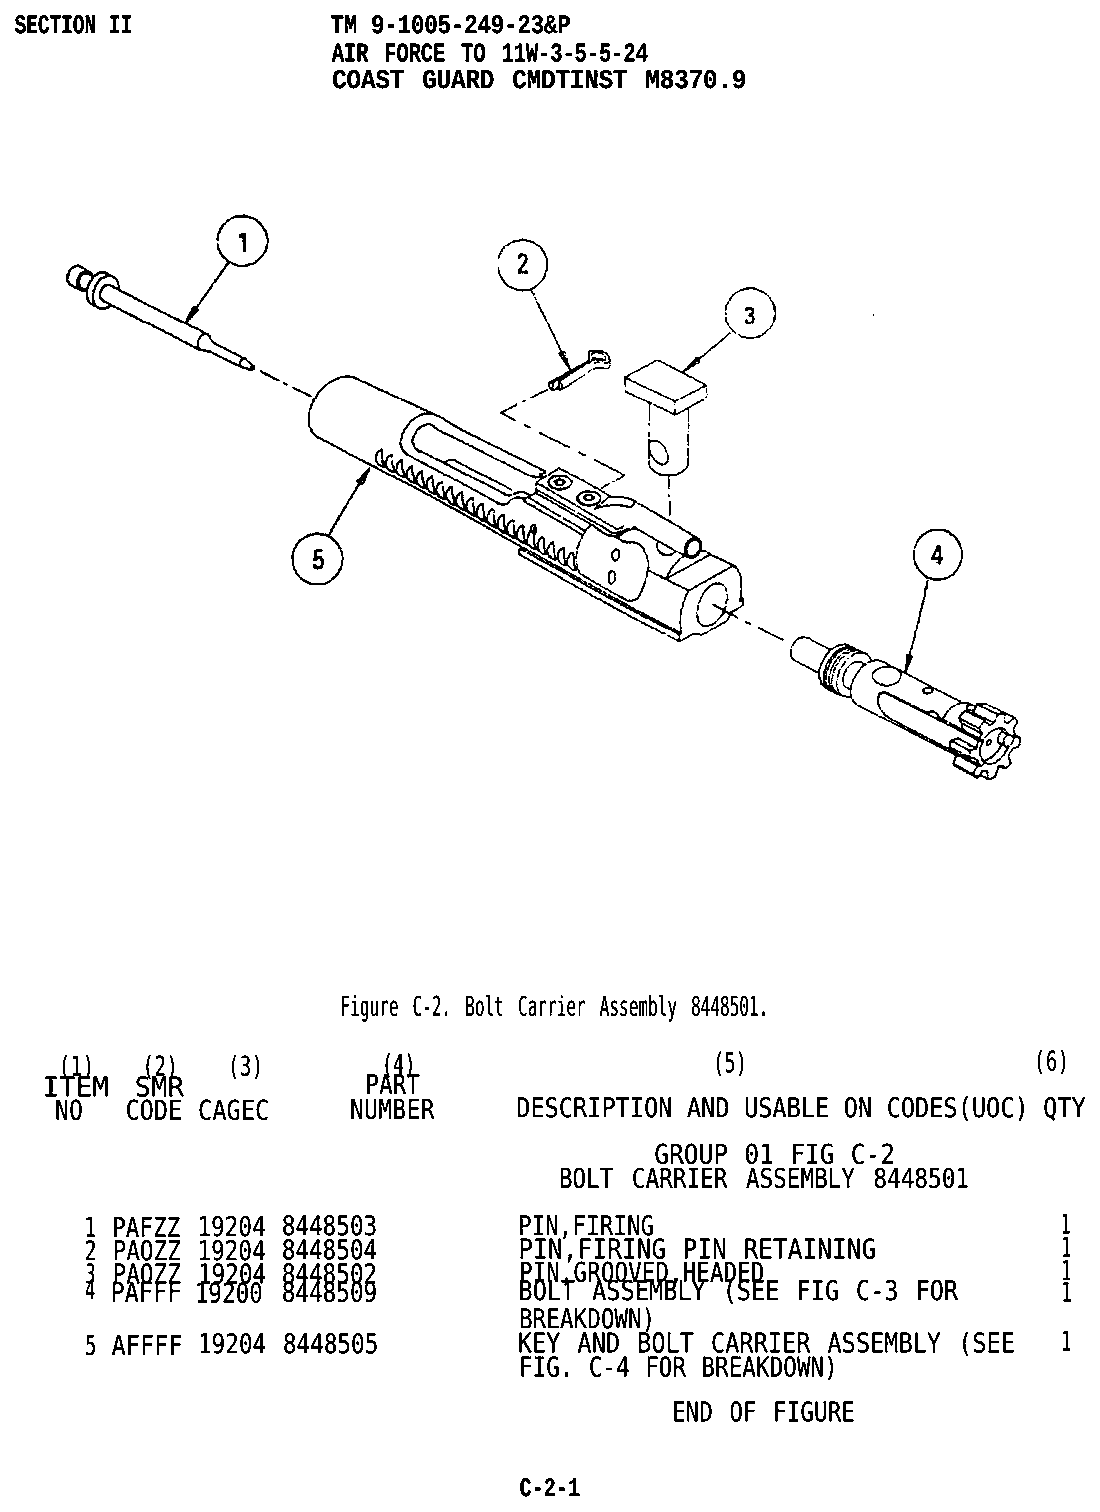
- The bolt cam pin MUST be installed. Without it the bolt cannot lock into the barrel extension, and firing in that condition can destroy the rifle and seriously injure the shooter. The firing pin retaining pin will not install without the cam pin in place — that is a designed safeguard, so if the retaining pin will not go in, stop and find out why.
- The safety selector only engages when the hammer is cocked. If it will not rotate to SAFE, the hammer is down.
- The buffer and buffer spring are under compression. When you depress the buffer retainer, control the buffer.
- Gas system components are extremely hot immediately after firing.
Under spring tension
- Buffer and buffer spring in the receiver extension
- Extractor spring
- Magazine springs
Easily lost parts
Bolt cam pin · Firing pin retaining pin · Extractor pin · Buffer retainer and spring
Tools
No tools required for the field strip.
Shop difficulty
Shop tier 2 Tier 2 — moderate among rifles and carbines, for the full job: strip to the parts that get coated and put it back together working. An AR-15: about 82 labelled parts across DD's upper, lower and bolt carrier drawings, with the bolt as one assembly. It has the same AR traps (pivot and takedown detents, roll pins, port cover spring, hammer spring), plus the DD rail, which bolts to its own barrel nut and which DD tells owners to leave to a gunsmith.
Parts: 82 numbered parts (DDM4 V1 upper (39 callouts), lower (37) and bolt carrier group (7, bolt as an assembly), counted from DD's parts illustrations; the complete BCG callout on the upper drawing is not counted twice), from Daniel Defense DD4 / DDM4 / DD5 Rifle Manual (2016, Rev 3.1) — Daniel Defense, pp. 37, 38, 42 (6.1, 6.2, 6.6) 308ar.com [10].
Bench time: about 40 min to strip, 65 min to rebuild (estimate). Estimate: same as a generic AR-15 plus the DD rail (bolt-up plate and screws) and fixed front sight base taper pins on V1; rebuild adds the DD rail torque and barrel-nut indexing.
Small parts: 15 pins, 15 springs, 6 detents or plungers (counted from the DD parts illustrations in partCount ('SPS' rows counted as spring pins))
What comes off for coating
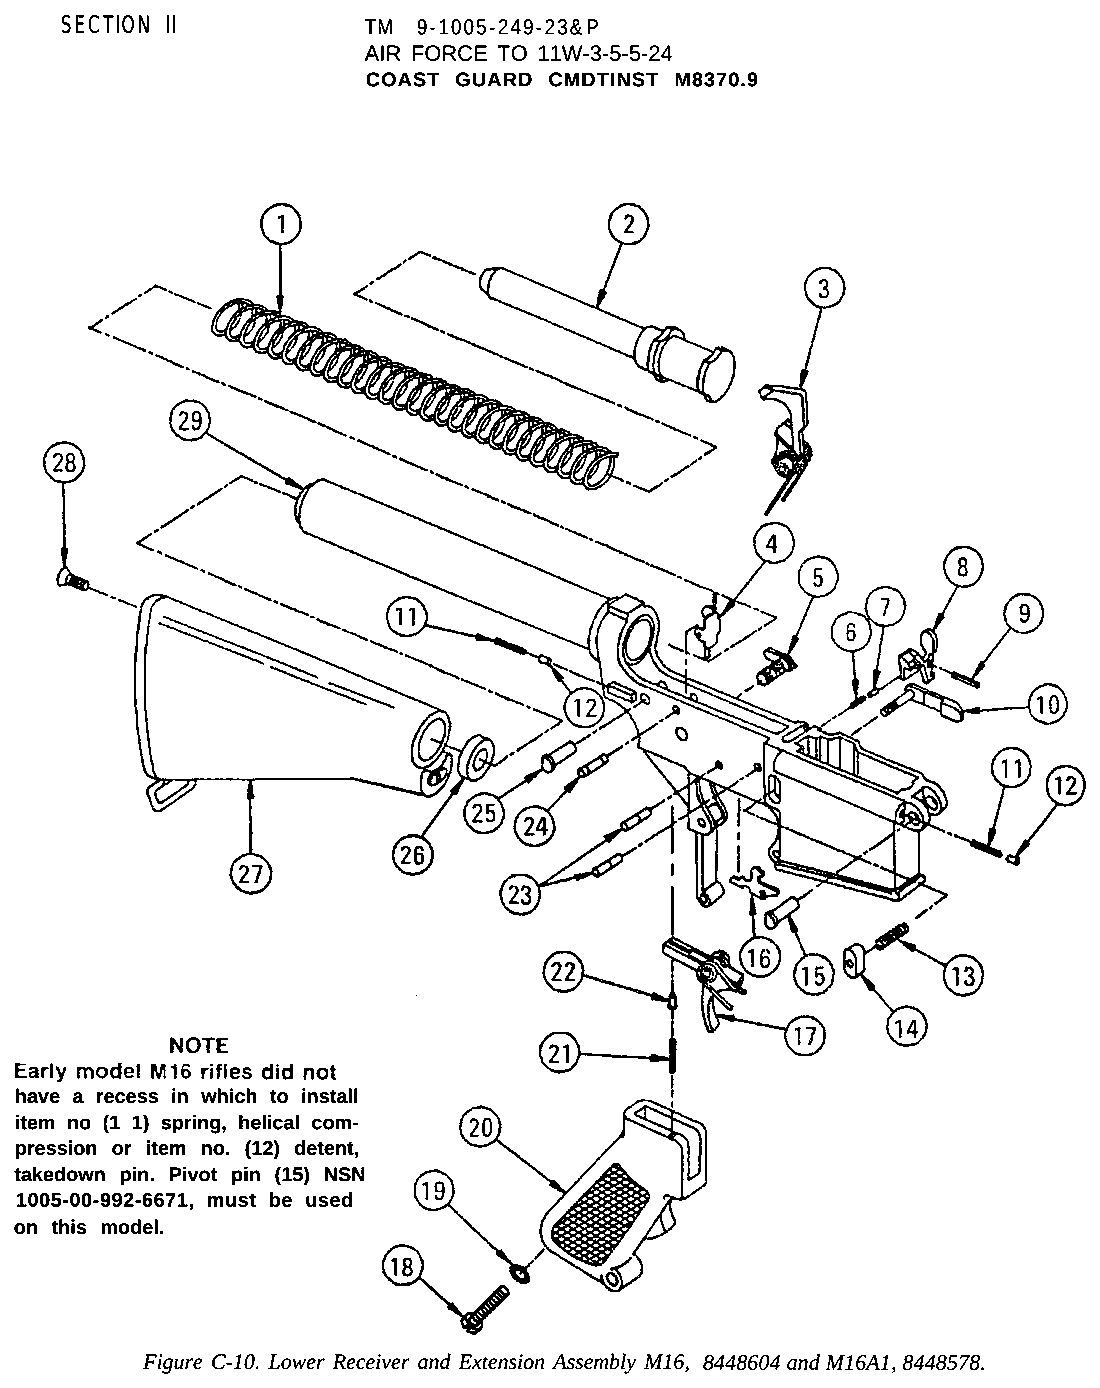
- Lower receiver: pistol grip and screw (selector detent and spring), safety selector, takedown pin, detent and spring, pivot pin, detent and spring, hammer, hammer spring and pin, trigger, trigger spring, disconnector and spring, pin, bolt catch, plunger, spring and roll pin, magazine catch, spring and button, trigger guard and roll pin, buffer, buffer spring, buffer retainer and spring, stock, castle nut, end plate, receiver extension — roll-pin punches/starters, pivot pin detent tool, castle nut wrench
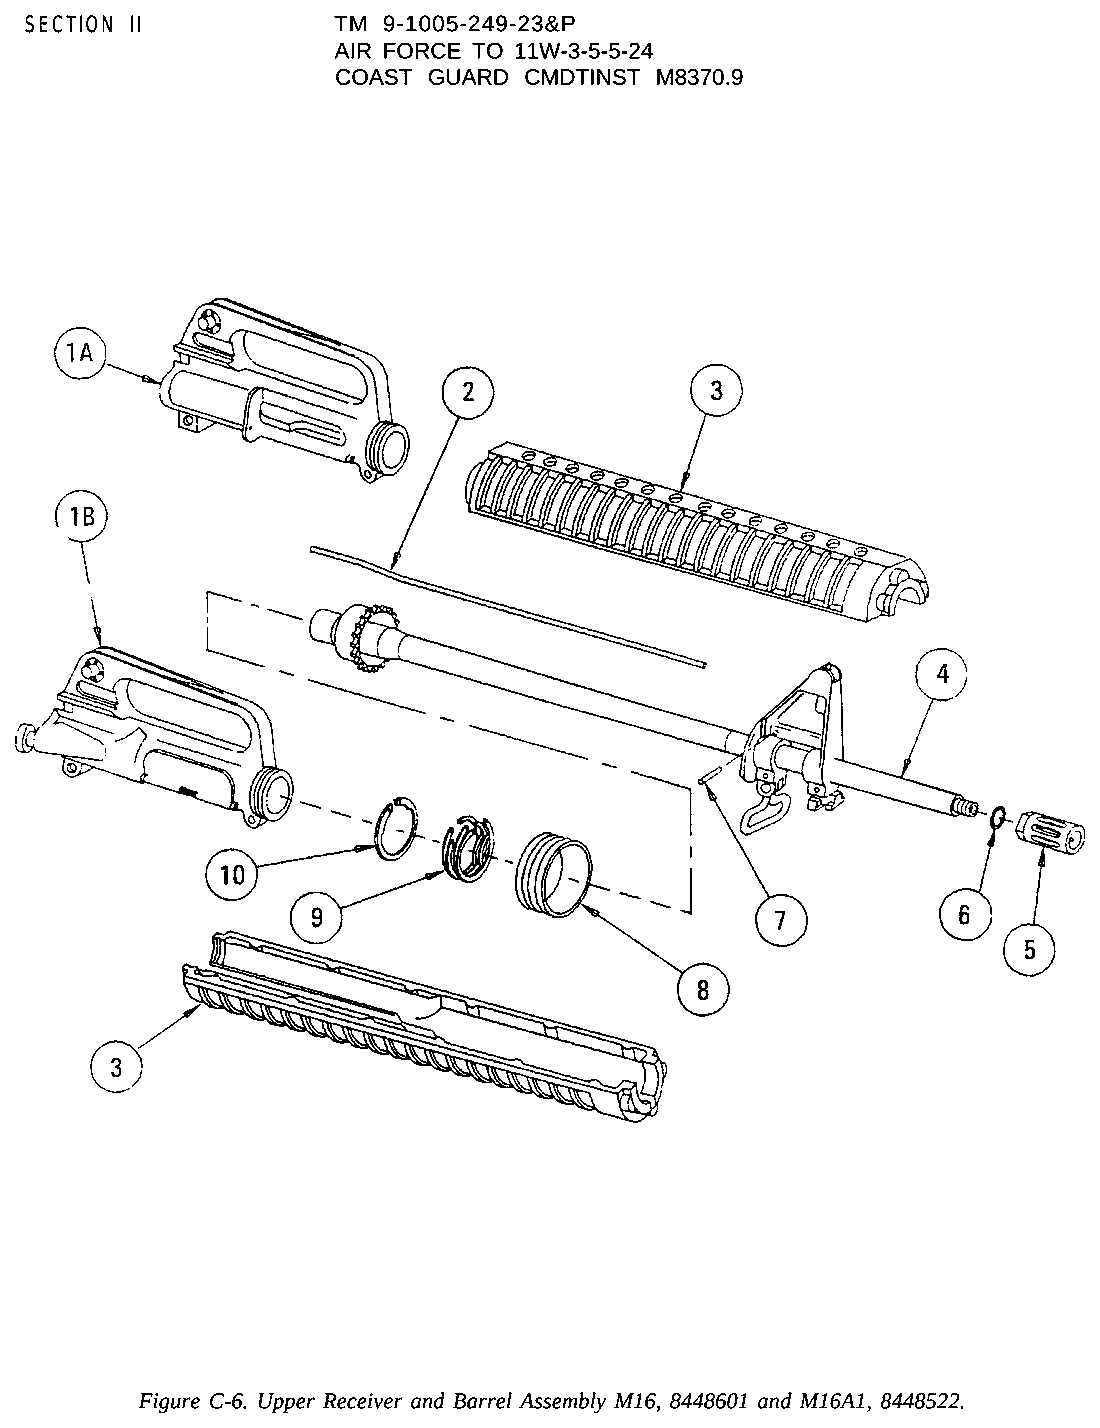
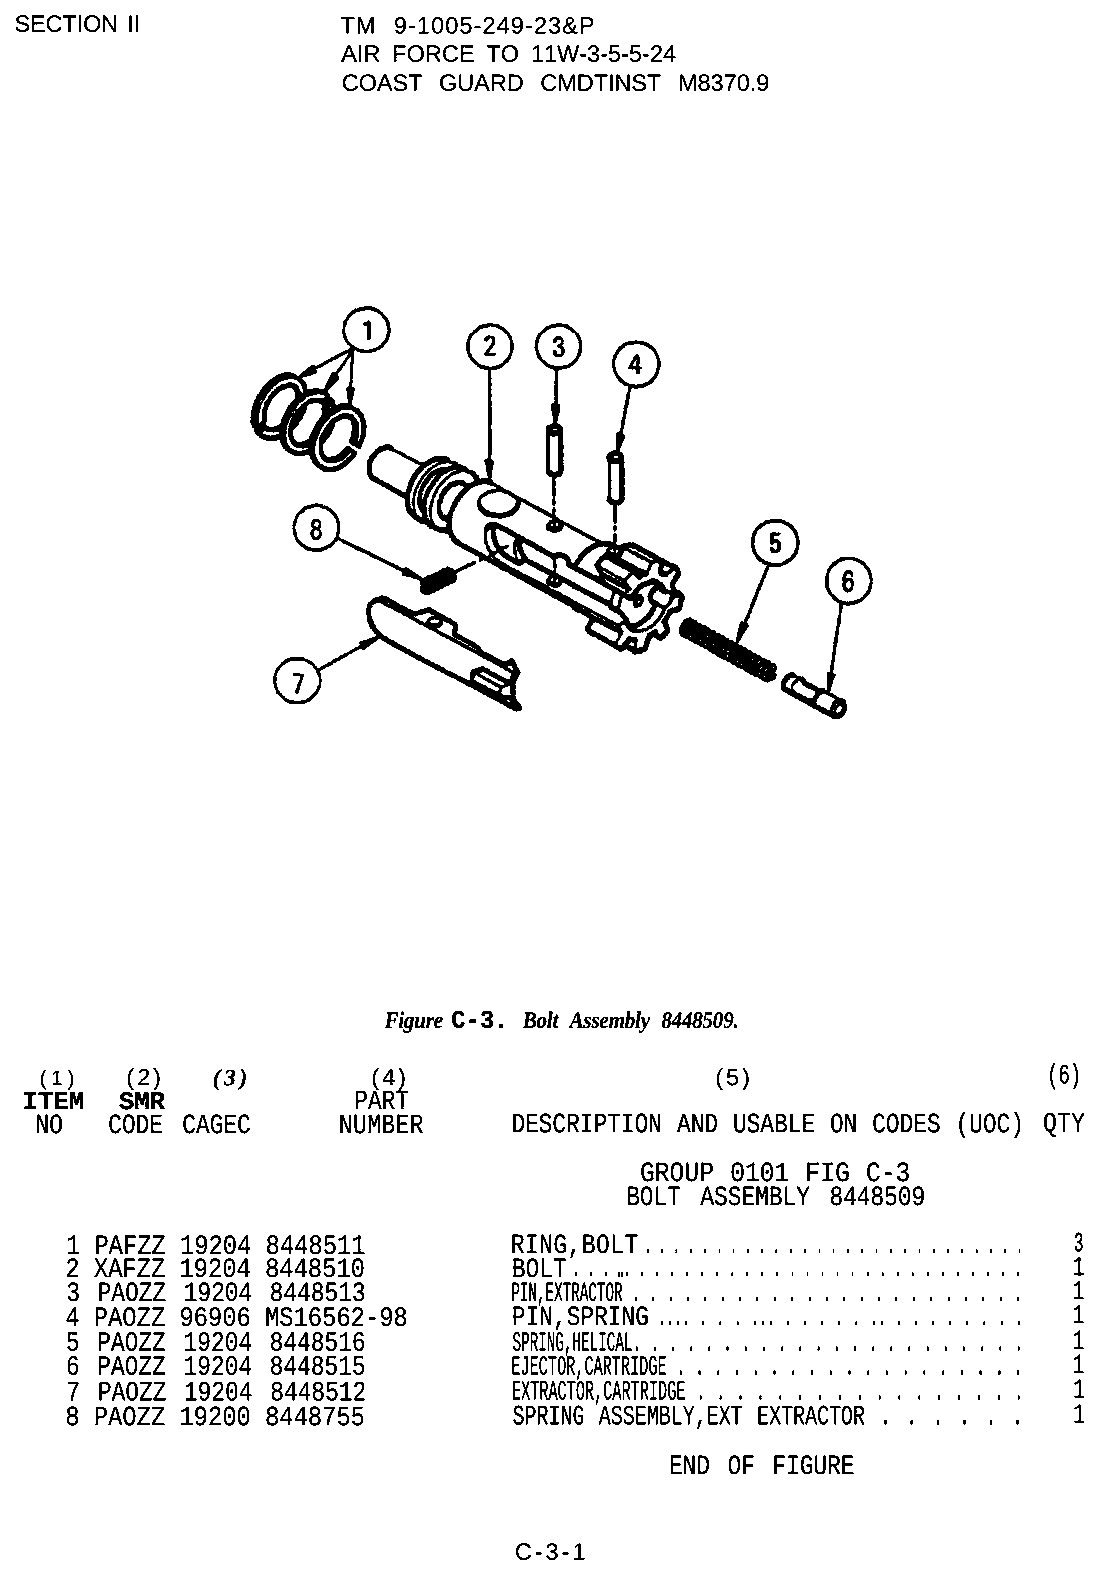
- Upper receiver: charging handle, bolt carrier group (firing pin, retaining pin, cam pin, bolt, extractor, spring, insert, ejector, ejector spring and pin, ejection port cover, pin, spring and clip, forward assist, spring and pin, rear sight, handguard/rail, gas block or front sight base and pins, gas tube and pin, DD bolt-up rail, plate and screws; barrel nut and barrel, muzzle device and crush washer — upper receiver vise block, armorer's/barrel nut wrench, torque wrench, bench block, taper-pin punch
Special tools
- Upper receiver vise block / reaction rod — Holding the upper for barrel nut and muzzle device work
- AR armorer's wrench (barrel nut/castle nut) — Barrel nut and receiver extension castle nut
- Torque wrench (ft-lb and in-lb) — Barrel nut, castle nut, muzzle device
- Pivot pin detent installation tool (or 3/32" punch) — Holding the pivot pin detent while the pin goes in
- Roll-pin starter punches (1/16", 3/32", 1/8") and a bench block — Bolt catch, trigger guard, forward assist and ejection port cover pins
- Lower receiver vise block — Supporting the trigger guard ears and bolt catch boss
Known pain points
- The front pivot pin and rear takedown pin each sit on a spring-loaded detent that launches when the pin comes out; reinstalling the pivot pin means holding the detent down while the pin goes in, which is the classic AR lower trap. (both)
Source: AR Lower Receiver Build: Pivot Pin Installation — Shooting Illustrated (NRA) shootingillustrated.com [11] — “The detent and spring will fly out and you will be spending a lot of time on your knees looking for them.” - The TM has the armorer use a pivot pin tool to compress the detent, and warns to catch the detent and spring as the pin comes out. (both)
Source: TM 9-1005-249-23&P, Rifle, 5.56mm, M16 and M16A1 (unit and direct support, incl. RPSTL) — Department of the Army archive.org [12] — “Catch detent and spring as pivot pin is” - The bolt catch and trigger guard roll pins mar the receiver unless the receiver is taped and supported and a roll-pin starter punch is used. (both)
Source: TFB Armorer's Bench: Complete AR15 Assembly - Lower Receiver — The Firearm Blog thefirearmblog.com [13] — “Installing the bolt catch roll pin can be cumbersome and in the wrong hands, aesthetically destructive.” - Daniel Defense says the rail/handguard (bolt-up system on its own barrel nut) should come off only at a gunsmith, with DD's torque specs. (both)
Source: Daniel Defense DD4 / DDM4 / DD5 Rifle Manual (2016, Rev 3.1) — Daniel Defense 308ar.com [10] — “If removal of handguard is deemed necessary, please take firearm to a qualified and competent gunsmith.”
Fit or check on rebuild
- Barrel nut torque and gas tube alignment — The barrel nut is torqued within a range and indexed for the gas tube
Source: TM 9-1005-249-23&P, Rifle, 5.56mm, M16 and M16A1 (unit and direct support, incl. RPSTL) — Department of the Army archive.org [12] — “torque barrel nut assembly (8) to 30 ft-lb.” - DD rail torque — DD publishes rail removal/installation torque values on request
Source: Daniel Defense DD4 / DDM4 / DD5 Rifle Manual (2016, Rev 3.1) — Daniel Defense 308ar.com [10] — “Removal/installation instructions and torque specifications are available from Daniel Defense.” - Headspace if the barrel or bolt is changed — Bolt-to-barrel headspace is set by the factory; mixing bolts and barrels needs a gauge check
- Gas key staking and screw torque — If the carrier key is disturbed the screws are torqued and staked
Source: TM 9-1005-249-23&P, Rifle, 5.56mm, M16 and M16A1 (unit and direct support, incl. RPSTL) — Department of the Army archive.org [12] — “torque the carrier and key screws (3) to 35 to” - Function check (safety, hammer reset, disconnector) — The hammer spring orientation and disconnector seating are checked with a function check
- Sight/optic re-zero — The front sight base, rail or optic moves when the barrel/handguard comes off
This is Pew-Takedown's rating, not the manufacturer's. How tiers are rated. Forum reports are owners' experience, not specifications.
Procedures
Clear and Make Safe
Clear & Make Safe- Point the muzzle in a safe direction and keep your finger off the trigger.
- Press the magazine release and remove the magazine.Removed at this step:
Magazine - Pull the charging handle fully to the rear and lock the bolt back with the bolt catch.
- Visually inspect the chamber and magazine well, then physically feel the chamber to confirm it is empty.WarningCheck the magazine well as well as the chamber — a round can hang up there.
- If the hammer is cocked, place the selector on SAFE.
- Remove all live ammunition from the work area.
Field Strip
Field Strip- Complete the Clear and Make Safe procedure and release the bolt forward.
- Push the rear takedown pin from the left side until it stops in its captured position.TipIf tight, tap it with a punch or a case rim rather than levering it.
- Pivot the upper receiver forward on the front pivot pin.
- Push the front pivot pin out to its captured position and separate the upper from the lower receiver.Removed at this step:
Upper receiver assembly - Pull the charging handle partway rearward and withdraw the bolt carrier group.Removed at this step:
Bolt carrier group - Pull the charging handle down and out of its channel.WarningThe charging handle comes out after the carrier, never before.Removed at this step:
Charging handle
Reassembly
Reassembly- Insert the bolt into the carrier with the extractor oriented toward the ejection port side.
- Push the bolt fully into the carrier, drop the cam pin into its hole, and rotate it 90 degrees.WarningIf the cam pin is not rotated, the firing pin will not seat. Never force the firing pin.
- Drop the firing pin into the rear of the carrier, tail first, and let it seat fully.
- Install the firing pin retaining pin. If it will not go in, the cam pin is missing or not rotated.WarningThis is the design’s built-in check. Do not defeat it.
- Insert the charging handle into its channel and push it partway forward.
- Insert the bolt carrier group into the charging handle’s track and slide both fully home.
- Mate the upper to the lower, press the front pivot pin home, close the receivers, and press the rear takedown pin home.
- Charge the rifle and perform the function check.
Diagrams
public domainThese are reproduced from government technical manuals, which are not subject to copyright. Manufacturer manual diagrams are not reproduced here — the entry links to the manual instead.
Torque specifications
| Fastener | Torque | Sequence, notes and the source's words | Where it comes from |
|---|---|---|---|
| Barrel nut (DD RIS II Bolt-Up System barrel nut) Daniel Defense RIS II rail, models M4A1, M4A1 FSP and MK18 (the rail used on DD's M4A1/MK18-configuration rifles) |
55 ft-lb 74.6 N·m · 660 in-lb |
Slide the barrel nut over the barrel and thread onto the upper receiver hand-tight, then torque with the Daniel Defense barrel nut wrench. The Bolt-Up Plate will remain loose. Reinstall low-profile gas block and gas tube. “Tighten the barrel nut to 55 ft/lbs using the Daniel Defense barrel nut wrench.” |
RIS II Rail Interface System II Installation Instructions (RIS II models M4A1, M4A1 FSP, MK18) — Daniel Defense (document re-hosted by ManualShelf; original at danieldefense.com/media/asset/r/i/ris_ii_instructions.pdf, which was blocked from this environment), p. 2 manualshelf.com [3] |
| RIS II rail screws (six, 7/8") through the Bolt-Up Plate Daniel Defense RIS II rail, models M4A1, M4A1 FSP and MK18 |
29–32 in-lb 3.3–3.6 N·m · 2.4–2.7 ft-lb |
Tighten all six screws in the following pattern: the center screws first, the bottom screws next, and the top screws last. Reinstall muzzle device. “Insert the four remaining 7/8" screws from the receiver toward the muzzle through the Bolt-Up Plate into the RIS II, and tighten all six screws to 29-32 in/lbs using the supplied allen wrench in the following pattern: the center screws first, the bottom screws next, and the top screws last.” |
RIS II Rail Interface System II Installation Instructions (RIS II models M4A1, M4A1 FSP, MK18) — Daniel Defense (document re-hosted by ManualShelf), PDF p. 1 (ManualShelf text view) manualshelf.com [4] |
| Integral suppressor baffle (left-hand thread) DDM4 ISR (integrally suppressed barrel) |
20–25 ft-lb 27.1–33.9 N·m · 240–300 in-lb |
Support the barrel extension lugs in an upper receiver bench block in a vise; use a torque-limiting (preferred) 1/2" square-drive wrench and the provided tool; threads are left-handed. Lightly oil the threads before re-installing. 'WARNING: DO NOT OVER TIGHTEN PAST 25 LB-FT. THIS MAY DAMAGE THE SUPPRESSOR ASSEMBLY AND RESULT IN THE PROJECTILE STRIKING THE BAFFLE UPON FIRING.' “Re-install the bafe per the instructions provided in the manual, remembering that the threads are left-handed. Torque the bafe to 20-25 lb-ft.” |
Daniel Defense DDM4 Safety & Maintenance Instructions (German/English) — Daniel Defense (manual re-hosted by ManualShelf), p. ManualShelf page 36 manualshelf.com [5] |
Reported by other sources — not the manufacturer
| Fastener | Torque | Who says so, and their words | Where it comes from |
|---|---|---|---|
| Rail screws (4) through the Bolt-Up Collar DDM4 (e.g. V7 with MFR XL 15.0) — Daniel Defense MFR / MFR XL (M-LOK or KeyMod) and MFR XS rails |
25–28 in-lb 2.8–3.2 N·m · 2.1–2.3 ft-lb |
Reported by Daniel Defense, Inc. Insert all four screws from the receiver toward the muzzle; tighten in an alternating pattern; without a wrench, a quarter to half turn past first resistance. “If you have an inch/pound torque wrench, the torque specification is 25-28 in/lbs.” |
Daniel Defense MFR / MFR XL Rail (M-LOK) — Installation Instructions, Rev 1.0 (served from www.danieldefense.com; the bare danieldefense.com host returns 403) — Daniel Defense, Inc., PDF p. 1, step 5 danieldefense.com [7] |
| Barrel nut (Daniel Defense Bolt-Up System barrel nut, MFR XS) DDM4 / AR-15 upper fitted with a Daniel Defense MFR XS rail |
50 ft-lb 67.8 N·m · 600 in-lb |
Reported by Daniel Defense, Inc. The Bolt-Up Plate remains loose after the nut is torqued. “Tighten the Bolt-Up System Barrel Nut and torque to 50 ft/lbs using the supplied Daniel Defense Bolt-Up System Barrel Nut Wrench.” |
Daniel Defense MFR XS Rail — Installation Instructions (served from www.danieldefense.com) — Daniel Defense, Inc., PDF p. 1, step 2 danieldefense.com [8] |
| Rail screws (4) through the Bolt-Up Plate DDM4 fitted with a Daniel Defense DDM4 Rail or SLiM Rail |
32 in-lb 3.6 N·m · 2.7 ft-lb |
Reported by Daniel Defense, Inc. Tighten all four screws in an alternating pattern; without a wrench, a quarter to half turn past first resistance. “If you have an inch/pound torque wrench, the torque specification is 32 in/lbs.” |
Daniel Defense DDM4 Rail — Installation Instructions, Rev 1.0 (served from www.danieldefense.com) — Daniel Defense, Inc., PDF p. 1, step 4 danieldefense.com [9] |
Function check
- Verify the rifle is unloaded with no magazine inserted before each step.
- Charge the rifle to cock the hammer, place the selector on SAFE, and press the trigger. The hammer must not fall.
- Move the selector to SEMI and press the trigger. The hammer should fall.
- Hold the trigger to the rear, charge the rifle, then release the trigger slowly and listen for the disconnector to release the hammer to the trigger.
- Press the trigger again. The hammer should fall.
- Insert an empty magazine, charge the rifle, and confirm the bolt locks back.
Maintenance
Lubrication points
- Bolt locking lugs and body
- Cam pin and its track
- Outside of the carrier
- Gas rings
- Charging handle rails
Cleaning notes
A direct-impingement AR runs better wet than dry. Carbon on the bolt tail is normal and does not all need removing — focus on the locking lugs, gas rings, chamber, and bore. Do not scrape the bolt tail with steel.
Suggested inspection interval: roughly every 1000 rounds. This is a general guideline, not a manufacturer specification.
Wear parts to inspect
Gas rings · Extractor and its spring insert · Bolt (check the cam pin hole and lugs for cracks) · Buffer spring · Gas key staking
Common issues
| Symptom | Likely cause | What to do |
|---|---|---|
| Firing pin retaining pin will not install | Cam pin missing or not rotated | Install and rotate the cam pin. Never force the retaining pin. |
| Charging handle will not come out | Trying to remove it before the bolt carrier group | Remove the carrier first. |
| Failure to lock back on an empty magazine | Worn gas rings, gas leak, or a fouled gas key | Check gas rings first, then gas block alignment and gas key staking. see a gunsmith |
Similar manual of arms
Legal notes
Sourcing
- Confidence
- high — Cross-checked against a primary source such as the manufacturer's manual or an issuing military technical manual.
- Verification
- Checked against an armorer/technical manual
- Last updated
- 2026-10-29
References
Every source this page draws on, with its web address so you can read it yourself. Numbers in brackets elsewhere on the page point here.
- [1] TM 9-1005-319-10: Rifle, 5.56mm, M16A2/M4 Carbine — U.S. Department of the Army military technical manual primary source
- [2] Daniel Defense DDM4 Owner’s Manual — Daniel Defense manufacturer manual primary source
- [3] RIS II Rail Interface System II Installation Instructions (RIS II models M4A1, M4A1 FSP, MK18) — Daniel Defense (document re-hosted by ManualShelf; original at danieldefense.com/media/asset/r/i/ris_ii_instructions.pdf, which was blocked from this environment) manufacturer manual primary source
https://www.manualshelf.com/manual/daniel-defense/ris-ii-rail/installation-instructions-english/page-2.html (checked 2026-09-27) - [4] RIS II Rail Interface System II Installation Instructions (RIS II models M4A1, M4A1 FSP, MK18) — Daniel Defense (document re-hosted by ManualShelf) manufacturer manual primary source
https://www.manualshelf.com/manual/daniel-defense/ris-ii-rail/installation-instructions-english.html (checked 2026-09-27) - [5] Daniel Defense DDM4 Safety & Maintenance Instructions (German/English) — Daniel Defense (manual re-hosted by ManualShelf) manufacturer manual primary source
https://www.manualshelf.com/manual/daniel-defense/ddm4/safety-maintenance-instructions-german-english/page-36.html (checked 2026-09-27) - [6] Daniel Defense DDM4 / DD5 Safety & Maintenance Instructions (German/English), section 5.1 Stripping for Cleaning (Daniel Defense manual, copy hosted by ManualShelf) — Daniel Defense manufacturer manual primary source
https://www.manualshelf.com/manual/daniel-defense/ddm4/safety-maintenance-instructions-german-english/page-30.html (checked 2026-10-11) - [7] Daniel Defense MFR / MFR XL Rail (M-LOK) — Installation Instructions, Rev 1.0 (served from www.danieldefense.com; the bare danieldefense.com host returns 403) — Daniel Defense, Inc. manufacturer manual secondary source
https://www.danieldefense.com/media/asset/m/f/mfr_mfrxl_rail_m-lok_instructions.pdf (checked 2026-10-11) - [8] Daniel Defense MFR XS Rail — Installation Instructions (served from www.danieldefense.com) — Daniel Defense, Inc. manufacturer manual secondary source
https://www.danieldefense.com/media/asset/m/f/mfr_xs_rail_installation_instructions.pdf (checked 2026-10-11) - [9] Daniel Defense DDM4 Rail — Installation Instructions, Rev 1.0 (served from www.danieldefense.com) — Daniel Defense, Inc. manufacturer manual secondary source
https://www.danieldefense.com/media/asset/d/d/ddm4_rail_instructions.pdf (checked 2026-10-11) - [10] Daniel Defense DD4 / DDM4 / DD5 Rifle Manual (2016, Rev 3.1) — Daniel Defense manufacturer manual primary source
https://308ar.com/wp-content/uploads/2017/03/Daniel-Defense-DD4-DD5-Rifle-Manual.pdf (checked 2026-10-29) - [11] AR Lower Receiver Build: Pivot Pin Installation — Shooting Illustrated (NRA) website secondary source
https://www.shootingillustrated.com/content/ar-lower-receiver-build-pivot-pin-installation/ (checked 2026-10-29) - [12] TM 9-1005-249-23&P, Rifle, 5.56mm, M16 and M16A1 (unit and direct support, incl. RPSTL) — Department of the Army military technical manual primary source
https://archive.org/download/ArmyTechnicalManualforM16Rifle-Tm9-1005-249-23p/Manual-Tm9-1005-249-23p_djvu.txt (checked 2026-10-29) - [13] TFB Armorer's Bench: Complete AR15 Assembly - Lower Receiver — The Firearm Blog website secondary source
https://www.thefirearmblog.com/blog/2022/07/31/tfb-armorers-bench-complete-ar15-assembly-lower-receiver/ (checked 2026-10-29)
Notes: Illustrated on 2026-09-14 with M16 figures from TM 9-1005-249-23&P (public domain, US Government work). Same pattern, same parts arrangement. Field strip and bolt carrier group disassembly follow the standard AR-15 pattern. Daniel Defense rifles use a proprietary free-float rail attached to a barrel nut; the rail does not need removal for routine maintenance and should be left alone unless you have the correct tools and torque specification.