← All firearms · Printable work order
Mossberg 590A1
- easy
- Shop tier 1
- high confidence
- Shotgun
- pump action
- tube magazine
- tang safety
- duty
- heavy barrel
field strip ~3 min · reassembly ~5 min · detail strip ~25 min
Specifications
- Manufacturer
- O.F. Mossberg & Sons
- Origin
- United States
- Category
- Shotgun
- Action
- Pump action
- Calibers
- 12 gauge
- Capacity
- 8+1 in the standard configuration
- Production
- 1987–present (in-production)
- Also known as
- 590A1 Mil-Spec
Model-specific safety
- Unloading a tube magazine takes several cycles. The manual specifies checking three places before disassembly: the chamber, the elevator, and the magazine tube.
- Wear eye protection during disassembly and cleaning — the manual calls for it specifically.
- Do not pull the trigger and allow the hammer to fall while the trigger housing assembly is out of the receiver. The manual warns this can injure you and damage the assembly.
- The trigger housing assembly must not be disassembled. The manual restricts that to an authorised Product Service Center or a qualified gunsmith.
- The 590 and 835 magazine spring retainer and spring are under significant spring pressure when the magazine cap comes off.
- The 590A1 uses a magazine cap at the muzzle end of the tube rather than the 500's takedown screw.
Under spring tension
- Magazine tube spring and follower
- Hammer spring in the trigger housing
Easily lost parts
Trigger housing pin · Magazine cap · Cartridge stops · Bolt slide
Tools
| Tool | Required | Used for | Substitute |
|---|---|---|---|
| Punch (roughly 1/8 in) | Optional | Pushing out the trigger housing pin if tight. |
Shop difficulty
Shop tier 1 Tier 1 — easy among shotguns, for the full job: strip to the parts that get coated and put it back together working. Same 500-family action: about 51 listed items (groups listed as assemblies), slip-fit parts and one push pin; traps are the bolt-slide/action-bar alignment, the hammer-cocked/safety-on order and the 590's heavily loaded magazine spring retainer. Heavier barrel and metal trigger guard do not add steps.
Parts: 51 numbered parts (Generic parts list for the 500/505/510/535/590/835 pump family (names the 590 only in row 34, magazine cap); not 590A1-specific; trigger housing and bolt listed as assemblies), from Owner's Manual for 500, 505, 510, 535, 590 and 835 Pump Action Shotguns — O.F. Mossberg & Sons, Inc., p. 34 resources.mossberg.com [1].
Bench time: about 35 min to strip, 50 min to rebuild (estimate). As Model 500 plus the heavy 590 magazine spring/retainer and metal trigger guard; rebuild longer for bolt-slide/action-bar alignment.
Small parts: 1 pins, 2 springs, 0 detents or plungers (counted from the manufacturer's parts list (one per key number unless a quantity is given))
What comes off for coating
- Barrel and magazine: barrel (takedown screw or magazine cap), magazine spring retainer, spring and follower, magazine tube from receiver (optional) — strap wrench, padded vise
- Forend / action slide: action slide tube nut, forend, anti-rattle spring — tube nut tool
- Receiver: trigger housing pin and trigger housing, elevator, cartridge stop and interrupter, bolt and bolt slide, ejector and ejector screw, safety button screw, safety button, detent plate, detent ball and spring
- Bolt: bolt lock pin and bolt lock, extractor pins, extractors and springs, firing pin retaining pin, firing pin, washer and spring
- Trigger housing: hammer, trigger, sear and disconnector group on their pins (only if the housing itself is being coated; Mossberg advises
- Stock / grip: recoil pad screws and pad, stock bolt, lock washer and washer — long 1/2 in. or 13 mm socket on extension
Special tools
- Tube nut tool — Forend action slide tube nut
- Strap wrench and padded vise — Magazine tube off the receiver
- Long socket extension — Stock bolt deep in the buttstock
- Roll/pin punches 1/16-1/8 in. — Bolt extractor and firing pin pins
Known pain points
- The bolt, bolt slide and both action slide bars have to go back in the same relationship they came out; a bar out of its cut or a bolt slide offered at the wrong point of forend travel will not drop in or binds the action. (reassembly)
Source: Owner's Manual for 500, 505, 510, 535, 590 and 835 Pump Action Shotguns — O.F. Mossberg & Sons, Inc. resources.mossberg.com [1] — “Pay special attention to the position of the bolt, bolt slide and action slide bar assembly during this portion of the disassembly, as the parts must be in the same relationship during reassembly.” - On 590-pattern guns the magazine spring retainer and spring are under significant pressure when the cap comes off or goes back on. (both)
Source: Owner's Manual for 500, 505, 510, 535, 590 and 835 Pump Action Shotguns — O.F. Mossberg & Sons, Inc. resources.mossberg.com [1] — “Model magazine spring retainers and springs are under significant spring pressure. Use caution to prevent injury” - Owners report the shell stop and interrupter get jammed in wrong and the action bars mis-seated when the gun is forced together; it only runs once everything lines up. (reassembly)
Owners report: Seeking help from someone who owns a Mossberg 500 in the Bay Area — Calguns.net calguns.net [6] — “mossbergs are great but they can be harder to put back together. it sounds like the action bars are not in the right spot. also i will bet the shell stop and interrupter are jammed in wrong.” - The hammer must be at full cock to get the trigger housing back in, and the safety must be on to reinstall the bolt; neither is obvious and forcing it damages parts. (reassembly)
Source: The Mossberg Model 500: History & Disassembly — American Rifleman (NRA) americanrifleman.org [7] — “Be aware that the hammer must be in the full-cock position for reinsertion of the trigger assembly and that the safety must be in the “on” position to re-install the bolt assembly.” - The action slide tube nut that holds the forend on is removed and refitted with a dedicated tube nut tool. (both)
Source: TM 9-1005-338-13&P: Technical Manual, Unit and Direct Support Maintenance (including Repair Parts and Special Tools List) for Mossberg 12-Gauge Shotgun, Model 500 (1005-01-295-1832) and Mossberg 12-Gauge Shotgun, Model 590 (1005-01-251-8578) — Headquarters, Department of the Army archive.org [3] — “Using tube nut tool, remove slide tube nut (1) from action slide assembly (2).”
Fit or check on rebuild
- Magazine tube torqued and aligned to the barrel lug — Tube carries the barrel; it is refitted hand-tight-plus with a strap wrench and must line up with the takedown screw or cap.
Source: TM 9-1005-338-13&P: Technical Manual, Unit and Direct Support Maintenance (including Repair Parts and Special Tools List) for Mossberg 12-Gauge Shotgun, Model 500 (1005-01-295-1832) and Mossberg 12-Gauge Shotgun, Model 590 (1005-01-251-8578) — Headquarters, Department of the Army archive.org [3] — “Place strap style pipe wrench around magazine tube assembly (2) and turn to the left (counterclockwise),” - Safety detent feel — The tang safety's ball and spring under the detent plate set the click; a missing ball gives a loose safety.
- Function check: safety, trigger/sear release, disconnector and feeding with dummy rounds — Standard after any detail strip; a mis-assembled sear or disconnector can double or fail to fire.
This is Pew-Takedown's rating, not the manufacturer's. How tiers are rated. Forum reports are owners' experience, not specifications.
Manufacturer videos
Official videos from O.F. Mossberg & Sons's own channels, linked rather than copied. Where a video and the steps on this page differ, follow the manufacturer's manual and video.
- Loading and Unloading - Mossberg 500 / 590 Series Shotguns MOSSBERG
clearing, operation · 2020-05-12
Covers: Mossberg 500 / 590 series pump-action shotguns (per title and description) - How Mossberg 500/590 Pump-Action Shotguns Work MOSSBERG
operation · 2024-06-18
Covers: Mossberg 500 and 590 pump-action shotguns (per description) - Gun Part Nomenclature - Mossberg 500 / 590 Series Shotguns MOSSBERG
operation · 2020-05-12
Covers: Mossberg 500 / 590 series pump-action shotguns (per title and description)
Procedures
Clear and Make Safe
Clear & Make SafeManufacturer’s video: Loading and Unloading - Mossberg 500 / 590 Series Shotguns MOSSBERG
- Point the muzzle in a safe direction and keep your finger off the trigger.
- Push the tang safety rearward to the safe position.
- Press the action lock lever on the left side behind the trigger guard and pull the forend rearward to open the action.Removed at this step:
Chambered shell, if present - Cycle the action repeatedly, catching each shell as it ejects, until no more shells feed from the magazine tube.
- With the action open, inspect the chamber and look up the magazine tube with a light.WarningThe chamber AND the tube. A shell hung up in the tube is easy to miss.
- Physically confirm the chamber is empty and remove all live ammunition from the work area.
Field Strip
Field Strip tools required- Complete the Clear and Make Safe procedure and put on eye protection.
- Depress the action lock lever and open the action by sliding the forearm fully rearward.
- Move the forearm slowly forward until the front of the bolt sits in the middle of the ejection port.WarningDo not skip this. The barrel will not come out cleanly unless the bolt is positioned here first.
- Unscrew the magazine cap counterclockwise from the muzzle end of the magazine tube.WarningThe magazine spring retainer and spring are under significant spring pressure.Removed at this step:
Magazine cap - Remove the barrel from the receiver with a gentle back-and-forth rotational movement while pulling it out.TipRotate as you pull. Pulling straight out is the common mistake.Removed at this step:
Barrel - Position the shotgun with the trigger guard upward.
- Using a punch no greater than 3/16 in (4.76 mm) in diameter, push out the trigger housing retainer pin from the side of the receiver, roughly 1/2 in (12.7 mm) below the rear of the trigger guard.Removed at this step:
Trigger housing retainer pin - Remove the trigger housing assembly by lifting the rear portion upward first.WarningOnce it is out, do not pull the trigger and let the hammer fall.Removed at this step:
Trigger housing assembly - Stop here for routine cleaning. The trigger housing assembly itself must not be disassembled.
Remove the interrupter, cartridge stop, bolt slide, bolt and elevator
Detail StripContinues the Army field strip past the trigger housing: the cartridge interrupter and cartridge stop come out of the receiver walls, then the bolt slide, fore end, bolt and elevator. Operator level in TM 9-1005-338-13&P (WP 0014 00), which ends 'Further disassembly of components is not authorized.'
Follows TM 9-1005-338-13&P: Technical Manual, Unit and Direct Support Maintenance (including Repair Parts and Special Tools List) for Mossberg 12-Gauge Shotgun, Model 500 (1005-01-295-1832) and Mossberg 12-Gauge Shotgun, Model 590 (1005-01-251-8578) — Headquarters, Department of the Army, p. WP 0014 00, pp. 0014 00-2 to 0014 00-3 archive.org [3]
- With the barrel and trigger mechanism removed, take the cartridge interrupter out of the ejection-port side of the receiver.WarningDo not allow the hammer to fall when removing the trigger group from the receiver. Personal injury or damage to the trigger assembly may result.Removed at this step:
Cartridge interrupter - Remove the cartridge stop from the opposite side of the receiver.Removed at this step:
Cartridge stop - Note the position of the bolt, bolt slide and action bar assembly.TipThese parts must be in the same relationship during assembly.
- Move the forearm and action slide assembly rearward until the bolt and bolt slide are three quarters of the way rearward.
- When the bottom of the bolt slide lines up with the clearance cuts in the side of the receiver, lift the bolt slide up and out of the receiver.Removed at this step:
Bolt slide - Remove the fore end assembly from the magazine tube.Removed at this step:
Fore end assembly (with action bars) - Push the bolt out of the front of the receiver.Removed at this step:
Bolt - Compress the elevator and remove it from the receiver.Removed at this step:
Elevator
Disassemble the fore end assembly
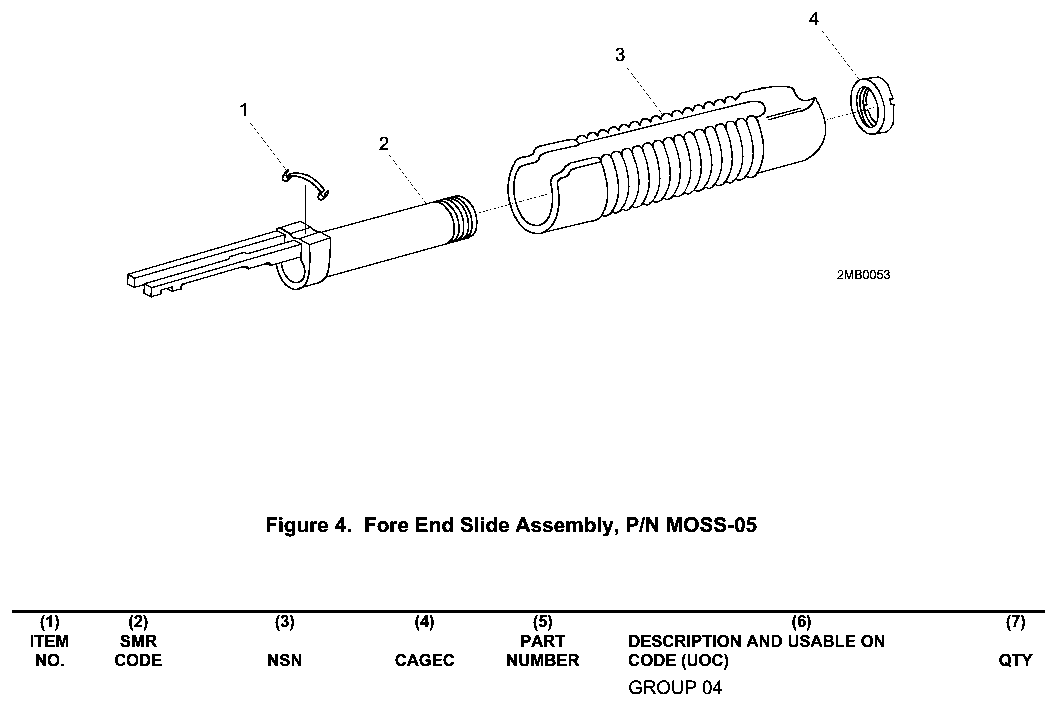
Detail Strip tools required gunsmith recommendedRemoves the slide tube nut with the fabricated tube nut tool, then slides the slide grip and anti-rattle spring off the action slide assembly (WP 0023 00). The manual puts this in Chapter 3, Unit Maintenance, with the small arms repairman tool kit; the Maintenance Allocation Chart (WP 0034 00) lists Repair of this group at direct support (F).
Follows TM 9-1005-338-13&P: Technical Manual, Unit and Direct Support Maintenance (including Repair Parts and Special Tools List) for Mossberg 12-Gauge Shotgun, Model 500 (1005-01-295-1832) and Mossberg 12-Gauge Shotgun, Model 590 (1005-01-251-8578) — Headquarters, Department of the Army, p. WP 0023 00, p. 0023 00-1 archive.org [3]
- Remove the barrel and take the fore end assembly off the receiver (operator field strip, WP 0014 00).
- Unscrew the slide tube nut from the action slide assembly with the tube nut tool.TipThe tube nut tool is a manufactured item; WP 0030 00, Figure 1 gives its dimensions (1080 bar stock).Removed at this step:
Slide tube nut - Remove the slide grip and the anti-rattle spring from the action slide assembly.WarningTo avoid injury to your eyes, use care when removing and installing spring-loaded parts.Removed at this step:
Shotgun slide gripAnti-rattle spring
Strip the barrel assembly (heat shield, front sight, sling swivel)
Detail Strip tools required gunsmith recommendedRemoves the parts attached to the barrel: the Model 590's heat shield, the front sight, the Model 500's retaining ring and machine screw, and (only if damaged) the sling swivel (WP 0024 00). The manual puts this in Chapter 3, Unit Maintenance, with the small arms repairman tool kit; the Maintenance Allocation Chart (WP 0034 00) lists Repair of this group at direct support (F). A bent barrel goes to direct support.
Follows TM 9-1005-338-13&P: Technical Manual, Unit and Direct Support Maintenance (including Repair Parts and Special Tools List) for Mossberg 12-Gauge Shotgun, Model 500 (1005-01-295-1832) and Mossberg 12-Gauge Shotgun, Model 590 (1005-01-251-8578) — Headquarters, Department of the Army, p. WP 0024 00, p. 0024 00-1 archive.org [3]
- Field strip the shotgun and remove the barrel (WP 0014 00).
- On the Model 590, remove the two self-locking nuts, the two screws, the heat shield spacer and the heat shield from the barrel.TipDiscard the self-locking nuts; new ones are used on assembly.Removed at this step:
Self-locking nuts (2)Screws (2)Heat shield spacerHeat shield - Remove the front sight from the barrel.Removed at this step:
Front sight - On the Model 500, remove the retaining ring and the machine screw from the barrel.Removed at this step:
Retaining ringMachine screw - Remove the sling swivel only if it is damaged. On an old-style swivel, remove the screw, the swivel and the sleeve bushing.Removed at this step:
ScrewSwivelSleeve bushing - On a new-style swivel, turn the locking knob fully counterclockwise.TipRemoval of the old and new swivel is the same for both models.
- Push in on the locking knob to release the swivel-locking bar and remove the sling swivel from the swivel post.Removed at this step:
Sling swivel - Turn the swivel post counterclockwise to remove it.Removed at this step:
Swivel post
Remove the buttstock and recoil pad
Detail Strip tools required gunsmith recommendedTakes off the recoil pad, then removes the stock bolt (machine screw) with its washer and lock-washer to separate the stock (military shoulder stock P/N 14762MIL) from the receiver; the sling swivel comes off only if damaged (WP 0025 00). The manual puts this in Chapter 3, Unit Maintenance, with the small arms repairman tool kit; the Maintenance Allocation Chart (WP 0034 00) lists Repair of this group at direct support (F).
Follows TM 9-1005-338-13&P: Technical Manual, Unit and Direct Support Maintenance (including Repair Parts and Special Tools List) for Mossberg 12-Gauge Shotgun, Model 500 (1005-01-295-1832) and Mossberg 12-Gauge Shotgun, Model 590 (1005-01-251-8578) — Headquarters, Department of the Army, p. WP 0025 00, p. 0025 00-1 archive.org [3]
- Remove the two machine screws and the recoil pad from the stock.Removed at this step:
Machine screws (2)Recoil pad - Remove the machine screw, washer and lock-washer from inside the stock.TipDiscard the lock-washer; a new one (P/N 7615P) is used on assembly.Removed at this step:
Machine screw (stock bolt)WasherLock-washer - Separate the stock from the receiver.Removed at this step:
Stock - Remove the sling swivel only if it is damaged. On an old-style swivel, remove the screw and the swivel, and on the Model 500 also the sleeve bushing and swivel washer.Removed at this step:
ScrewSwivelSleeve bushingSwivel washer - On a new-style swivel, turn the locking knob fully counterclockwise, push it in to release the swivel-locking bar, and remove the sling swivel from the swivel post.Removed at this step:
Sling swivel - Turn the swivel post counterclockwise to remove it.Removed at this step:
Swivel post
Remove the pistol grip assembly
Detail Strip tools required gunsmith recommendedRemoves the hex screw, washer and lock-washer holding the pistol grip assembly to the receiver, and the swivel post (WP 0026 00). The pistol grip is an Additional Authorization List item that replaces the shoulder stock; remove the stock first per WP 0025 00. The manual puts this in Chapter 3, Unit Maintenance, with the small arms repairman tool kit; the Maintenance Allocation Chart (WP 0034 00) lists Repair of this group at direct support (F).
Applies to: Military pistol grip assembly P/N 7995P (AAL item)
Follows TM 9-1005-338-13&P: Technical Manual, Unit and Direct Support Maintenance (including Repair Parts and Special Tools List) for Mossberg 12-Gauge Shotgun, Model 500 (1005-01-295-1832) and Mossberg 12-Gauge Shotgun, Model 590 (1005-01-251-8578) — Headquarters, Department of the Army, p. WP 0026 00, p. 0026 00-1 archive.org [3]
- Field strip the shotgun (WP 0014 00).
- Remove the hex screw, washer and lock-washer from the pistol grip.TipDiscard the lock-washer; a new one (P/N 7613P) is used on assembly.Removed at this step:
Hex screwWasherLock-washerPistol grip - Remove the swivel post.Removed at this step:
Swivel post
Remove the magazine spring, follower and magazine tube
Detail Strip tools required gunsmith recommendedOn the Model 590, takes the magazine catch retainer, spring and follower out of the tube, and unscrews the tube from the receiver only if it must be replaced. On the Model 500 the tube is unscrewed from the receiver with a strap wrench first, then the follower and spring come out. Direct support maintenance (Chapter 4, WP 0028 00; MAC Repair at F).
Follows TM 9-1005-338-13&P: Technical Manual, Unit and Direct Support Maintenance (including Repair Parts and Special Tools List) for Mossberg 12-Gauge Shotgun, Model 500 (1005-01-295-1832) and Mossberg 12-Gauge Shotgun, Model 590 (1005-01-251-8578) — Headquarters, Department of the Army, p. WP 0028 00, pp. 0028 00-1 to 0028 00-2 archive.org [3]
- Remove the barrel assembly and the fore end assembly (WP 0014 00).
- Model 590: remove the magazine catch retainer, the magazine spring and the cartridge follower from the magazine tube.WarningTo avoid injury to your eyes, use care when removing and installing spring-loaded parts.Removed at this step:
Magazine catch retainerMagazine springCartridge follower - Wrap a wiping rag around the receiver and clamp it in a bench vise with jaw caps, closing the vise just enough to hold it.TipOn the Model 590 do this and the next two steps only if the magazine tube must be replaced. On the Model 500 they come first, because the follower and spring come out after the tube is off.
- Place a strap-style pipe wrench around the magazine tube and turn it to the left (counterclockwise) to loosen it.
- Remove the magazine tube from the receiver.Removed at this step:
Magazine tube assembly - Model 500: remove the cartridge follower and the magazine spring from the magazine tube.WarningTo avoid injury to your eyes, use care when removing and installing spring-loaded parts.Removed at this step:
Cartridge followerMagazine spring
Disassemble the bolt assembly
Detail Strip tools required gunsmith recommendedDrives out the bolt lock pin to free the bolt lock, removes both extractors with their pins and springs, then the firing pin retaining pin, firing pin, washer and spring. Direct support maintenance (Chapter 4, WP 0029 00; the MAC lists Replace of the bolt assembly at F), with the small arms repairman tool kit and the basic small arms shop set.
Follows TM 9-1005-338-13&P: Technical Manual, Unit and Direct Support Maintenance (including Repair Parts and Special Tools List) for Mossberg 12-Gauge Shotgun, Model 500 (1005-01-295-1832) and Mossberg 12-Gauge Shotgun, Model 590 (1005-01-251-8578) — Headquarters, Department of the Army, p. WP 0029 00, p. 0029 00-1 archive.org [3]
- Field strip the shotgun and remove the bolt (WP 0014 00).
- Remove the grooved headless pin and the bolt lock from the bolt.Removed at this step:
Grooved headless pin (bolt lock pin)Bolt lock - Remove the two cartridge extractor pins, the left-hand and right-hand cartridge extractors, and the two extractor springs from the bolt.WarningTo avoid injury to your eyes, use care when removing and installing spring-loaded parts.Removed at this step:
Cartridge extractor pins (2)Left-hand cartridge extractorRight-hand cartridge extractorCartridge extractor springs (2) - Remove the firing pin retaining pin, the firing pin, the flat washer and the spring from the bolt.TipWP 0029 00 calls this spring the 'follower spring'; the parts list (WP 0040 00, item 9) names it SPRING, FIRING PIN.Removed at this step:
Firing pin retaining pinFiring pinFlat washerFiring pin spring
Install the elevator, bolt, bolt slide, interrupter and cartridge stop
Detail ReassemblyThe Army's assembly sequence for the receiver internals, ending with the trigger mechanism and its pin (WP 0014 00). Operator level.
Follows TM 9-1005-338-13&P: Technical Manual, Unit and Direct Support Maintenance (including Repair Parts and Special Tools List) for Mossberg 12-Gauge Shotgun, Model 500 (1005-01-295-1832) and Mossberg 12-Gauge Shotgun, Model 590 (1005-01-251-8578) — Headquarters, Department of the Army, p. WP 0014 00, p. 0014 00-3 archive.org [3]
- Make sure the safety is on SAFE (fully to the rear).
- Insert the compressed elevator into the receiver.
- Depress the ejector and insert the bolt into the receiver.
- Push the sides of the elevator down beside the bolt and slide the bolt back.
- Install the fore end assembly over the magazine tube, inserting the action bars into the slots in the front of the receiver on either side of the magazine tube.TipHaving the fore end about three quarters of the way forward eases installation of the bolt slide.
- Insert the bolt slide, lowering the front end and inserting the rear end first so its lug fits the slot in the bolt lock and is retained by the action bar.
- Push the bolt slide down and move the action slide to the rear until it engages.
- Move the bolt, bolt slide and action forward.
- Insert the cartridge interrupter and the cartridge stop.
- Make sure the hammer is fully cocked.TipThe hammer must be fully cocked for the trigger housing to go into the receiver.
- Hold the cartridge stop and cartridge interrupter firmly against the receiver walls with one hand and grasp the trigger mechanism with the other.
- Insert the lugs on each side of the front cover of the trigger mechanism into the slots on each side of the receiver.
- Ease the rear of the trigger mechanism down into position without forcing it.TipIf it does not fit easily, check that all internal pins in the trigger mechanism are flush with the side of the housing and that the cartridge stop and interrupter are positioned correctly.
- Align the pin holes and insert the trigger housing retainer pin until it is flush on both sides.
Reassemble the fore end assembly
Detail Reassembly tools required gunsmith recommendedSlides the slide grip back onto the action slide assembly, fits the anti-rattle spring and tightens the slide tube nut with the tube nut tool (WP 0023 00). The manual puts this in Chapter 3, Unit Maintenance, with the small arms repairman tool kit; the Maintenance Allocation Chart (WP 0034 00) lists Repair of this group at direct support (F).
Follows TM 9-1005-338-13&P: Technical Manual, Unit and Direct Support Maintenance (including Repair Parts and Special Tools List) for Mossberg 12-Gauge Shotgun, Model 500 (1005-01-295-1832) and Mossberg 12-Gauge Shotgun, Model 590 (1005-01-251-8578) — Headquarters, Department of the Army, p. WP 0023 00, p. 0023 00-1 archive.org [3]
- Slide the slide grip onto the action slide assembly.WarningTo avoid injury to your eyes, use care when removing and installing spring-loaded parts.
- Install the anti-rattle spring.
- Screw the slide tube nut onto the action slide assembly and tighten it with the tube nut tool.
Reassemble the barrel assembly
Detail Reassembly tools required gunsmith recommendedInstalls a new-style sling swivel, the front sight, the Model 590 heat shield with new self-locking nuts, and the Model 500 retaining ring and machine screw (WP 0024 00). The manual puts this in Chapter 3, Unit Maintenance, with the small arms repairman tool kit; the Maintenance Allocation Chart (WP 0034 00) lists Repair of this group at direct support (F).
Follows TM 9-1005-338-13&P: Technical Manual, Unit and Direct Support Maintenance (including Repair Parts and Special Tools List) for Mossberg 12-Gauge Shotgun, Model 500 (1005-01-295-1832) and Mossberg 12-Gauge Shotgun, Model 590 (1005-01-251-8578) — Headquarters, Department of the Army, p. WP 0024 00, p. 0024 00-4 archive.org [3]
- Install the swivel post by turning it clockwise.TipIf an old-style swivel was removed, replace it with the new-style swivel.
- Turn the locking knob fully counterclockwise.
- Push in on the locking knob to release the swivel-locking bar and insert the bar through the swivel post.
- Tighten the locking knob by turning it fully clockwise.
- Install the front sight on the barrel.
- On the Model 590, install the heat shield, the heat shield spacer, the two screws and two new self-locking nuts on the barrel.
- On the Model 500, install the retaining ring and the machine screw on the barrel.
Install the buttstock and recoil pad
Detail Reassembly tools required gunsmith recommendedRefits the sling swivel, then bolts the stock to the receiver with the machine screw, washer and a new lock-washer, and refits the recoil pad (WP 0025 00). The manual puts this in Chapter 3, Unit Maintenance, with the small arms repairman tool kit; the Maintenance Allocation Chart (WP 0034 00) lists Repair of this group at direct support (F).
Follows TM 9-1005-338-13&P: Technical Manual, Unit and Direct Support Maintenance (including Repair Parts and Special Tools List) for Mossberg 12-Gauge Shotgun, Model 500 (1005-01-295-1832) and Mossberg 12-Gauge Shotgun, Model 590 (1005-01-251-8578) — Headquarters, Department of the Army, p. WP 0025 00, p. 0025 00-4 archive.org [3]
- Install the swivel post by turning it clockwise.TipIf an old-style swivel was removed, replace it with the new-style swivel.
- Turn the locking knob fully counterclockwise, push it in to release the swivel-locking bar, and insert the bar through the swivel post.
- Tighten the locking knob by turning it fully clockwise.
- Align the stock with the receiver assembly.
- Place the washer and a new lock-washer on the shaft of the machine screw.
- Insert the machine screw into the end of the stock and tighten it into the receiver.
- Align the recoil pad with the end of the stock and secure it with the two machine screws.
Install the pistol grip assembly
Detail Reassembly tools required gunsmith recommendedBolts the pistol grip to the receiver with a new lock-washer, hand tight only, and refits the swivel post (WP 0026 00). The manual puts this in Chapter 3, Unit Maintenance, with the small arms repairman tool kit; the Maintenance Allocation Chart (WP 0034 00) lists Repair of this group at direct support (F).
Applies to: Military pistol grip assembly P/N 7995P (AAL item)
Follows TM 9-1005-338-13&P: Technical Manual, Unit and Direct Support Maintenance (including Repair Parts and Special Tools List) for Mossberg 12-Gauge Shotgun, Model 500 (1005-01-295-1832) and Mossberg 12-Gauge Shotgun, Model 590 (1005-01-251-8578) — Headquarters, Department of the Army, p. WP 0026 00, p. 0026 00-2 archive.org [3]
- Align the pistol grip to the receiver.
- Place a new lock-washer and the washer on the hex screw and insert it into the pistol grip.
- Tighten the hex screw hand tight only.
- Install the swivel post.
Install the magazine tube, spring and follower
Detail Reassembly tools required gunsmith recommendedModel 500: spring and follower go into the tube, then the tube is screwed into the receiver with a strap wrench. Model 590: a replaced tube is screwed in first, then the follower, spring and magazine catch retainer go in. Direct support maintenance (Chapter 4, WP 0028 00).
Follows TM 9-1005-338-13&P: Technical Manual, Unit and Direct Support Maintenance (including Repair Parts and Special Tools List) for Mossberg 12-Gauge Shotgun, Model 500 (1005-01-295-1832) and Mossberg 12-Gauge Shotgun, Model 590 (1005-01-251-8578) — Headquarters, Department of the Army, p. WP 0028 00, pp. 0028 00-3 to 0028 00-4 archive.org [3]
- Model 500: insert the magazine spring and the cartridge follower into the magazine tube.WarningTo avoid injury to your eyes, use care when removing and installing spring-loaded parts.
- Wrap a wiping rag around the receiver and clamp it in a bench vise with jaw caps, closing the vise just enough to hold it.TipOn the Model 590, do this and the next step only if the magazine tube was replaced.
- Place a strap-style pipe wrench around the magazine tube and turn it to the right (clockwise) to tighten it.
- Model 590: insert the cartridge follower, the magazine spring and the magazine catch retainer into the magazine tube.WarningTo avoid injury to your eyes, use care when removing and installing spring-loaded parts.
- Assemble the weapon (WP 0014 00) and perform a function check.TipWP 0028 00 ends with: after any work, check the shotgun for proper functioning before firing live ammunition.
Reassemble the bolt assembly
Detail Reassembly tools required gunsmith recommendedReverses the bolt disassembly: firing pin group first, then the extractors, then the bolt lock and its pin. Direct support maintenance (WP 0029 00).
Follows TM 9-1005-338-13&P: Technical Manual, Unit and Direct Support Maintenance (including Repair Parts and Special Tools List) for Mossberg 12-Gauge Shotgun, Model 500 (1005-01-295-1832) and Mossberg 12-Gauge Shotgun, Model 590 (1005-01-251-8578) — Headquarters, Department of the Army, p. WP 0029 00, p. 0029 00-2 archive.org [3]
- Install the firing pin spring, the flat washer, the firing pin and the firing pin retaining pin in the bolt.
- Install the two cartridge extractor springs, the right-hand and left-hand cartridge extractors, and the two cartridge extractor pins in the bolt.WarningTo avoid injury to your eyes, use care when removing and installing spring-loaded parts.
- Install the bolt lock and the grooved headless pin in the bolt.
Reassembly
Reassembly- Confirm the safety is fully rearward in the ON position and place the receiver with the trigger housing opening upward.
- Slide the forearm assembly onto the magazine tube, guiding both action slide bars into the corresponding cuts in the front of the receiver.WarningBoth bars must enter their cuts. One out of its track will bind the action.
- Insert the rear of the bolt assembly into the barrel opening with its bolt lock downward, depressing the ejector so the bolt can slide fully rearward.WarningThe ejector must fit into the corresponding slot in the bolt.
- Fit the bolt slide, slotted side up and notch to the rear, lowering its front first so its protrusions engage the bolt lock cut and both action slide bar slots.
- Cock the hammer, then set the trigger housing assembly into the receiver and insert its retainer pin.WarningThe hammer must be fully cocked or the trigger housing will not seat. Do not force it.
- Set the barrel into the receiver with a gentle rotational movement, seating the extension fully with the barrel ring over the magazine tube.
- Install and hand-tighten the magazine cap firmly.WarningA loose barrel retainer lets the barrel move under recoil. Check it before every use.
- Perform the function check.
Diagrams
public domainThese are reproduced from government technical manuals, which are not subject to copyright. Manufacturer manual diagrams are not reproduced here — the entry links to the manual instead.
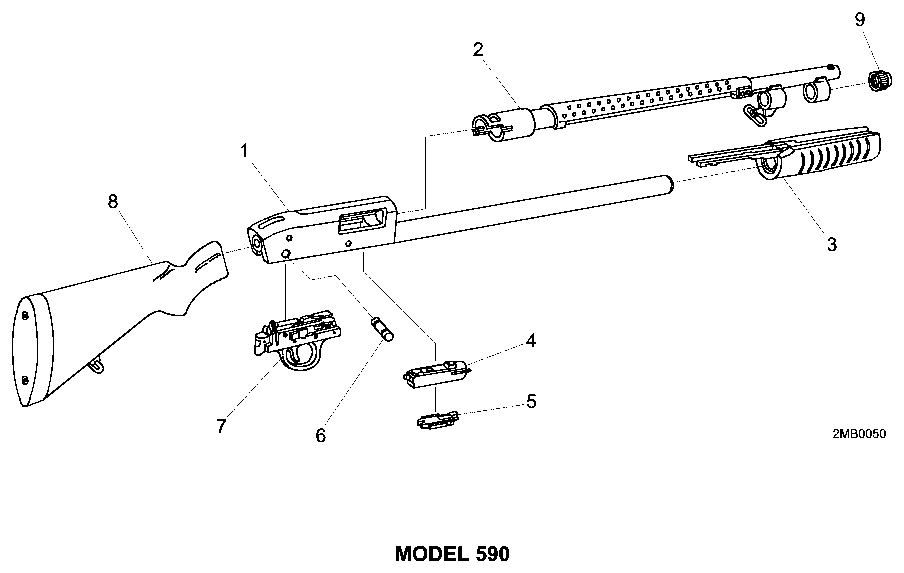
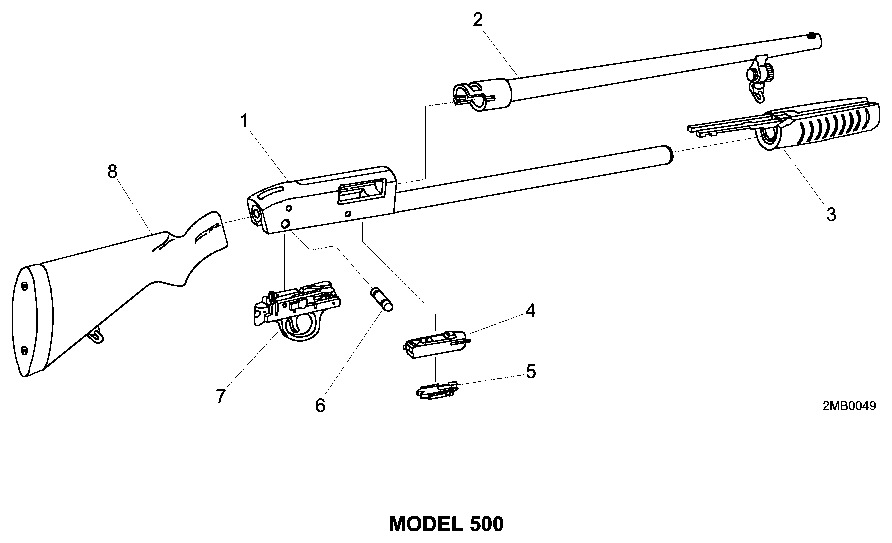
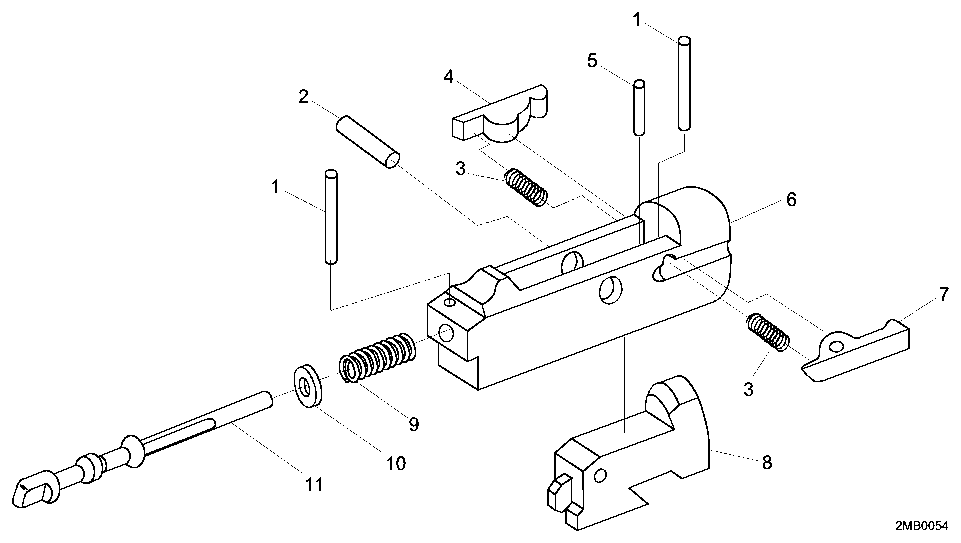
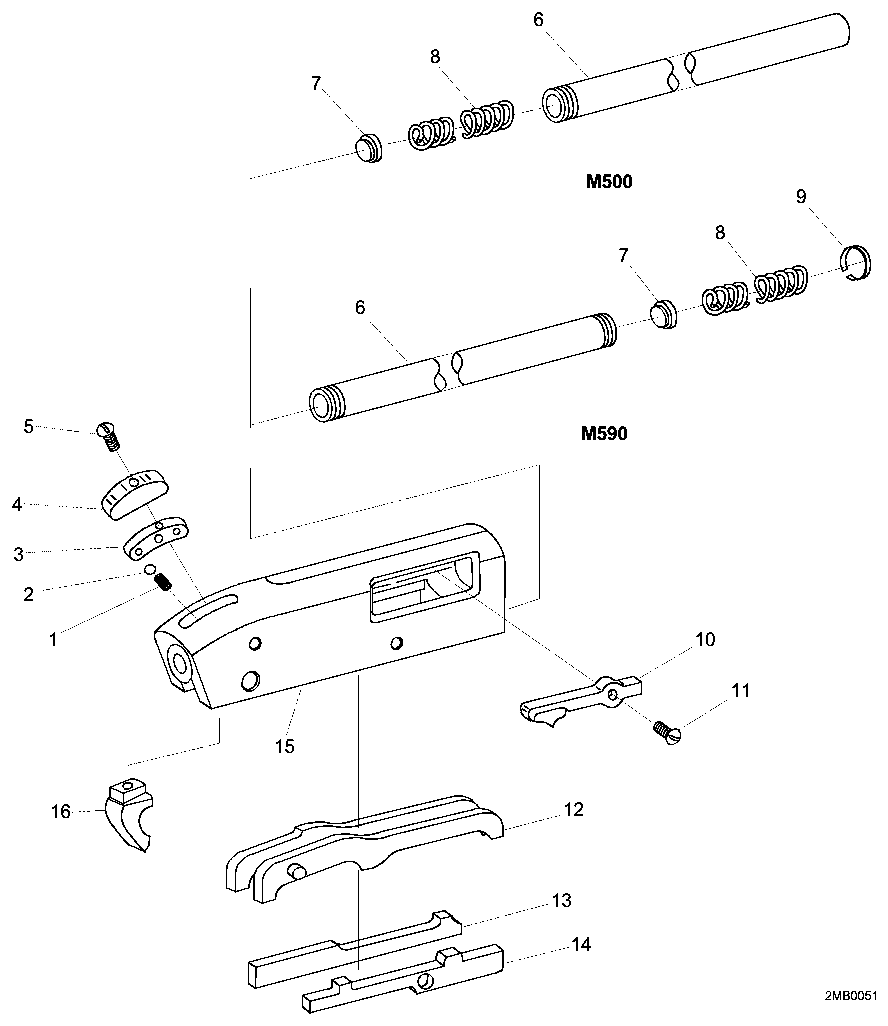
Torque specifications
No sourced torque values from the manufacturer are recorded for this firearm. Where a fastener has a specified torque — action screws, scope bases, muzzle devices, barrel nuts — get it from the manufacturer or a gunsmith rather than estimating it.
What the manufacturer does say: The manufacturer's documents give no torque value. They say: "Using hex wrench supplied, tighten bolt snugly." (Owner's Manual for 500, 505, 510, 535, 590 and 835 Pump Action Shotguns, PDF p. 21) "tighten the clamp screws to securely hold the heat shield in place. DO NOT OVERTIGHTEN THE SCREWS." (Owner's Manual for 500, 505, 510, 535, 590 and 835 Pump Action Shotguns, PDF p. 28)
Reported by other sources — not the manufacturer
| Fastener | Torque | Who says so, and their words | Where it comes from |
|---|---|---|---|
| Stock adaptor bolt (into rear of receiver) Mossberg 590 with Midwest Industries MI-SG-590 stock (replaces factory stock bolt) |
50 in-lb 5.6 N·m · 4.2 ft-lb |
Reported by Midwest Industries, Inc. Remove recoil pad and factory stock bolt; install grip adaptor into back of receiver (50 in-lb, Vibra-Tite); for Mossberg 590 attach grip with the 6 provided 8-32 flat heads (10 in-lb); fasten stock with four 10-24 flat heads (10 in-lb). Threadlocker: "Use the provided Vibra-tite on this bolt ONLY." “Install grip adaptor into back of the receiver. Use the provided Allen wrench and torque to 50inch lbs.” |
Mossberg 590 / Remington 970 Stock - MI-SG-590 / MI-SG-870 installation instructions — Midwest Industries, Inc., PDF p. 1 midwestindustriesinc.com [2] |
| Sling mount clamp screw (through sling mount halves, on extended magazine tube) Magpul Forward Sling Mount – Mossberg 590A1 (MAG493) |
max. 25 in-lb 2.8 N·m · 2.1 ft-lb |
Reported by Magpul Industries “Maximum Torque 25 in-lbs.” |
Magpul MAG493 Forward Sling Mount – Mossberg 590A1 — Installation Instructions — Magpul Industries, PDF p. 1 (single page) magpul.com [4] |
| Sling mount clamp screw (through sling mount halves, on extended magazine tube) Magpul Forward Sling Mount – Mossberg 590A1 (MAG493) |
23 in-lb 2.6 N·m · 1.9 ft-lb |
Reported by Magpul Industries “For best operation and compatibility, torque to 23 in-lbs and place sling clamps within 2.25 inches of the end of the magazine tube or extension.” |
Magpul MAG493 Forward Sling Mount – Mossberg 590A1 — Installation Instructions — Magpul Industries, PDF p. 1 (single page) magpul.com [4] |
| Grip-to-adaptor flat head screws (six 8-32) Midwest Industries shotgun stock on a Mossberg 590 family (MI-SG-590; MI lists 'Mossberg 590 Shotguns') |
10 in-lb 1.1 N·m · 0.83 ft-lb |
Reported by Midwest Industries, Inc. “Slide the grip on the adaptor and attach with the provided flat heads. (For Remington 870 models you will use four 10-24 flat heads) (For Mossberg 590 models, you will use the 6 provided 8-32 flat heads. Torque these to 10inch lbs.” |
Mossberg 590 / Remington 970 Stock - MI-SG-590 / MI-SG-870 installation instructions — Midwest Industries, Inc., PDF p. 1 (single page) midwestindustriesinc.com [2] |
| Stock-to-grip 10-24 flat head screws (4) Midwest Industries shotgun stock on a Mossberg 590 family (MI-SG-590; MI lists 'Mossberg 590 Shotguns') |
10 in-lb 1.1 N·m · 0.83 ft-lb |
Reported by Midwest Industries, Inc. “Slide the stock into the grip and fasten the four 10-24 flat heads. Torque to 10inch lbs.” |
Mossberg 590 / Remington 970 Stock - MI-SG-590 / MI-SG-870 installation instructions — Midwest Industries, Inc., PDF p. 1 (single page) midwestindustriesinc.com [2] |
| Stock adapter receiver screw (socket head bolt into rear of receiver) Mesa Tactical telescoping stock adapter (High-tube or LEO) on a Mossberg 590 (Mesa lists 'Mossberg 500, 590 and Maverick 88') |
20 ft-lb 27.1 N·m · 240 in-lb |
Reported by Mesa Tactical “Mossberg 500: 20 foot pounds” |
Mesa Tactical Telescoping Stock & Adapter Shotgun Conversion Kit — Assembly Guide (#47371 Rev II) — Mesa Tactical, PDF p. 10 of 16 mesatactical.com [5] |
Parts list
Transcribed from the manufacturer's parts list (Owner's Manual for 500, 505, 510, 535, 590 and 835 Pump Action Shotguns — O.F. Mossberg & Sons, Inc., p. 34 resources.mossberg.com [1]) — The only list in this manual: a generic "PARTS LIST" for the whole 500/505/510/535/590/835 pump family. It names the 590 only in row 34, "Magazine cap (model 590®/835®)". It is not 590A1-specific. No part numbers.. Key numbers refer to the exploded view in that document.
51 parts
| Key | Part | Part no. | Qty | Group |
|---|---|---|---|---|
| 1 | Barrel Assembly | 1 | ||
| 2 | Mid-point bead | 1 | ||
| 3 | Front Sight | 1 | ||
| 4 | Takedown screw (model 500®/ 505™/535™) | 1 | ||
| 5 | Choke tube | 1 | ||
| 6 | Receiver * Restricted Item | 1 | ||
| 7 | Scope mount dummy screws | 1 | ||
| 8 | Ejector | 1 | ||
| 9 | Ejector Screw | 1 | ||
| 10 | Elevator | 1 | ||
| 11 | Cartridge stop | 1 | ||
| 12 | Cartridge interrupter | 1 | ||
| 13 | Bolt assembly * Restricted Item | 1 | ||
| 14 | Bolt Slide * Restricted Item | 1 | ||
| 15 | Trigger housing assembly * Restricted Item | 1 | ||
| 16 | Trigger housing pin | 1 | ||
| 17 | Stock | 1 | ||
| 18 | Recoil Pad | 1 | ||
| 19 | Spacer | 1 | ||
| 20 | Recoil pad screw | 1 | ||
| 21 | Stock bolt | 1 | ||
| 22 | Lock washer | 1 | ||
| 23 | Ejector follower | 1 | ||
| 24 | Magazine spring | 1 | ||
| 25 | Limiting plug | 1 | ||
| 26 | Retaining ‘O’ ring | 1 | ||
| 27 | Magazine tube | 1 | ||
| 28 | Action slide assembly | 1 | ||
| 29 | Forearm | 1 | ||
| 30 | Action slide tube nut | 1 | ||
| 31 | Rifled barrel | 1 | ||
| 32 | Front sight assembly | 1 | ||
| 33 | Rear rifle sight assembly | 1 | ||
| 34 | Magazine cap (model 590®/835®) | 1 | ||
| 35 | Retaining washer | 1 | ||
| 36 | Front swivel stud | 1 | ||
| 37 | Heat shield | 1 | ||
| 38 | Heat shield spacer | 1 | ||
| 39 | Heat shield screw/nuts | 1 | ||
| 40 | +4 Shell Holder Stock | 1 | ||
| 41 | +4 Shell Holder recoil pad | 1 | ||
| 42 | +4 Shell Holder recoil pad screws | 1 | ||
| 43 | +4 Shell Holder Stock bolt | 1 | ||
| 44 | Lock washer | 1 | ||
| 45 | Flat washer | 1 | ||
| 46 | Stock swivel Q.D. post | 1 | ||
| 47 | +4 Shell Holder followers | 1 | ||
| 48 | +4 Shell Holder springs | 1 | ||
| 49 | Recoil pad, adjustable stock ** See exploded view for recoil pad sizes. | 1 | ||
| 50 | 6-Position adjustable stock | 1 | ||
| 51 | Pistol grip | 1 |
Function check
- After any cleaning or disassembly, check the shotgun for proper functioning before firing live ammunition.
- Move the safety fully rearward to ON and keep the muzzle in a safe direction.
- Open the action and visually and physically check the chamber, elevator, and magazine tube.
- Depress and hold the action lock lever, then open and close the action several times to check for free movement.
- Close the action, leave the safety ON, and pull the trigger fully rearward. The hammer should not fall.
- Remove your finger from the trigger and move the safety to OFF. The hammer should not fall.
- With the safety OFF, pull the trigger. The hammer should fall.
- Load two dummy shells and confirm they feed and eject one per cycle.
- Confirm the magazine cap is tight.
Maintenance
Lubrication points
- Action bars where they ride in the receiver
- Bolt body and locking block
- Magazine tube exterior where the forend slides
- Hammer and sear pivots
Cleaning notes
Keep the magazine tube interior clean and dry rather than oiled — oil there collects plastic wad residue and slows the follower. Plastic fouling in the chamber and bore is normal with shotshells.
Suggested inspection interval: roughly every 1000 rounds. This is a general guideline, not a manufacturer specification.
Wear parts to inspect
Extractor · Shell latches · Magazine spring · Action bars (inspect for bends) · Ejector
Common issues
| Symptom | Likely cause | What to do |
|---|---|---|
| Action binds after reassembly | An action bar out of its groove or the bolt slide installed wrong | Disassemble and reinstall keeping both bars in their tracks. |
| Shells release two at a time | Bent or worn cartridge stop | Replace the cartridge stop. see a gunsmith |
| Barrel loose after firing | Magazine cap backing off | Hand-tighten firmly and check periodically. |
Also covers
The procedures above are reported to apply to: Mossberg 590 · Mossberg 590 Shockwave (with a different stock configuration). Verify against the manual for your specific model.
Similar manual of arms
Legal notes
Sourcing
- Confidence
- high — Cross-checked against a primary source such as the manufacturer's manual or an issuing military technical manual.
- Verification
- Checked against the manufacturer manual
- Last updated
- 2026-10-29
References
Every source this page draws on, with its web address so you can read it yourself. Numbers in brackets elsewhere on the page point here.
- [1] Owner's Manual for 500, 505, 510, 535, 590 and 835 Pump Action Shotguns — O.F. Mossberg & Sons, Inc. manufacturer manual primary source
https://resources.mossberg.com/hubfs/manuals/12173-Owners-Manual-Pumps-English.pdf (checked 2026-09-14) - [2] Mossberg 590 / Remington 970 Stock - MI-SG-590 / MI-SG-870 installation instructions — Midwest Industries, Inc. manufacturer manual secondary source
https://midwestindustriesinc.com/content/installation-instructions/Mossberg-590-Remington-970-Stocks-Instructionrs.pdf (checked 2026-09-27) - [3] TM 9-1005-338-13&P: Technical Manual, Unit and Direct Support Maintenance (including Repair Parts and Special Tools List) for Mossberg 12-Gauge Shotgun, Model 500 (1005-01-295-1832) and Mossberg 12-Gauge Shotgun, Model 590 (1005-01-251-8578) — Headquarters, Department of the Army (2005) military technical manual primary source
https://archive.org/download/16-manuali-duso-e-manutenzione-per-armi-specifiche-use-and-maintenance-manuals-f_20230430/ARMY%20TM%209-1005-338-13%26P%20Technical%20Manual%20for%20Mossberg%2012-Gauge%20Shotgun%20Model%20500%2C%20590%20-%20May%202005.pdf (checked 2026-10-03) - [4] Magpul MAG493 Forward Sling Mount – Mossberg 590A1 — Installation Instructions — Magpul Industries manufacturer manual secondary source
https://magpul.com/media/wysiwyg/Instructions/MAG493_Forward_Sling_Mount_Mossberg_INSRT.pdf (checked 2026-10-11) - [5] Mesa Tactical Telescoping Stock & Adapter Shotgun Conversion Kit — Assembly Guide (#47371 Rev II) — Mesa Tactical manufacturer manual secondary source
https://mesatactical.com/content/manuals/47371_Stock_Adapter_Manual_rev_ii.pdf (checked 2026-10-11) - [6] Seeking help from someone who owns a Mossberg 500 in the Bay Area — Calguns.net community anecdotal source
https://www.calguns.net/forum/general-discussion/general-gun-discussions/910351-seeking-help-someone-own-mossberg-500-in-bay-area?p=21089362 (checked 2026-10-29) - [7] The Mossberg Model 500: History & Disassembly — American Rifleman (NRA) website secondary source
https://www.americanrifleman.org/content/the-mossberg-model-500-history-disassembly (checked 2026-10-29)
Notes: Corrected against the factory manual on 2026-09-14, which covers the 500, 505, 510, 535, 590 and 835 together. The bolt-position step before barrel removal, the rotational barrel removal, the 3/16 in maximum punch size, and the rear-first trigger housing removal all come from that manual.