← All firearms · Printable work order
Ruger 10/22
- moderate
- Shop tier 2
- high confidence
- Rimfire Rifle
- rimfire
- blowback
- plinker
- beginner rifle
- heavily aftermarket supported
field strip ~5 min · reassembly ~8 min · detail strip ~25 min
Specifications
- Manufacturer
- Sturm, Ruger & Co.
- Origin
- United States
- Category
- Rimfire Rifle
- Action
- Blowback
- Calibers
- .22 Long Rifle
- Capacity
- 10+1 with the standard rotary magazine
- Production
- 1964–present (in-production)
- Also known as
- 10/22 Carbine, 10/22 Takedown, 10/22 Sporter
Model-specific safety
- Rimfire cartridges can be fired by a blow to the case rim, not just the center. Handle .22 LR ammunition accordingly and keep it away from the work area.
- A .22 LR round can hide in the chamber and be very hard to see. Check the chamber with a light and a finger, and check the magazine well too.
- The bolt is driven by the recoil spring and guide, which are under tension and are not captive. When the bolt comes out, the spring assembly can come with it.
- Reassembling the bolt is the step that frustrates people. The bolt must be held in a specific position relative to the recoil spring guide, and forcing it will damage parts.
- The 10/22 Takedown model separates at a barrel/receiver joint and has its own procedure — do not confuse the two.
- Ruger's current manual permits dry firing in moderation for basic function checks, and directs that a snap cap be used for extensive dry-fire practice. This is unusual for a rimfire and is Ruger's own published guidance.
If it will not go back together
Common ways this firearm resists reassembly, and what is actually wrong. Forcing a part that will not seat is how firearms get damaged.
-
The stock cracked, or the barrelled action will not come out cleanly.
Why The safety was not centred. If it is not in the middle when the barrel and receiver leave the stock, the stock is damaged.
Fix Position the safety so an equal amount of button shows on each side before lifting the action out.
Forcing it Ruger states plainly that an off-centre safety damages the stock during removal.
-
The takedown screw will not come all the way out.
Why It is not meant to. Ruger's procedure loosens it, not removes it.
Fix Loosen the takedown screw with an Allen wrench and leave it in the stock.
Under spring tension
- Recoil spring and guide rod
- Hammer spring in the trigger housing
- Magazine rotor spring
Easily lost parts
Bolt stop pin · Trigger housing cross pins · Recoil spring guide · Ejector
Tools
| Tool | Required | Used for | Substitute |
|---|---|---|---|
| Flat-blade screwdriver | Yes | The stock takedown screw and, on models that have one, the barrel band screw. | |
| Small punch | Optional | Pushing out the trigger housing cross pins if they are tight. |
Shop difficulty
Shop tier 2 Tier 2 — moderate among rimfire rifles, for the full job: strip to the parts that get coated and put it back together working. 48 listed parts (54 pieces) with an aluminium trigger housing whose hammer, sear, disconnector, bolt lock and their springs share pins and are normally rebuilt on a slave pin; the bolt goes in against a compressed recoil spring and the ejector must be held while the group is pinned. Common jig, no timing.
Parts: 48 numbered parts (Ruger 10/22 rifle (standard, model numbers 32000+), 48 line items), from Ruger 10/22 Instruction Manual (Standard, model numbers 32000 and higher) — Sturm, Ruger & Co., Inc., p. 50 ruger-docs.s3.amazonaws.com [2].
Bench time: about 35 min to strip, 55 min to rebuild (estimate). Strip of barrel, bolt, trigger guard assembly (slave-pin rebuild) and sights; rebuild longer for the trigger group pins and bolt lock.
Small parts: 11 pins, 4 springs, 7 detents or plungers (counted from the manufacturer's parts list (one per key number unless a quantity is given))
What comes off for coating
- Stock / barrel band: barrel band screw and band, takedown screw (loosened, safety centred), barrelled action out of the stock
- Receiver: two receiver cross pins and trigger guard assembly, bolt stop pin, bolt, bolt handle, guide rod and recoil spring, barrel retainer screws and V-block, barrel, rear sight (dovetail) and scope base — sight pusher
- Bolt: firing pin stop pin, firing pin and rebound spring, extractor, plunger and spring
- Trigger guard assembly: hammer pivot pin, hammer, hammer spring/strut, bolt lock, bolt lock spring, sear, disconnector and trigger pivot pin, trigger and plunger spring, magazine latch, plunger and spring, ejector, safety, detent plunger and spring — slave pin / assembly dowel
Special tools
- Slave pin or 3/32 in. assembly dowel — Aligning sear, trigger and housing for the trigger pivot pin
- 3/32 in. punch — Receiver cross pins and trigger group pins
- 5/32 in. Allen wrench — Takedown screw
- Sight pusher or brass drift — Dovetail rear sight
Known pain points
- Rebuilding the trigger group, the sear, trigger and housing holes are lined up on a punch used as a slave pin, which the real pivot pin then pushes out. (reassembly)
Source: DIY 10/22 Trigger Upgrade Kit instructions — Brownells prod.brownells.com [13] — “trigger-guard assembly using a punch as a slave pin to help align the parts.” - The bolt lock has to be pushed up out of the way to fit the hammer and again for clearance as the group is rebuilt. (reassembly)
Source: Ruger 10/22 Trigger Spring Kit and Polish instructions — MCARBO mcarbo.com [14] — “Step 48: Push the Bolt Lock up to make room for the Hammer.” - The bolt goes back in while the guide rod and recoil spring are held fully compressed with the bolt handle. (reassembly)
Source: Ruger 10/22 Instruction Manual (Standard, model numbers 32000 and higher) — Sturm, Ruger & Co., Inc. ruger-docs.s3.amazonaws.com [2] — “While holding the guide rod assembly fully to the rear with the bolt handle, lay the bolt into the receiver and push it to the rear.” - The ejector has to be held forward in its slot while the trigger guard assembly is set in and the two cross pins pushed through. (reassembly)
Source: Ruger 10/22 Instruction Manual (Standard, model numbers 32000 and higher) — Sturm, Ruger & Co., Inc. ruger-docs.s3.amazonaws.com [2] — “Be sure the ejector is held forward in the ejector slot as you set the trigger guard assembly in place.”
See also 2 documented reassembly problems and their fixes.
Fit or check on rebuild
- Barrel retainer screws snug, not over-tight — Ruger warns over-tightening the V-block screws can damage the rifle.
Source: Ruger 10/22 Instruction Manual (Standard, model numbers 32000 and higher) — Sturm, Ruger & Co., Inc. ruger-docs.s3.amazonaws.com [2] — “CAUTION: Do not over tighten the barrel retainer screws.” - Sight re-zero — The rear sight or scope base is removed for coating; the rifle must be re-zeroed.
- Function check: safety, trigger/sear release, disconnector and feeding with dummy rounds — Standard after any detail strip; a mis-assembled sear or disconnector can double or fail to fire.
This is Pew-Takedown's rating, not the manufacturer's. How tiers are rated. Forum reports are owners' experience, not specifications.
Manufacturer videos
Official videos from Sturm, Ruger & Co.'s own channels, linked rather than copied. Where a video and the steps on this page differ, follow the manufacturer's manual and video.
- Ruger® 10/22® Rifle Disassembly Tech Tip RugerFirearms
field strip · 2026-03-06
Covers: Ruger 10/22 rifles with model numbers 32000 and higher only (per the video description) - Ruger® 10/22® Rifle Assembly Tech Tip RugerFirearms
reassembly · 2026-03-06
Covers: Ruger 10/22 rifles with model numbers 32000 and higher only (per the video description) - Ruger® 10/22® Rifle Cleaning Tech Tip RugerFirearms
cleaning · 2026-03-06
Covers: Ruger 10/22 rifles with model numbers 32000 and higher only (per the video description) - Tech Tip - 10/22® Disassembly Ruger Firearms · plays on ruger.com
field strip · 2017-08-11
Covers: Ruger 10/22 (2017 Tech Tip; title does not limit model numbers - use for 10/22s numbered below 32000, which the 2026 videos exclude) - Tech Tip - 10/22® Reassembly Ruger Firearms · plays on ruger.com
reassembly · 2017-08-11
Covers: Ruger 10/22 (2017 Tech Tip; for pre-32000 model numbers, see note on the disassembly entry) - Ruger® 10/22® Magazine Latch Assembly Tech Tip RugerFirearms
detail reassembly · 2024-10-03
Covers: Ruger 10/22 (description does not limit models)
Procedures
Clear and Make Safe
Clear & Make Safe- Point the muzzle in a safe direction and keep your finger off the trigger.
- Press the magazine release and remove the rotary magazine.Removed at this step:
Magazine - Pull the bolt handle fully to the rear and engage the bolt lock (push the bolt lock up while holding the bolt back).
- Inspect the chamber and the magazine well with a light, then physically confirm the chamber is empty.WarningA .22 LR case is small and dull-colored. Do not trust a quick glance.
- Engage the safety and remove all ammunition from the work area.
Field Strip — Action Out of the Stock
Field Strip tools requiredStandard cleaning disassembly for a carbine-pattern 10/22.
Manufacturer’s videos: Ruger® 10/22® Rifle Disassembly Tech Tip RugerFirearms · Tech Tip - 10/22® Disassembly Ruger Firearms · plays on ruger.com
- Complete the Clear and Make Safe procedure: remove the magazine, open the bolt, visually confirm no cartridge is in the chamber, then let the bolt close. The rear sight leaf should be down and the hammer should be cocked.
- If the rifle has a barrel band, loosen its screw and remove the band. Sporter and Rifle models do not have one.Removed at this step:
Barrel band - With an appropriately sized Allen wrench, LOOSEN the takedown screw. Do not remove it.TipLoosen, not remove. The screw stays in the stock.
- Position the safety so an equal amount of the button is exposed on each side — dead centre.WarningIf the safety is not in the middle when the barrel and receiver assembly comes out, the stock will be damaged. This is the step people skip and then wonder what cracked.
- Swing the barrel and receiver assembly upward away from the forearm of the stock.TipWatch that the two receiver cross pins and the bolt stop pin do not fall out as it comes free.Removed at this step:
Stock - Place the safety in the ON position, then remove the trigger guard by drifting out the two receiver pins.TipRuger recommends the components of the trigger guard assembly are not disassembled further.Removed at this step:
Trigger guard assembly - Stop here for routine inspection, cleaning and lubrication. Ruger states this is the extent of disassembly required.
Reassembly
ReassemblyThe bolt is the tricky part. Take your time and do not force anything.
Manufacturer’s videos: Ruger® 10/22® Rifle Assembly Tech Tip RugerFirearms · Tech Tip - 10/22® Reassembly Ruger Firearms · plays on ruger.com
- Insert the bolt handle and recoil spring assembly into the receiver, seating the guide rod's front end into its recess in the receiver.
- Set the bolt into the receiver, engaging the bolt handle's lug into the notch on the right side of the bolt.TipPull the bolt handle slightly rearward to give yourself room, then drop the bolt in and let it engage.
- Hold the bolt to the rear against the recoil spring, then set the trigger housing assembly up into the receiver.WarningThe hammer must be cocked for the trigger housing to fit. If it will not seat, hold the hammer back with a thumb or cock it before installing.TipMany people find it easiest to pull the bolt fully back and hold it there while seating the housing.
- Insert both trigger housing cross pins and press them fully home.
- Cycle the bolt several times by hand and confirm it runs freely and returns fully into battery.WarningDo not install the action in the stock until the bolt cycles correctly. Finding a problem now is easier than finding it later.
- Set the barreled action back into the stock, install and snug the takedown screw, and reinstall the barrel band if fitted.TipDo not overtighten the takedown screw — it can bind the action and hurt accuracy.
- Perform the function check.
Bolt removal
Detail StripRuger documents this, but only for cleaning inside the receiver.
- Only go on if you want to clean inside the receiver. Ruger notes that removing and installing the bolt is simple but must be done correctly.
- Position the rifle upside down so the bolt is fully accessible.
- Drift out the bolt stop pin, located at the rear of the receiver.Removed at this step:
Bolt stop pin - Pull the cocking handle fully to the rear of the receiver with your left hand and hold it there. With your right hand, lift up the front of the bolt until it is disengaged from the cocking handle.
- Remove the cocking handle assembly through the ejection port.Removed at this step:
Cocking handle and recoil spring assembly - Lift the bolt out of the receiver. If it does not come out readily, turn the rifle over and it will drop out.Removed at this step:
Bolt
Patent drawings
not under copyrightDrawings from US patents on this design. A patent shows the invention as the inventor filed it; the firearm that shipped can differ in detail, and later production often does. Use them to see how the parts relate, not as a parts reference or a procedure. Per the USPTO, the text and drawings of a patent are typically not subject to copyright; each patent here was checked for a copyright notice.
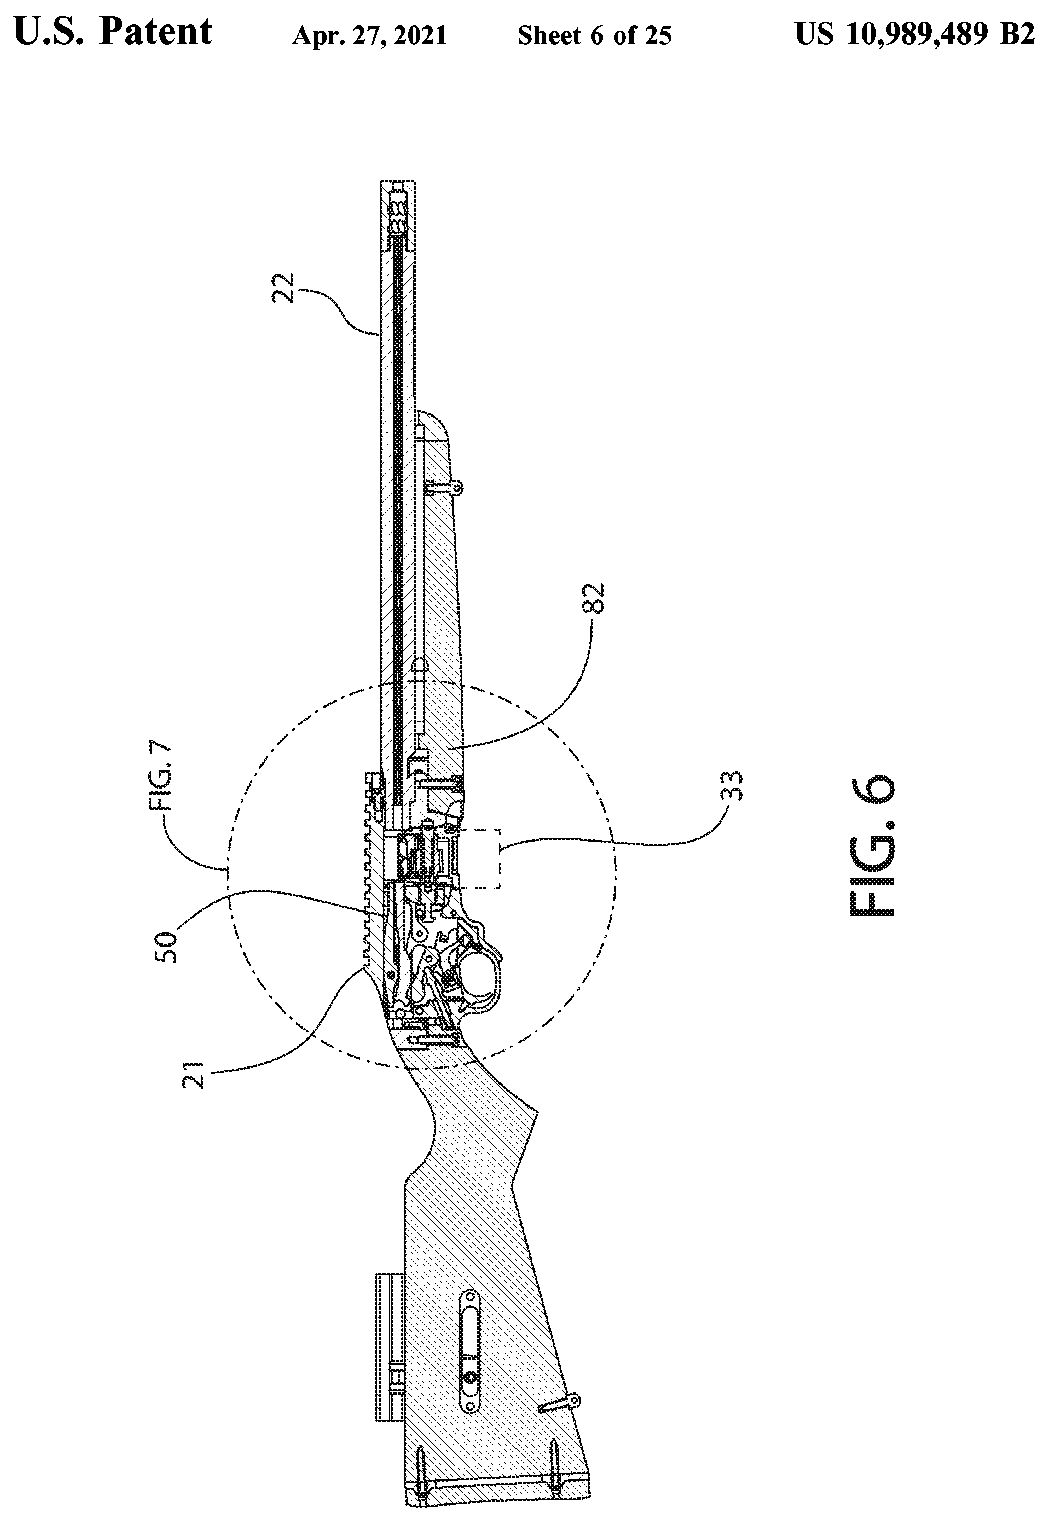
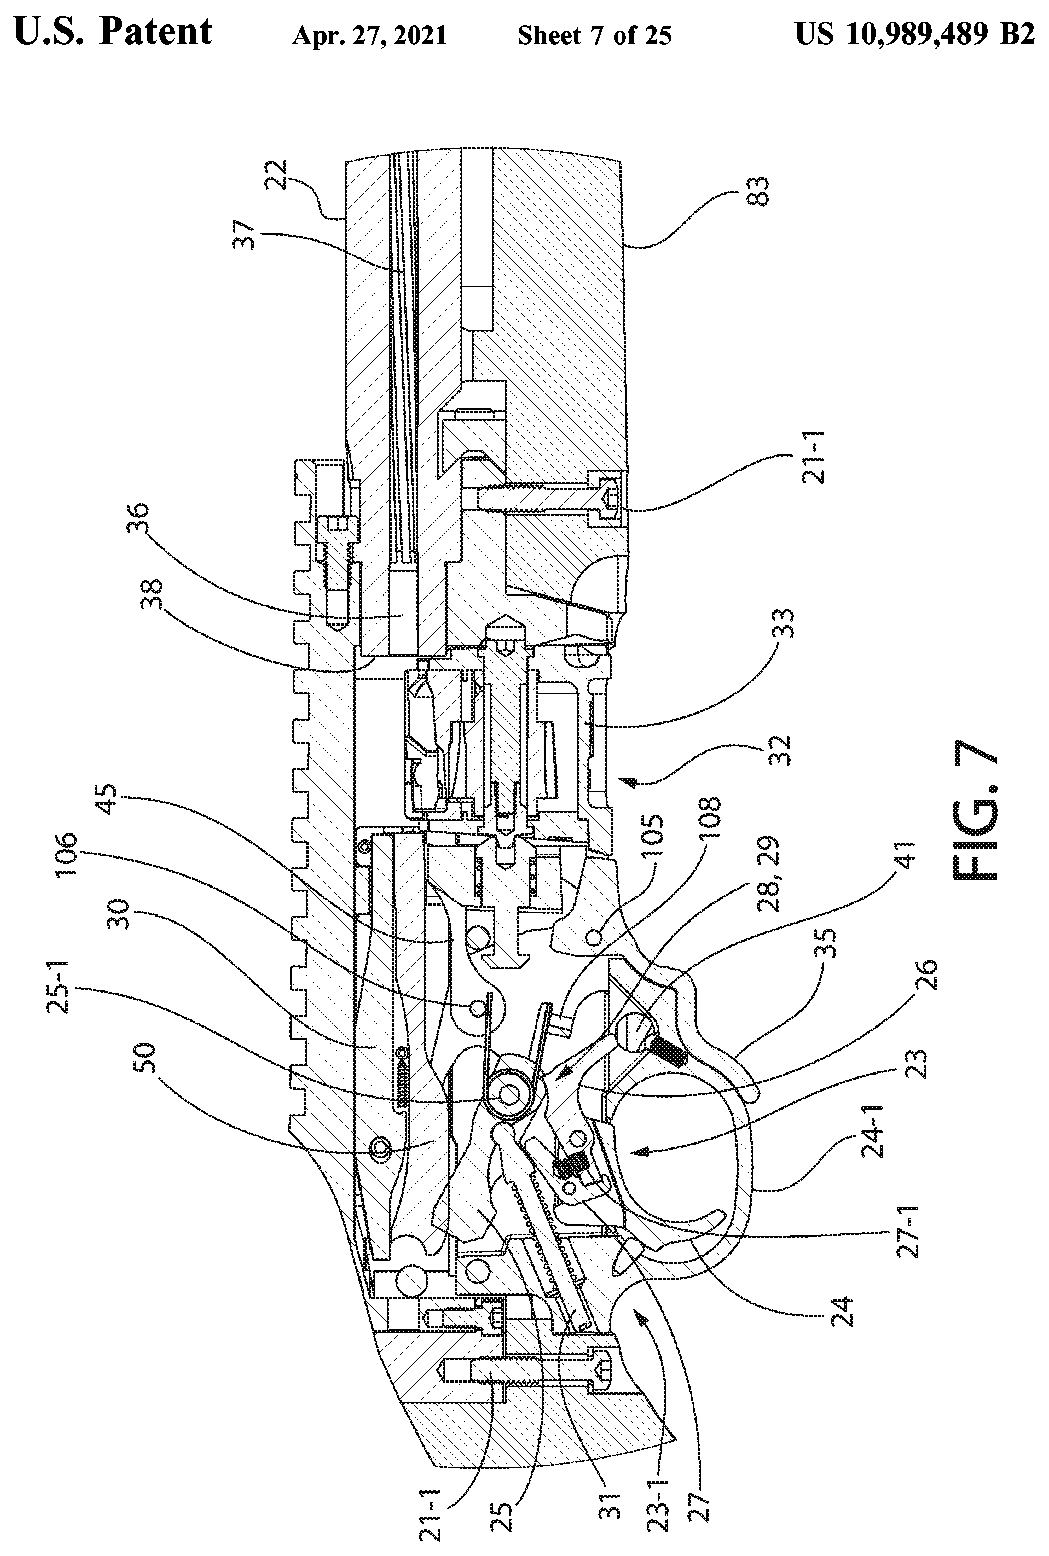
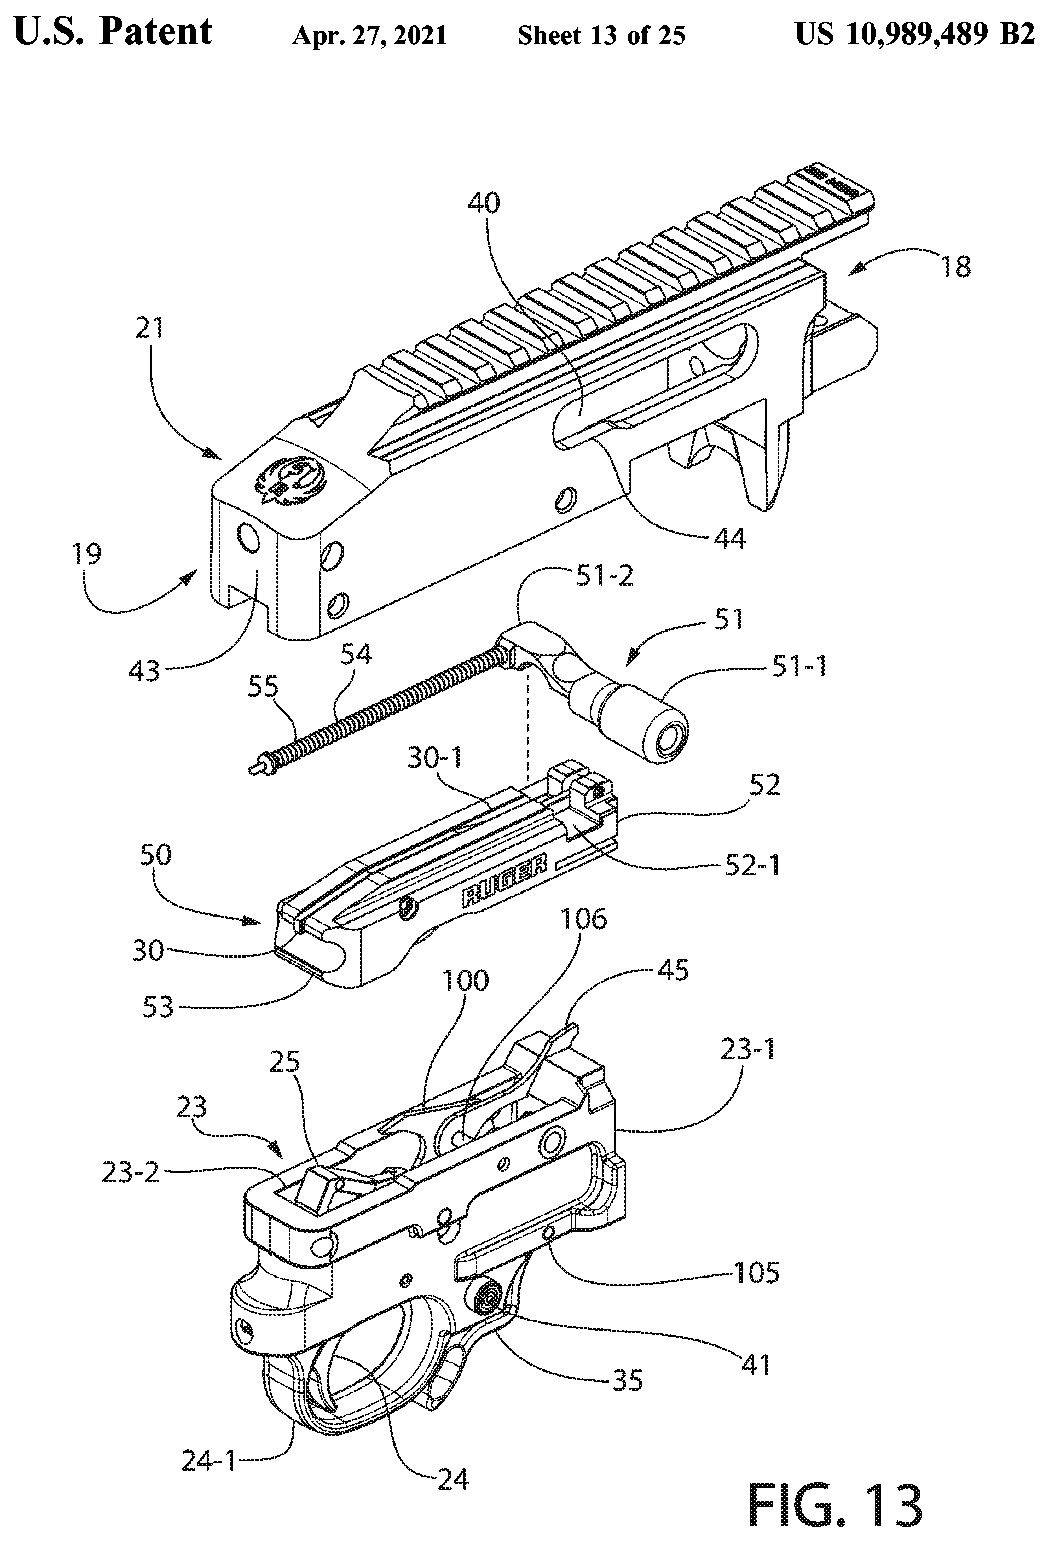
US Patent 10,989,489 — Bolt release mechanism for firearm
Matthias Downey, Jonathan Philip MATHER, Adam Jay Taylor · assigned to Sturm, Ruger & Company, Inc. · filed 2019-04-05 · granted 2021-04-27. Full patent (USPTO)
The Ruger 10/22 action: receiver, bolt with bolt-release lever, recoil spring and the trigger housing as it sits in the stock (the patent adds a manual bolt-release lever to this layout).
Why this is the Ruger 10/22’s patent: listed on the maker’s patent-marking page — Ruger Patents — Sturm, Ruger & Co., Inc. ruger.com [11]: “10/22® / 10/22 Takedown® D681,148; 10,989,489”
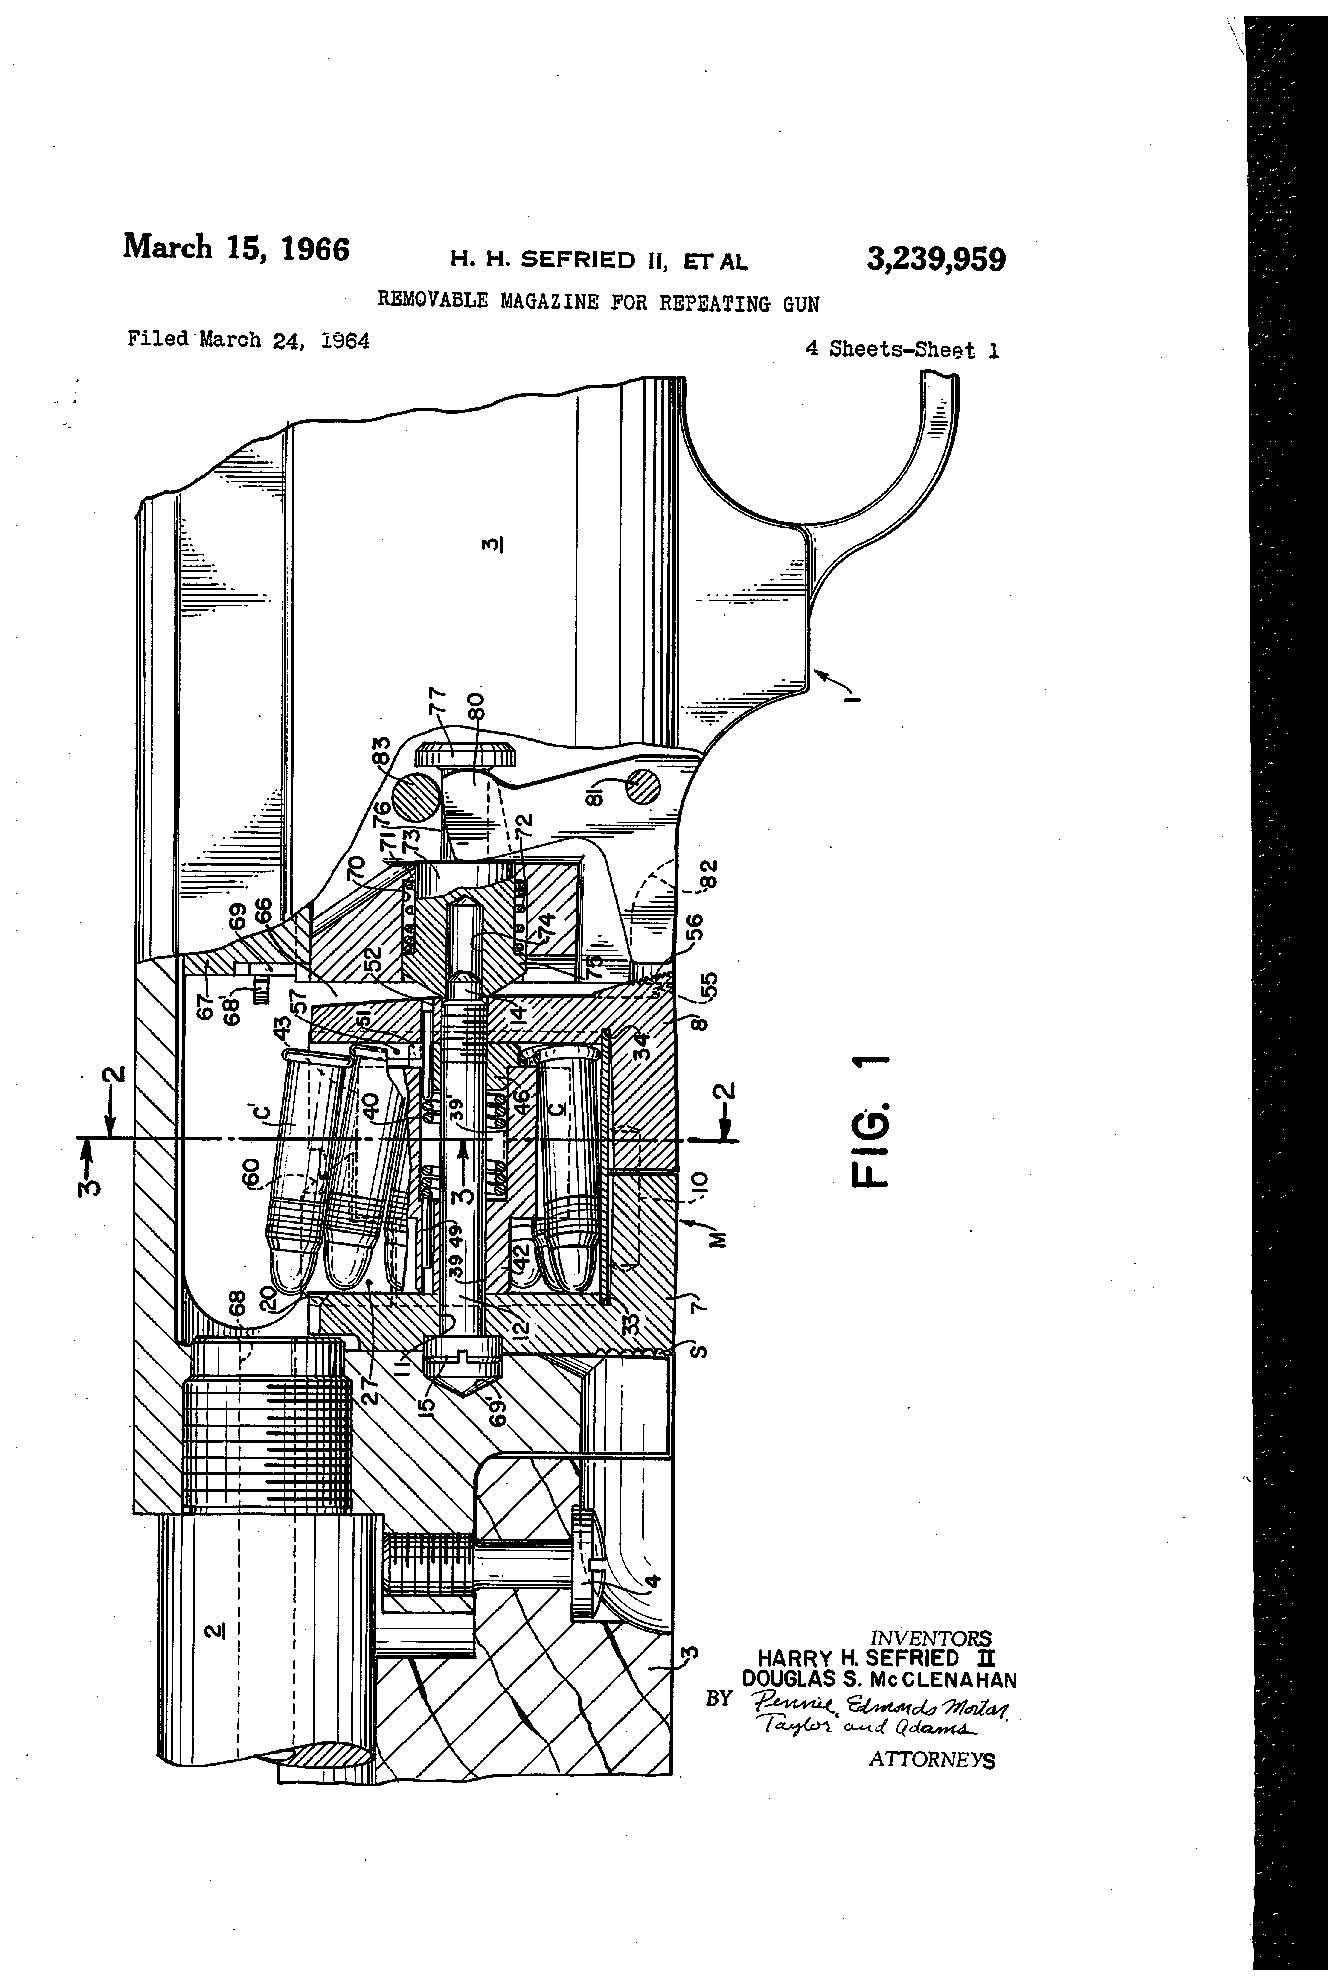
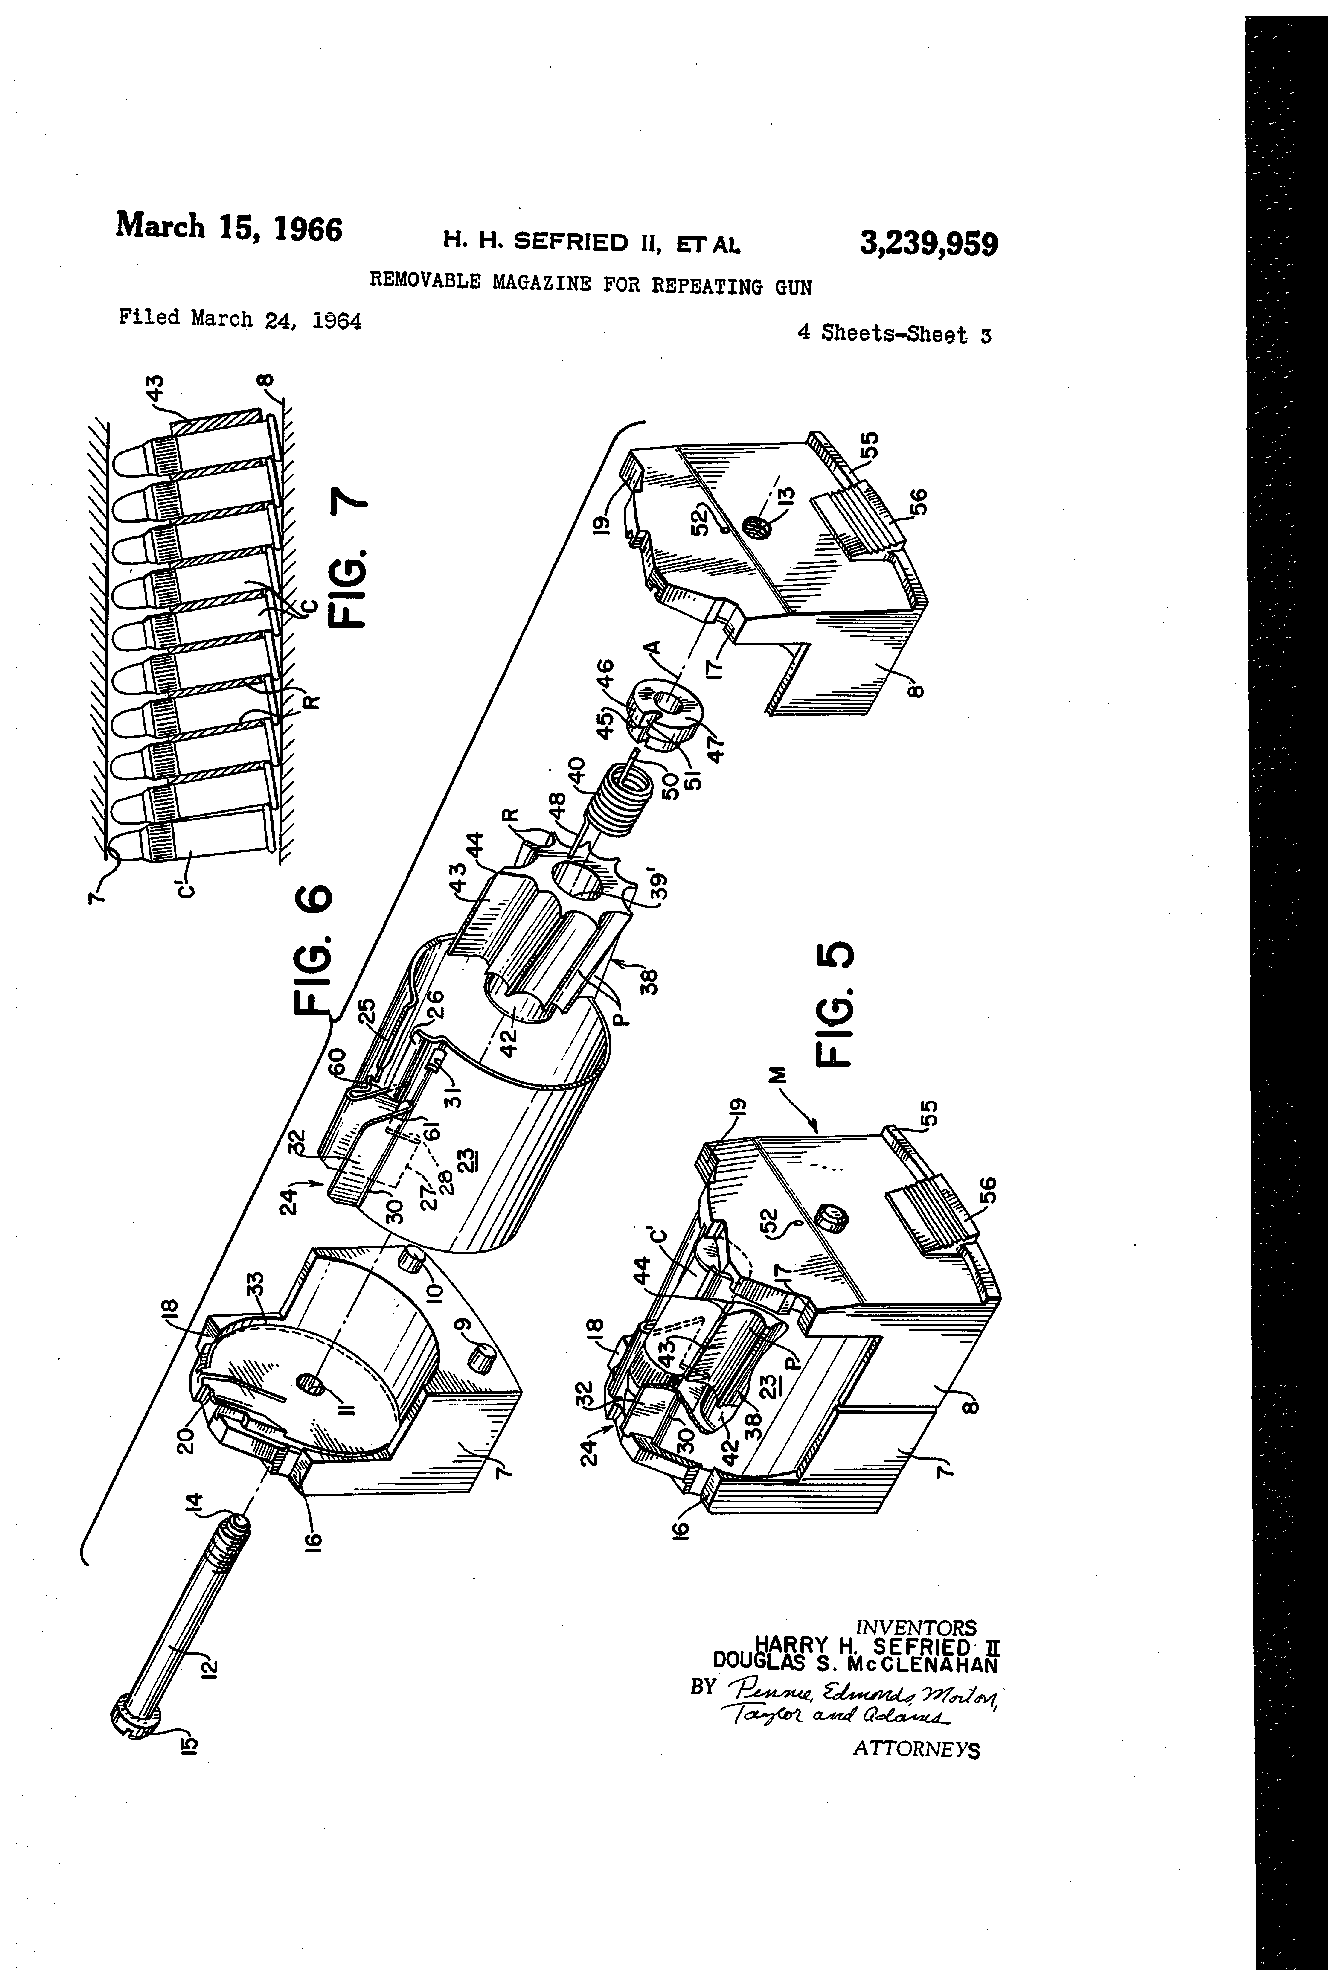
US Patent 3,239,959 — Removable magazine for repeating gun
Harry H. Sefried II, Douglas S. McClenahan · assigned to Sturm, Ruger & Company, Inc. · filed 1964-03-24 · granted 1966-03-15. Full patent (USPTO)
The 10/22's detachable rotary magazine and how it seats in the receiver below the bolt.
Why this is the Ruger 10/22’s patent: named by a historical source — The Ruger 10/22: History & Design (posted October 22, 2020; excerpted from Walt Kuleck, "The Ruger 10/22 Complete Owner's and Assembly Guide") — NRA American Rifleman americanrifleman.org [12]: “The second of the three innovations that made the 10/22 a popular success: the detachable rotary magazine. This innovation by Harry Sefried made the 10/22 the dead-on reliable shooter it is today. Patent 3239959: The Rotary Magazine”
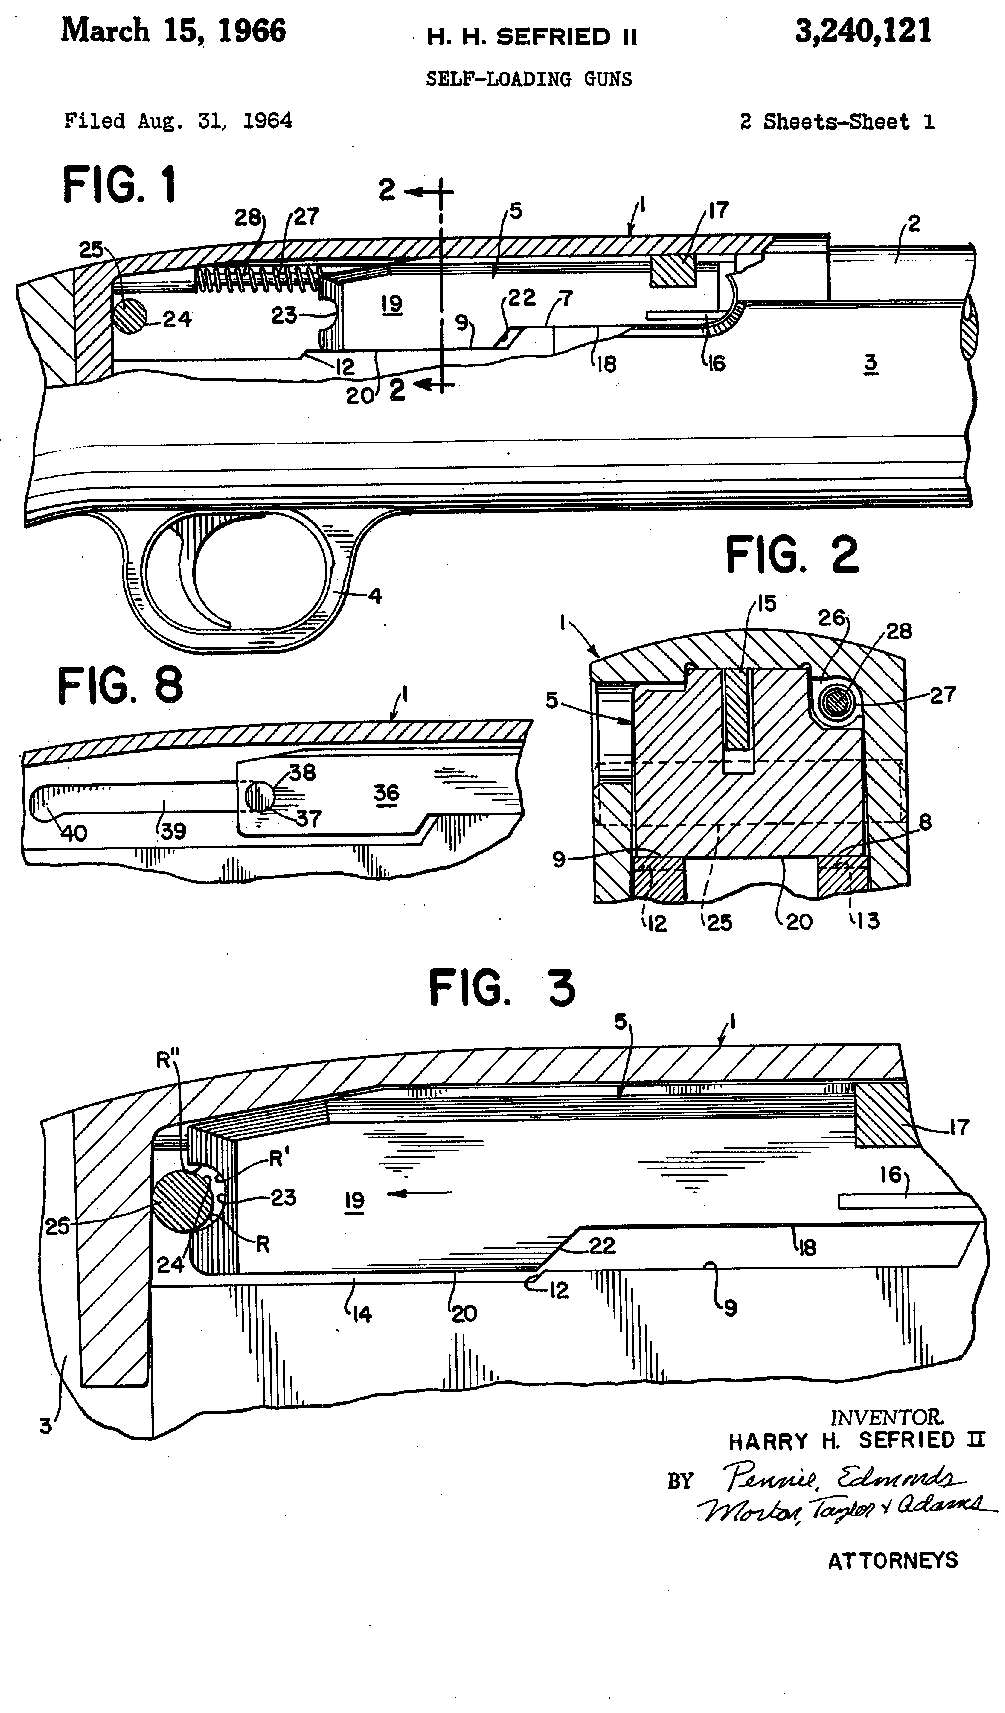
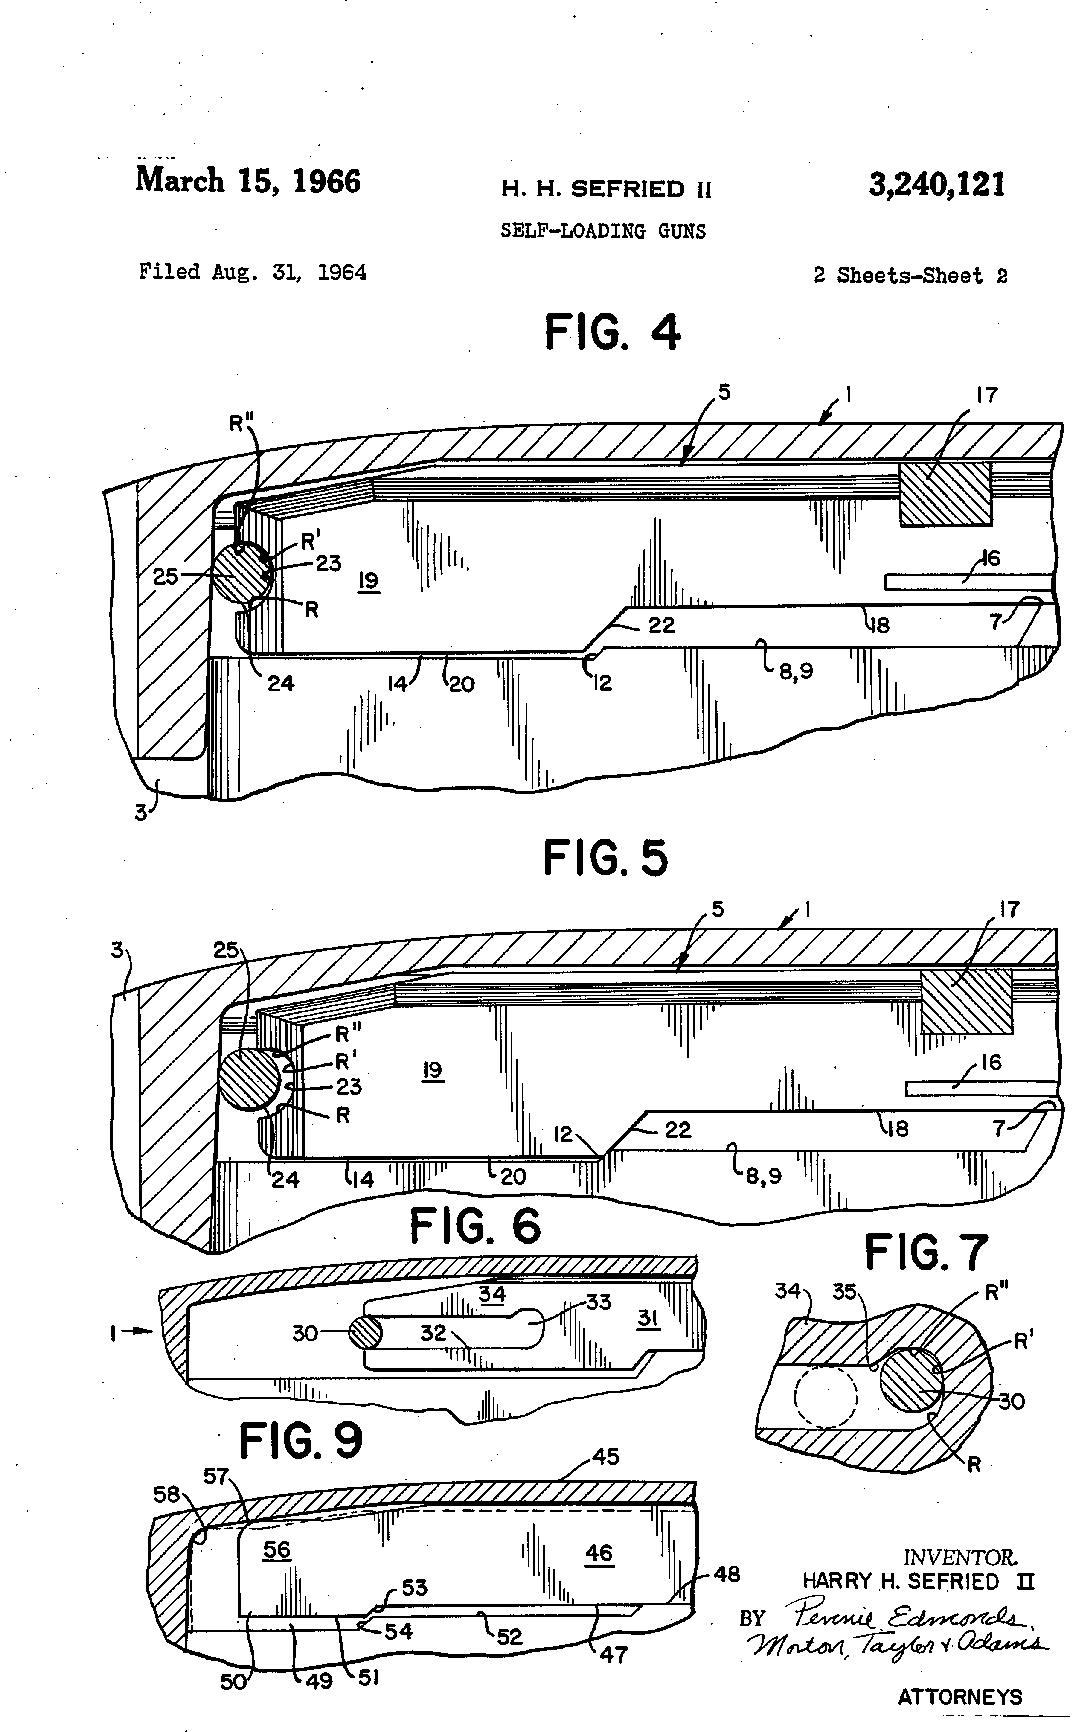
US Patent 3,240,121 — Self-loading guns
Harry H. Sefried II · assigned to Sturm, Ruger & Company, Inc. · filed 1964-08-31 · granted 1966-03-15. Full patent (USPTO)
The 10/22's receiver and breechblock (bolt) with its cross-pin 'breechblock decelerator' that slows the bolt's rearward travel.
Why this is the Ruger 10/22’s patent: named by a historical source — The Ruger 10/22: History & Design (posted October 22, 2020; excerpted from Walt Kuleck, "The Ruger 10/22 Complete Owner's and Assembly Guide") — NRA American Rifleman americanrifleman.org [12]: “Patent 3240121: The Breechblock Decelerator The third innovation that has contributed to the 10/22’s success is its “breechblock decelerator,” again from Ruger’s Harry Sefried.”
Torque specifications
| Fastener | Torque | Sequence, notes and the source's words | Where it comes from |
|---|---|---|---|
| Scope base adapter mounting screws (4) Receivers drilled for the scope base adapter |
12–15 in-lb 1.4–1.7 N·m · 1–1.2 ft-lb |
Remove the four filler screws with a correctly sized #1 flat-head screwdriver (a wider blade damages the receiver). Start all four base-mounting screws until they just catch, then bring them down a part turn at a time in rotation. Afterwards cycle the bolt several times: a screw that binds on the bolt must be shortened and its top chamfered. Ruger calls this range a maximum and cautions that over-tightening may damage the rifle. “Starting at the first screw, turn each screw part way in; then move to the next screw, repeating the procedure until all four screws are tightened to a maximum torque setting of 12-15 inch/lb.” |
Ruger 10/22 Instruction Manual (Standard, model numbers 32000 and higher) — Sturm, Ruger & Co., Inc., p. 42 ruger-docs.s3.amazonaws.com [2] |
Notes: From Ruger's current 10/22 instruction manual (model numbers 32000 and higher). Ruger's current 10/22 manual (p. 46) warns that on some models a barrel nut sits behind the muzzle cap, is torqued to precise factory specifications, and must not be tightened or removed by the owner. Its value is not published.
Reported by other sources — not the manufacturer
| Fastener | Torque | Who says so, and their words | Where it comes from |
|---|---|---|---|
| Receiver (takedown) screw Ruger 10/22 in a Magpul Hunter X-22 stock |
20 in-lb 2.3 N·m · 1.7 ft-lb |
Reported by Magpul Industries Be sure safety switch is centered during removal and installation of receiver. After installing, verify function including the safety switch (the safety may rotate and put the detent spring out of alignment). “Place receiver into Hunter X-22 Stock, install receiver screw, and tighten screw to 20 [in-lb] according to manufacturer’s instructions.” |
Hunter X-22 Stock Installation Instructions (MAG548) — Magpul Industries, PDF p. 1 magpul.com [3] |
| Receiver (takedown) screw Ruger 10/22 in a Magpul MOE X-22 stock |
20 in-lb 2.3 N·m · 1.7 ft-lb |
Reported by Magpul Industries “Place receiver into MOE® X-22 Stock, install receiver screw, and tighten screw to 20 [in-lb] according to manufacturer’s instructions.” |
MOE X-22 Stock Installation Instructions (MAG1428) — Magpul Industries, PDF p. 1 magpul.com [4] |
| Barrel V-block screws Ruger 10/22 |
10–20 in-lb 1.1–2.3 N·m · 0.83–1.7 ft-lb |
Reported by Fix It Sticks (compiled reference list) “V-block screws: 10-20 in-lbs” |
Torque Specs (Torque Specs by Brand — Ruger 10/22) — Fix It Sticks (compiled reference list) store.fixitsticks.com [5] |
| Action (takedown) screw Ruger 10/22 |
15–20 in-lb 1.7–2.3 N·m · 1.2–1.7 ft-lb |
Reported by Fix It Sticks (compiled reference list) “Action screw: 15-20 in-lbs (most people seem to prefer 20)” |
Torque Specs (Torque Specs by Brand — Ruger 10/22) — Fix It Sticks (compiled reference list) store.fixitsticks.com [5] |
| Barrel tray screws (stock forend tray, re-installed after selecting barrel profile) Magpul Hunter X-22 Stock (MAG548) on a factory Ruger 10/22 |
12 in-lb 1.4 N·m · 1 ft-lb |
Reported by Magpul Industries “Re-install Barrel Tray Screws tightening to 12 [in-lb].” |
Hunter X-22 Stock Installation Instructions (MAG548) — Magpul Industries, PDF p. 1 of 2 magpul.com [3] |
| Barrel tray screws Magpul MOE X-22 Stock (MAG1428) on a factory Ruger 10/22 |
12 in-lb 1.4 N·m · 1 ft-lb |
Reported by Magpul Industries “Re-install Barrel Tray Screws and hand tighten to 12 [in-lb].” |
MOE X-22 Stock Installation Instructions (MAG1428) — Magpul Industries, PDF p. 1 (single page) magpul.com [4] |
| Receiver-to-chassis 12-24 x 3/4 hex screw (replaces factory stock screw) Midwest Industries Ruger 10/22 Fixed Barrel Chassis (MI-1022-FC8 / FC13) on Ruger 10/22 models and clones (not Takedown) |
55 in-lb 6.2 N·m · 4.6 ft-lb |
Reported by Midwest Industries, Inc. “Drop the provided 12-24x3/4 hex screw in the screw hole in the hole in front of the magazine well and tighten to 55 inch/pounds, securing the receiver to chassis.” |
Midwest Industries Ruger 10/22 Fixed Barrel Chassis (MI-1022-FC8 / MI-1022-FC13) — Installation Instructions — Midwest Industries, Inc., PDF p. 1 (single page) midwestindustriesinc.com [7] |
| M-LOK hand guard screws (2) into chassis duck bill Midwest Industries Ruger 10/22 Fixed Barrel Chassis (MI-1022-FC8 / FC13) |
55 in-lb 6.2 N·m · 4.6 ft-lb |
Reported by Midwest Industries, Inc. “Install both screws and tighten to 55 in/lbs.” |
Midwest Industries Ruger 10/22 Fixed Barrel Chassis (MI-1022-FC8 / MI-1022-FC13) — Installation Instructions — Midwest Industries, Inc., PDF p. 1 (single page) midwestindustriesinc.com [7] |
| AR grip adaptor 1/4-20 x 1.5" screw Midwest Industries Ruger 10/22 Fixed Barrel Chassis (MI-1022-FC8 / FC13) |
35 in-lb 4 N·m · 2.9 ft-lb |
Reported by Midwest Industries, Inc. “install the ¼-20x1.5” screw from the top rear of the chassis and torque screw to 35 inch/pounds.” |
Midwest Industries Ruger 10/22 Fixed Barrel Chassis (MI-1022-FC8 / MI-1022-FC13) — Installation Instructions — Midwest Industries, Inc., PDF p. 1 (single page) midwestindustriesinc.com [7] |
| Receiver extension anti-rotation 6-32 set screw Midwest Industries Ruger 10/22 Fixed Barrel Chassis (MI-1022-FC8 / FC13) |
15 in-lb 1.7 N·m · 1.2 ft-lb |
Reported by Midwest Industries, Inc. “When aligned tighten 6/32 set screw to 15 inch/pounds to prevent rotation.” |
Midwest Industries Ruger 10/22 Fixed Barrel Chassis (MI-1022-FC8 / MI-1022-FC13) — Installation Instructions — Midwest Industries, Inc., PDF p. 1 (single page) midwestindustriesinc.com [7] |
| AR grip screw Midwest Industries Ruger 10/22 Fixed Barrel Chassis (MI-1022-FC8 / FC13) |
45 in-lb 5.1 N·m · 3.7 ft-lb |
Reported by Midwest Industries, Inc. “Install AR style grip with provided grip screw/washer and torque grip screw to 45 inch/pounds.” |
Midwest Industries Ruger 10/22 Fixed Barrel Chassis (MI-1022-FC8 / MI-1022-FC13) — Installation Instructions — Midwest Industries, Inc., PDF p. 1 (single page) midwestindustriesinc.com [7] |
| Barrel V-block screws Tactical Solutions X-RING TSS Gen 2 barrel (.920" profile) installed in a Ruger 10/22 receiver |
18–24 in-lb 2–2.7 N·m · 1.5–2 ft-lb |
Reported by Tactical Solutions (TacSol) Torque only after the barrel is lined up with the V notch on the receiver bottom (per the manual). “reinstall the V Block and screws. Tighten the screws to 18-24 inch pounds of torque” |
Tactical Solutions X-RING TSS Gen 2 (.22 LR barrel for Ruger 10/22) — Product Manual REV03-2026 (linked from tacsolusa.com/product-manuals; hosted on TacSol's BigCommerce store CDN) — Tactical Solutions (TacSol), PDF p. 1 of 3 store-cixt9wadn9.mybigcommerce.com [8] |
| Action (stock) screw on stock underside Ruger 10/22 barreled action fitted with a Tactical Solutions X-RING TSS Gen 2 barrel, in a stock that accepts a .920" barrel |
12–15 in-lb 1.4–1.7 N·m · 1–1.2 ft-lb |
Reported by Tactical Solutions (TacSol) “Once seated, tighten the action screw on the stock’s underside to 12-15 inch pounds.” |
Tactical Solutions X-RING TSS Gen 2 (.22 LR barrel for Ruger 10/22) — Product Manual REV03-2026 (linked from tacsolusa.com/product-manuals; hosted on TacSol's BigCommerce store CDN) — Tactical Solutions (TacSol), PDF p. 2 of 3 store-cixt9wadn9.mybigcommerce.com [8] |
| Barrel V-block screws Tactical Solutions X-RING TSS barrel (first generation) installed in a Ruger 10/22 receiver |
18–24 in-lb 2–2.7 N·m · 1.5–2 ft-lb |
Reported by Tactical Solutions (TacSol) Small increments, one screw at a time. The maker says "roughly". “until you have a secure and tight fit – roughly 18 – 24 inch pounds using a standard hex key.” |
Tactical Solutions X-RING TSS barrel (Ruger 10/22) — Installation Instructions (7-20-23) (linked from tacsolusa.com/product-manuals; hosted on TacSol's BigCommerce store CDN) — Tactical Solutions (TacSol), PDF p. 1 of 4 store-cixt9wadn9.mybigcommerce.com [9] |
| Barrel V-block screws KIDD .22 autoloader (10/22-pattern) barrel installed in a Ruger 10/22 receiver |
approx. 10 in-lb 1.1 N·m · 0.83 ft-lb |
Reported by KIDD Innovative Design “Attach the v-block and screws and tighten to snug about 10 inch pounds.” |
KIDD .22 autoloader barrel installation (KIDD Barrel / KIDD Receiver) — KIDD Innovative Design, PDF p. 1 (single page) kiddinnovativedesign.com [10] |
Materials and factory finish
As stated by Sturm, Ruger & Co.. Prep, masking and cure depend on these; a polymer or aluminium part, a nitrided or anodised finish, and a blued steel part are each a different job. Variants with other finishes may exist — check the maker's page for the exact SKU on the bench.
| Component | Material | Factory finish | Where it comes from |
|---|---|---|---|
| Barrel Model 32009 (birch stock) | Alloy Steel | Satin Black | Ruger 10/22 Standard Autoloading Rifle — Specifications (model 32009) — Sturm, Ruger & Co. ruger.com [6] “Barrel Material Alloy Steel … Barrel Finish Satin Black” |
| Stock Model 32009 | Birch | — | Ruger 10/22 Standard Autoloading Rifle — Specifications (model 32009) — Sturm, Ruger & Co. ruger.com [6] “Stock Birch” |
| Barrel Model 32002 (black polymer stock) | Alloy Steel | Satin Black | Ruger 10/22 Standard Autoloading Rifle — Specifications (model 32009) — Sturm, Ruger & Co. ruger.com [6] “Barrel Material Alloy Steel … Barrel Finish Satin Black” |
| Trigger guard all 10/22 models | glass-filled, polymer | — | Ruger 10/22 Standard Autoloading Rifle — Specifications (model 32009) — Sturm, Ruger & Co. ruger.com [6] “Heat-stabilized, glass-filled, polymer trigger housing assembly is precision made of high-tech material for improved manufacturing tolerances, impact and abrasion-resistance and an unmatched ability to withstand the elements.” |
Parts list
Transcribed from the manufacturer's parts list (Ruger 10/22 Instruction Manual (Standard, model numbers 32000 and higher) — Sturm, Ruger & Co., Inc., p. 50 ruger-docs.s3.amazonaws.com [2]) — Ruger 10/22 rifle. Exploded views on pp. 51–52. Key numbers refer to the exploded view in that document.
48 parts
| Key | Part | Part no. | Qty | Group |
|---|---|---|---|---|
| 1 | Stock Assembly | 1 | ||
| 2 | Barreled Action – Complete | 1 | ||
| 3 | Receiver The receiver is a serial-numbered part and is not offered for sale. | 1 | Barreled Action | |
| 4 | Barrel | 1 | Barreled Action | |
| 5 | Front Sight | 1 | Barreled Action | |
| 6 | Rear Sight | 1 | Barreled Action | |
| 7 | Barrel Retainer Screw | 2 | Barreled Action | |
| 8 | Barrel Retainer V-Block | 1 | Barreled Action | |
| 9 | Filler Screws | 4 | Barreled Action | |
| 10 | Cleanout Hole Plug | 1 | Barreled Action | |
| 11 | Bolt Assembly – Complete | 1 | ||
| 12 | Bolt | 1 | Bolt Assembly | |
| 13 | Extractor | 1 | Bolt Assembly | |
| 14 | Last Round Spring | 1 | Bolt Assembly | |
| 15 | Firing Pin | 1 | Bolt Assembly | |
| 16 | Firing Pin Retention Pin | 1 | Bolt Assembly | |
| 17 | Extractor Plunger | 1 | Bolt Assembly | |
| 18 | Firing Pin Rebound Spring | 1 | Bolt Assembly | |
| 19 | Guide Rod Assembly | 1 | ||
| 20 | Trigger Guard Assembly – Complete | 1 | ||
| 21 | Trigger Guard | 1 | Trigger Guard Assembly | |
| 22 | Trigger Parts so marked must be factory fit. | 1 | Trigger Guard Assembly | |
| 23 | Safety Button, Complete | 1 | Trigger Guard Assembly | |
| 24 | Trigger Plunger | 1 | Trigger Guard Assembly | |
| 25 | Trigger Pivot Pin | 1 | Trigger Guard Assembly | |
| 26 | Disconnector | 1 | Trigger Guard Assembly | |
| 27 | Trigger Pivot Pin | 1 | Trigger Guard Assembly | |
| 28 | Sear Parts so marked must be factory fit. | 1 | Trigger Guard Assembly | |
| 29 | Safety Detent Plunger | 1 | Trigger Guard Assembly | |
| 30 | Hammer Parts so marked must be factory fit. | 1 | Trigger Guard Assembly | |
| 31 | Bolt Lock | 1 | Trigger Guard Assembly | |
| 32 | Magazine Latch | 1 | Trigger Guard Assembly | |
| 33 | Magazine Latch Pivot Pin | 2 | Trigger Guard Assembly | |
| 34 | Magazine Latch Plunger | 1 | Trigger Guard Assembly | |
| 35 | Ejector | 1 | Trigger Guard Assembly | |
| 36 | Hammer Pivot Pin | 1 | Trigger Guard Assembly | |
| 37 | Hammer Strut | 1 | Trigger Guard Assembly | |
| 38 | Hammer Spring | 1 | Trigger Guard Assembly | |
| 39 | Hammer Strut Washer | 1 | Trigger Guard Assembly | |
| 40 | Trigger Plunger Spring | 1 | Trigger Guard Assembly | |
| 41 | Disconnector Spring | 1 | Trigger Guard Assembly | |
| 42 | Safety Detent Plunger Spring | 1 | Trigger Guard Assembly | |
| 43 | Magazine Latch Plunger Spring | 1 | Trigger Guard Assembly | |
| 44 | Bolt Lock Spring | 1 | Trigger Guard Assembly | |
| 45 | Receiver Cross Pin | 2 | ||
| 46 | Bolt Stop Pin | 1 | ||
| 47 | Takedown Screw | 1 | ||
| 48 | Magazine Assembly | 1 |
Function check
- Verify the rifle is unloaded with no magazine inserted before each step.
- Cycle the bolt by hand. It should travel smoothly and return fully into battery.
- Cock the action, engage the safety, and press the trigger. The hammer must not fall.
- Disengage the safety and press the trigger. The hammer should fall.
- Confirm the bolt lock holds the bolt to the rear when engaged.
- Insert an empty magazine and confirm it locks in and releases cleanly.
Maintenance
Lubrication points
- Bolt body sides where it rides in the receiver
- Recoil spring guide rod
- Hammer and sear pivots
- Bolt handle lug
Cleaning notes
Rimfire fouling is waxy and heavy. Clean the chamber and bolt face regularly — most 10/22 reliability complaints trace to a dirty chamber or a worn magazine. Keep lubrication light; oil attracts the unburned powder that .22 LR produces in quantity.
Suggested inspection interval: roughly every 500 rounds. This is a general guideline, not a manufacturer specification.
Wear parts to inspect
Extractor and extractor spring · Recoil spring · Magazine rotor and feed lips · Firing pin
Common issues
| Symptom | Likely cause | What to do |
|---|---|---|
| Trigger housing will not seat back into the receiver | Hammer is not cocked | Cock the hammer and hold it back while seating the housing. Do not force it. |
| Bolt will not go fully into battery after reassembly | Bolt handle lug not properly engaged in the bolt notch | Remove the bolt and reinstall it, confirming the handle lug seats in the bolt notch before installing the trigger housing. |
| Failures to feed or fire | Dirty chamber, worn magazine, or cheap bulk ammunition | Clean the chamber thoroughly and try a different magazine and ammunition before suspecting the rifle. |
| Failure to extract | Worn or chipped extractor | Replace the extractor — it is an inexpensive and common wear part on this rifle. |
Also covers
The procedures above are reported to apply to: Ruger 10/22 Sporter · Ruger 10/22 Target · Ruger 10/22 Tactical · Ruger Charger (pistol variant, with differences). Verify against the manual for your specific model.
Similar manual of arms
Sourcing
- Confidence
- high — Cross-checked against a primary source such as the manufacturer's manual or an issuing military technical manual.
- Verification
- Checked against the manufacturer manual
- Last updated
- 2026-10-29
References
Every source this page draws on, with its web address so you can read it yourself. Numbers in brackets elsewhere on the page point here.
- [1] Instruction Manual for Ruger 10/22 Autoloading Carbine — Sturm, Ruger & Co., Inc. manufacturer manual primary source
https://ruger-docs.s3.amazonaws.com/_manuals/1022.pdf (checked 2026-09-15) - [2] Ruger 10/22 Instruction Manual (Standard, model numbers 32000 and higher) — Sturm, Ruger & Co., Inc. manufacturer manual primary source
https://ruger-docs.s3.amazonaws.com/_manuals/Ruger_1022.pdf (checked 2026-09-15) - [3] Hunter X-22 Stock Installation Instructions (MAG548) — Magpul Industries manufacturer manual secondary source
https://magpul.com/media/wysiwyg/Instructions/MAG548_X-22_Stock_INSRT.pdf (checked 2026-09-27) - [4] MOE X-22 Stock Installation Instructions (MAG1428) — Magpul Industries manufacturer manual secondary source
https://magpul.com/media/wysiwyg/Instructions/MAG1428_MOE_X-22_INSRT.pdf (checked 2026-09-27) - [5] Torque Specs (Torque Specs by Brand — Ruger 10/22) — Fix It Sticks (compiled reference list) website tertiary source
https://store.fixitsticks.com/pages/torque-specs (checked 2026-09-27) - [6] Ruger 10/22 Standard Autoloading Rifle — Specifications (model 32009) — Sturm, Ruger & Co. website primary source
https://ruger.com/products/1022/specSheets/32009.html (checked 2026-10-03) - [7] Midwest Industries Ruger 10/22 Fixed Barrel Chassis (MI-1022-FC8 / MI-1022-FC13) — Installation Instructions — Midwest Industries, Inc. manufacturer manual secondary source
https://midwestindustriesinc.com/content/installation-instructions/Ruger-Fixed-Barrel-Chassis-Instructions.pdf (checked 2026-10-11) - [8] Tactical Solutions X-RING TSS Gen 2 (.22 LR barrel for Ruger 10/22) — Product Manual REV03-2026 (linked from tacsolusa.com/product-manuals; hosted on TacSol's BigCommerce store CDN) — Tactical Solutions (TacSol) manufacturer manual secondary source
https://store-cixt9wadn9.mybigcommerce.com/content/X-RING%20TSS%20GEN%202%20Product%20Manual%20REV03-2026%201.pdf (checked 2026-10-11) - [9] Tactical Solutions X-RING TSS barrel (Ruger 10/22) — Installation Instructions (7-20-23) (linked from tacsolusa.com/product-manuals; hosted on TacSol's BigCommerce store CDN) — Tactical Solutions (TacSol) manufacturer manual secondary source
https://store-cixt9wadn9.mybigcommerce.com/content/X-RING%20TSS%E2%84%A2_Instrutions_7-20-23_Updated.pdf (checked 2026-10-11) - [10] KIDD .22 autoloader barrel installation (KIDD Barrel / KIDD Receiver) — KIDD Innovative Design manufacturer manual secondary source
https://www.kiddinnovativedesign.com/assets/images/kidd/Barrel_InstallationPDF.pdf (checked 2026-10-11) - [11] Ruger Patents — Sturm, Ruger & Co., Inc. website primary source
https://ruger.com/micros/Patents/index.html (checked 2026-10-13) - [12] The Ruger 10/22: History & Design (posted October 22, 2020; excerpted from Walt Kuleck, "The Ruger 10/22 Complete Owner's and Assembly Guide") — NRA American Rifleman periodical secondary source
https://www.americanrifleman.org/content/the-ruger-10-22-history-design/ (checked 2026-10-13) - [13] DIY 10/22 Trigger Upgrade Kit instructions — Brownells book secondary source
https://prod.brownells.com/globalassets/pdfs/product-pdfs/076-200-163_diy_10_22_trigger_upgrade_kit.pdf (checked 2026-10-29) - [14] Ruger 10/22 Trigger Spring Kit and Polish instructions — MCARBO book secondary source
https://mcarbo.com/Printable%20Instructions/Ruger-10_22-Trigger-Spring-Kit-Polish.pptx.pdf (checked 2026-10-29)
Notes: Verified on 2026-09-15 against the factory manual, which is a scanned PDF with no text layer and had to be read page by page as images. The entry previously claimed manufacturer-manual verification while citing nothing. Two things it was missing matter: the takedown screw is LOOSENED, not removed, and the safety must be centred — equal button showing each side — before the barrel and receiver come out of the stock, or the stock is damaged. Also added Ruger's warning to watch for the receiver cross pins and bolt stop pin falling out. The 10/22 Takedown model uses a completely different barrel/receiver separation procedure and is not covered by this entry. The current Ruger 10/22 manual (model numbers 32000 and higher) was read on 2026-09-15 and is now cited alongside the earlier one. It carries an explicit dry-fire notice — the rifle may be dry fired in moderation for basic function checks, with a snap cap for extensive practice — so doNotDryFire was changed from true to false. Ruger publishes a separate manual for rifles below model number 32000, which was not re-read for this change.