← All firearms · Printable work order
Ruger American Rifle
- easy
- Shop tier 1
- high confidence
- Rifle
- bolt action
- hunting
- budget
- detachable magazine
field strip ~2 min · reassembly ~3 min · detail strip ~30 min
Specifications
- Manufacturer
- Sturm, Ruger & Co.
- Origin
- United States
- Category
- Rifle
- Action
- Bolt action
- Calibers
- .308 Winchester, 6.5 Creedmoor, .223 Remington, .450 Bushmaster
- Capacity
- 3, 4, or 10 rounds depending on caliber and magazine
- Production
- 2011–present (in-production)
- Also known as
- American Predator, American Ranch
Model-specific safety
- Removing the magazine does not clear the chamber. Cycle the bolt and check the chamber directly.
- The bolt release must be operated to withdraw the bolt. Do not force the bolt out — if it will not come, the release is not engaged or the safety is blocking it.
- Clean from the breech with a bore guide. Cleaning a bolt rifle from the muzzle without a guide wears the crown and costs accuracy permanently.
- Removing the barrelled action from the stock changes the bedding relationship. Reinstall the action screws to a consistent torque or the rifle will shift its zero.
- The action beds on two V-blocks moulded into the stock rather than on conventional pillars. Action screw torque still matters, but overtightening can deform the polymer stock.
If it will not go back together
Common ways this firearm resists reassembly, and what is actually wrong. Forcing a part that will not seat is how firearms get damaged.
-
The bolt will not come out of the receiver.
Why The safety is off. Ruger specifies the safety ON if the firing pin is cocked.
Fix Put the safety in the SAFE position, open the bolt, and press the rear of the bolt stop — on the left of the receiver for a right-handed rifle, the right for a left-handed one.
Under spring tension
- Firing pin spring inside the bolt (detail strip)
- Magazine follower spring
Easily lost parts
Bolt release · Action screws · Magazine or floorplate components
Tools
| Tool | Required | Used for | Substitute |
|---|---|---|---|
| Bore guide | Yes | Cleaning from the breech without damaging the throat or the crown. | There is no good substitute. A rod run into an unguided chamber scrapes the throat. |
| Hex key or screwdriver matching the action screws | Optional | Removing the barrelled action from the stock. Not needed for routine cleaning. | |
| Torque wrench | Optional | Reinstalling action screws to a consistent value, which is an accuracy variable on every bolt rifle. |
Shop difficulty
Shop tier 1 Tier 1 — easy among rifles and carbines, for the full job: strip to the parts that get coated and put it back together working. 54 pieces, held by screws and pins, with a bolt that comes apart without a tool. The traps are small: the cocking piece falls off its cams if over-rotated, spring-loaded parts can jump, and the magazine latch goes back with a slave pin. None of it is timed.
Parts: 50 numbered parts (Complete rifle (50 line items, keys 1–50)), from Instruction Manual for Ruger American Rifle — Sturm, Ruger & Co., Inc., p. 32–33 ruger-docs.s3.amazonaws.com [1].
Bench time: about 30 min to strip, 45 min to rebuild (estimate). Stock, bolt (sleeve, cocking piece, firing pin), bottom metal, magazine latch (slave pin), bolt stop and safety.
Small parts: 18 pins, 8 springs, 2 detents or plungers (counted from the manufacturer's parts list (one per key number unless a quantity is given))
What comes off for coating
- Stock / bottom metal: action screws, trigger guard / floorplate, magazine box, spring, follower, swivel studs, recoil pad or butt plate
- Bolt: firing pin assembly (shroud, cocking piece, mainspring), extractor, ejector and spring, bolt sleeve / cocking piece
- Receiver: trigger assembly (as a unit), bolt stop and spring, safety (if receiver-mounted), scope bases / iron sights
- Magazine latch: magazine latch pin, latch, spring — slave pin and assembly tool (Ruger)
Special tools
- slave pin / assembly tool — Magazine latch reinstall
- 1/8 in punch — Magazine latch pin
- torque driver — Action screws
Known pain points
- Over-rotating the cocking piece when the bolt sleeve comes off drops it to the bottom of the dual cocking cams. Getting it back can take tools and real effort. (both)
Source: Instruction Manual for Ruger American Rifle — Sturm, Ruger & Co., Inc. ruger-docs.s3.amazonaws.com [1] — “If the cocking piece is turned too far in either direction, it will “fall down” to the bottom of the cocking cams. It will take significant effort, and possibly the use of hand tools or a gripping aid, to return the cocking piece to the correct cam notches.” - The safety selector, bolt stop and trigger are spring-and-plunger parts that jump when removed. Ruger forbids substitute springs if one is lost. (disassembly)
Source: Instruction Manual for Ruger American Rifle — Sturm, Ruger & Co., Inc. ruger-docs.s3.amazonaws.com [1] — “If a part is under spring tension (such as the Safety Selector, Bolt Stop, Trigger) remove it cautiously and anticipate the direction the spring and plunger are most likely to “jump.”” - The magazine latch and spring are reinstalled on a slave pin and assembly tool, which the pin then pushes out. (reassembly)
Source: Instruction Manual for Ruger American Rifle — Sturm, Ruger & Co., Inc. ruger-docs.s3.amazonaws.com [1] — “The slave pin and assembly tool will drop free after the magazine latch pin has been installed.”
See also 1 documented reassembly problem and their fixes.
Fit or check on rebuild
- Cocking piece in correct cam notch — If it has dropped, the bolt will not cock or assemble.
Source: Instruction Manual for Ruger American Rifle — Sturm, Ruger & Co., Inc. ruger-docs.s3.amazonaws.com [1] — “Please note that the cocking piece will only rotate clockwise, relative to the bolt body (when viewed from the rear of the bolt).” - Action screw torque — Affects zero.
- Re-zero sights or scope — Sights and optics come off for coating, and point of impact must be re-confirmed. This is a standard check, so no source.
This is Pew-Takedown's rating, not the manufacturer's. How tiers are rated. Forum reports are owners' experience, not specifications.
Manufacturer videos
Official videos from Sturm, Ruger & Co.'s own channels, linked rather than copied. Where a video and the steps on this page differ, follow the manufacturer's manual and video.
- Tech Tip - Ruger American® Rifle Disassembly & Reassembly Ruger Firearms · plays on ruger.com
field strip, reassembly · 2015-06-20
Covers: Ruger American Rifle (original/Gen I, standard magazine well) - Disassembly of a Ruger® American® Rifle with an AI/AR mag well Tech Tip RugerFirearms
field strip · 2021-11-22
Covers: Ruger American Rifle with AI/AR-style magazine well (per description) - Reassembly of the Ruger® American® Rifle with an AI/AR mag well Tech Tip RugerFirearms
reassembly · 2021-11-22
Covers: Ruger American Rifle with AI/AR-style magazine well (per description) - Ruger American® Rifle Generation II Disassembly Tech Tip RugerFirearms
field strip, detail strip · 2023-12-20
Covers: Ruger American Rifle Generation II (per description) - The Ruger American® Rifle Generation II Reassembly Tech Tips RugerFirearms
reassembly · 2023-12-20
Covers: Ruger American Rifle Generation II (per description) - The Ruger American® Rifle Generation II Length of Pull Tech Tips RugerFirearms
adjustment · 2023-12-20
Covers: Ruger American Rifle Generation II (per description)
Procedures
Clear and Make Safe
Clear & Make Safe- Point the muzzle in a safe direction and keep your finger off the trigger.
- Place the safety in the on position.
- Lift the bolt handle and draw the bolt fully rearward, extracting and ejecting any chambered round.
- Remove the detachable magazine.Removed at this step:
Magazine contents - Inspect the chamber and magazine well with a light and physically confirm the chamber is empty.WarningLook and feel. Both, every time.
- Remove all live ammunition from the work area.
Field Strip
Field StripBolt removal is the whole of routine maintenance on a bolt rifle. The bore cleans from the breech with the bolt out.
Manufacturer’s videos: Tech Tip - Ruger American® Rifle Disassembly & Reassembly Ruger Firearms · plays on ruger.com · Disassembly of a Ruger® American® Rifle with an AI/AR mag well Tech Tip RugerFirearms · Ruger American® Rifle Generation II Disassembly Tech Tip RugerFirearms
- Complete the Clear and Make Safe procedure. Confirm the chamber and magazine are empty and remove the magazine.
- If the firing pin is cocked, put the safety in the SAFE position.TipNote the direction: Ruger wants the safety ON for this, not off. Bolt rifles differ on this point and guessing is how people end up forcing a bolt that is simply locked.
- Open the bolt and pull it to the rear while pressing on the rear of the bolt stop.TipThe bolt stop is on the left side of the receiver on right-handed rifles and on the right side on left-handed ones.Removed at this step:
Bolt - Clean the bore from the breech using a bore guide, and clean the bolt face, lugs, and chamber.
- Stop here. Ruger states this is as far as you need to dismantle the rifle for routine cleaning, and that it is rarely necessary to go further.
Reassembly
ReassemblyManufacturer’s videos: Tech Tip - Ruger American® Rifle Disassembly & Reassembly Ruger Firearms · plays on ruger.com · Reassembly of the Ruger® American® Rifle with an AI/AR mag well Tech Tip RugerFirearms · The Ruger American® Rifle Generation II Reassembly Tech Tips RugerFirearms
- Confirm the bolt is correctly assembled and the bolt head is properly oriented.
- Align the bolt with the receiver raceway and slide it forward into the action.
- Close the bolt handle and cycle the bolt several times to confirm smooth travel and correct cocking.
- Confirm the bolt release retains the bolt when the action is opened fully.
- Perform the function check.
Remove the Barrelled Action from the Stock
Detail Strip tools requiredFor a deep clean or bedding work. Not routine maintenance.
Manufacturer’s video: Ruger American® Rifle Generation II Disassembly Tech Tip RugerFirearms
- Read this before touching the cocking piece: if it is rotated too far in either direction it will fall to the bottom of the cocking cams, and getting it back into the correct cam notches takes significant effort and possibly tools.WarningThis is the one place on this rifle where a careless quarter-turn creates a real job.TipThe cocking piece only rotates clockwise relative to the bolt body, viewed from the rear. There are dual cocking cams, so you may need to rotate it up the cams twice to return it to position.
- Remove the bolt as described in the field strip.
- Grasp the outside of the bolt shroud and cocking piece and rotate approximately 30 degrees, so the cocking piece lobe aligns with the cam notch, following the manual's figures rather than feel.
- Reverse the sequence to reassemble, checking the cocking piece lobe is seated in its notch before the bolt goes back in the rifle.
Patent drawings
not under copyrightDrawings from US patents on this design. A patent shows the invention as the inventor filed it; the firearm that shipped can differ in detail, and later production often does. Use them to see how the parts relate, not as a parts reference or a procedure. Per the USPTO, the text and drawings of a patent are typically not subject to copyright; each patent here was checked for a copyright notice.
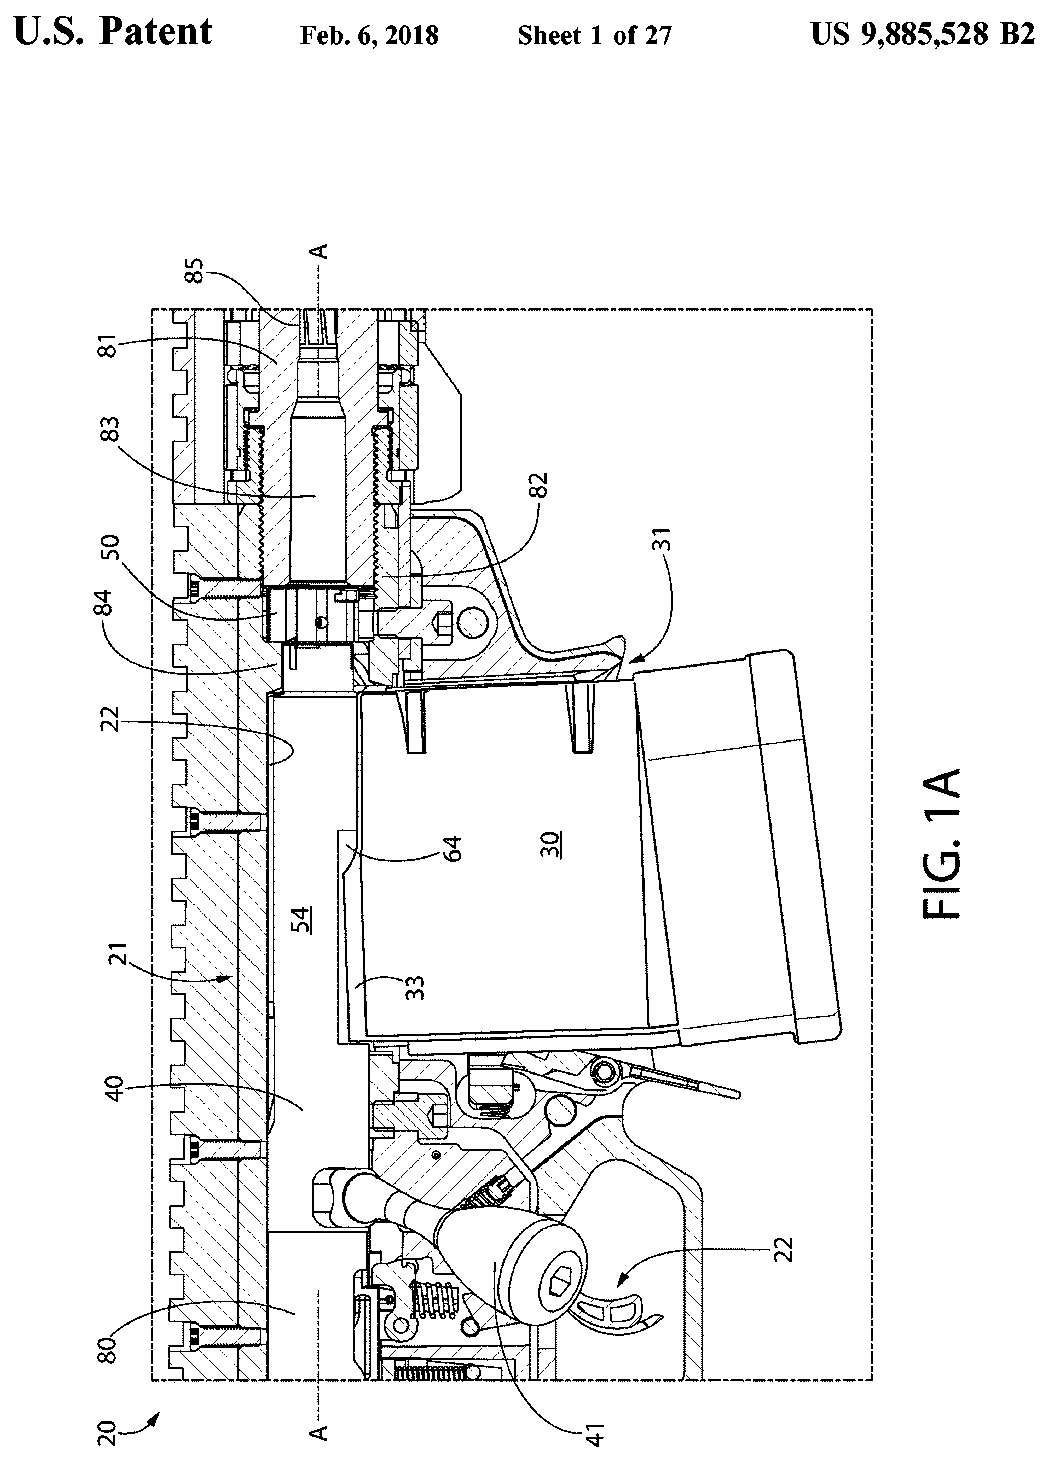
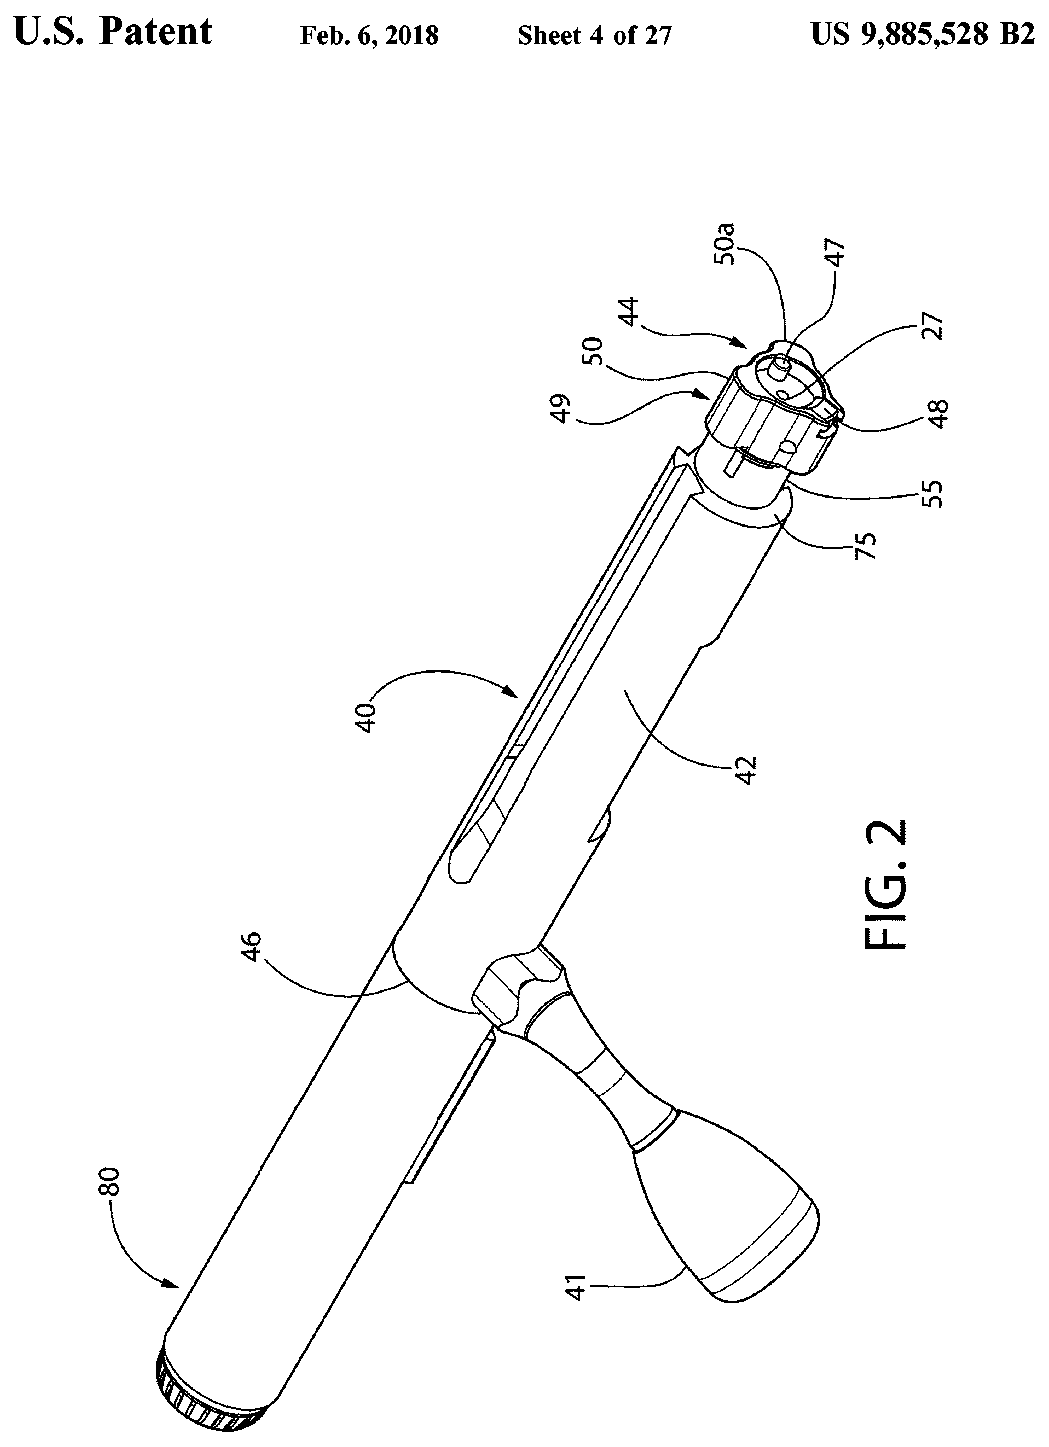
US Patent 9,885,528 — Bolt for bolt action rifles
Jonathan Philip MATHER · assigned to Sturm, Ruger & Company, Inc. · filed 2016-02-25 · granted 2018-02-06. Full patent (USPTO)
The Ruger American Rifle's three-lug bolt, bolt rear extension and handle, and how the bolt locks in the receiver above the magazine.
Why this is the Ruger American Rifle’s patent: listed on the maker’s patent-marking page — Ruger Patents — Sturm, Ruger & Co., Inc. ruger.com [13]: “Ruger American® Rifle 11,105,570; 10,921,075; 10,458,731; 9,885,528; 8,925,230; 8,881,444”
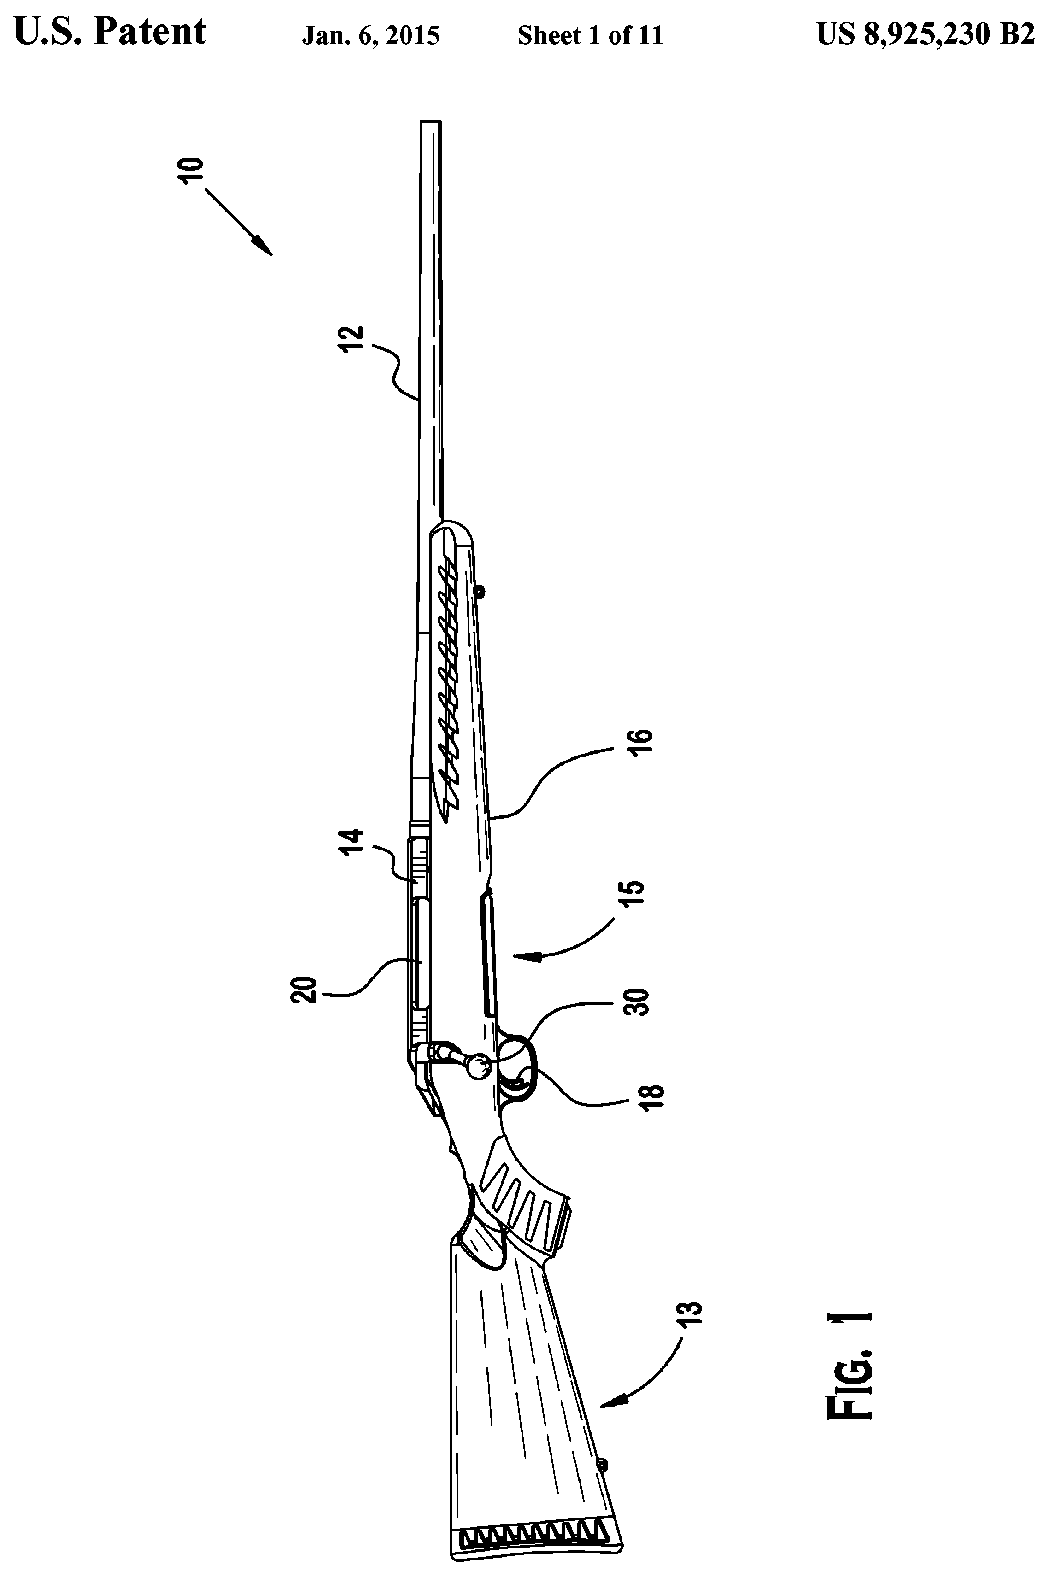
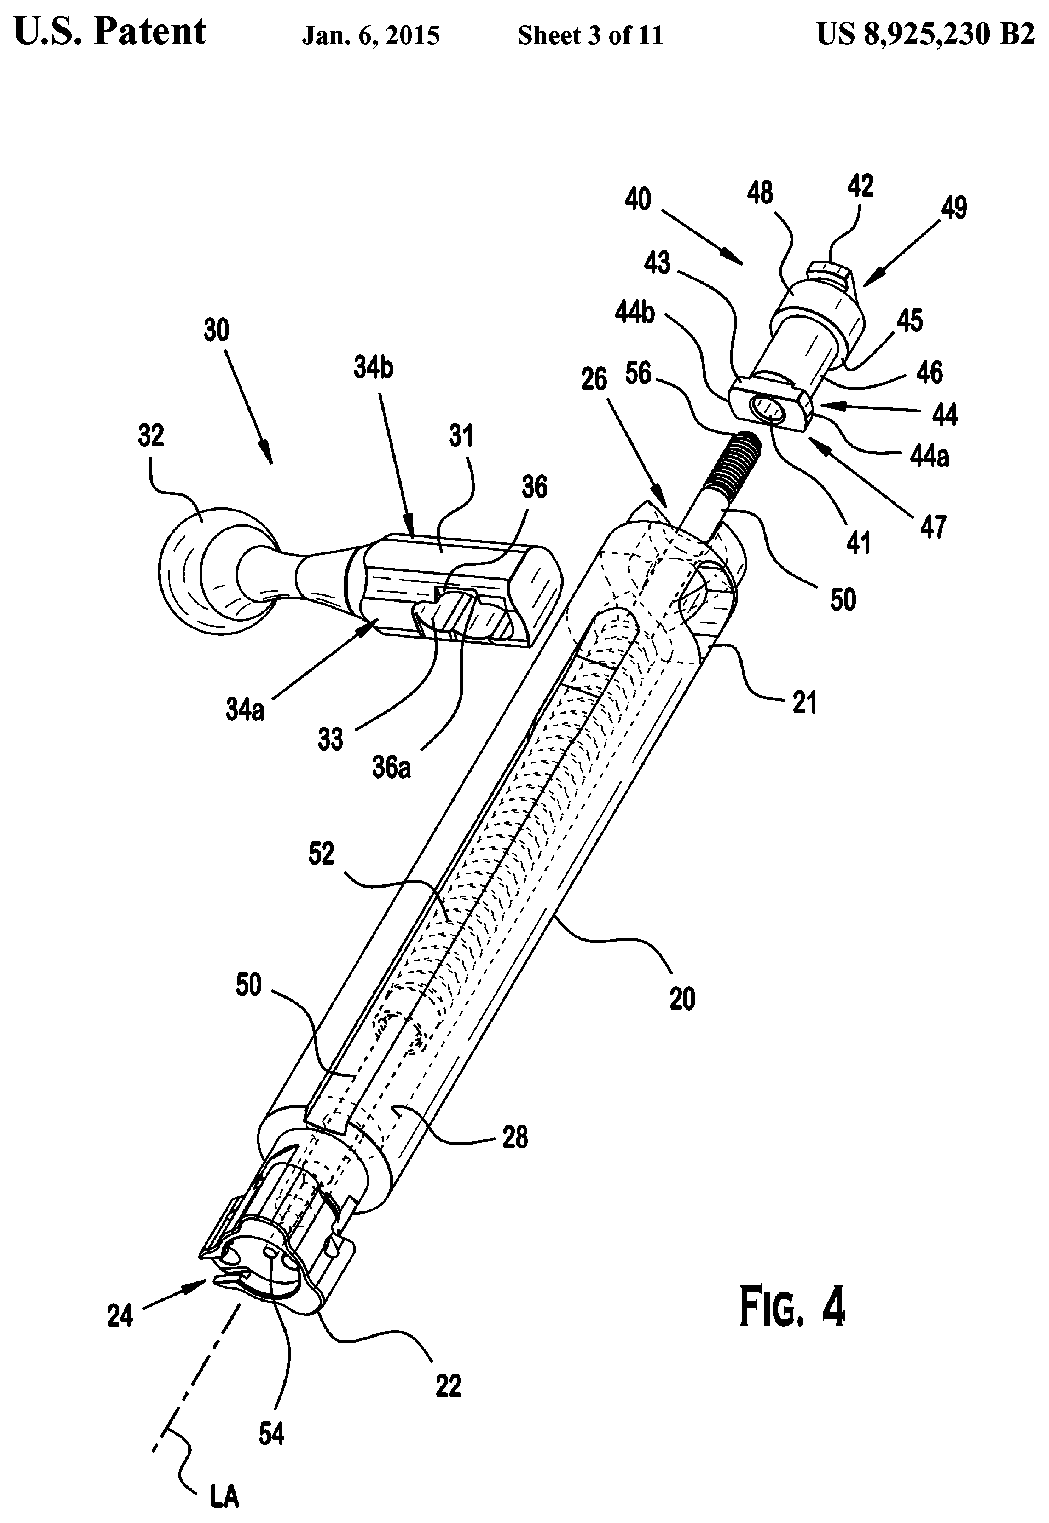
US Patent 8,925,230 — Bolt handle assembly for firearm
Scott Warburton, Bruce Rozum, Dwight Potter · assigned to Sturm, Ruger & Company, Inc. · filed 2012-12-14 · granted 2015-01-06. Full patent (USPTO)
The Ruger American Rifle's bolt handle assembly and how the handle mounts to the bolt.
Why this is the Ruger American Rifle’s patent: listed on the maker’s patent-marking page — Ruger Patents — Sturm, Ruger & Co., Inc. ruger.com [13]: “Ruger American® Rifle 11,105,570; 10,921,075; 10,458,731; 9,885,528; 8,925,230; 8,881,444”
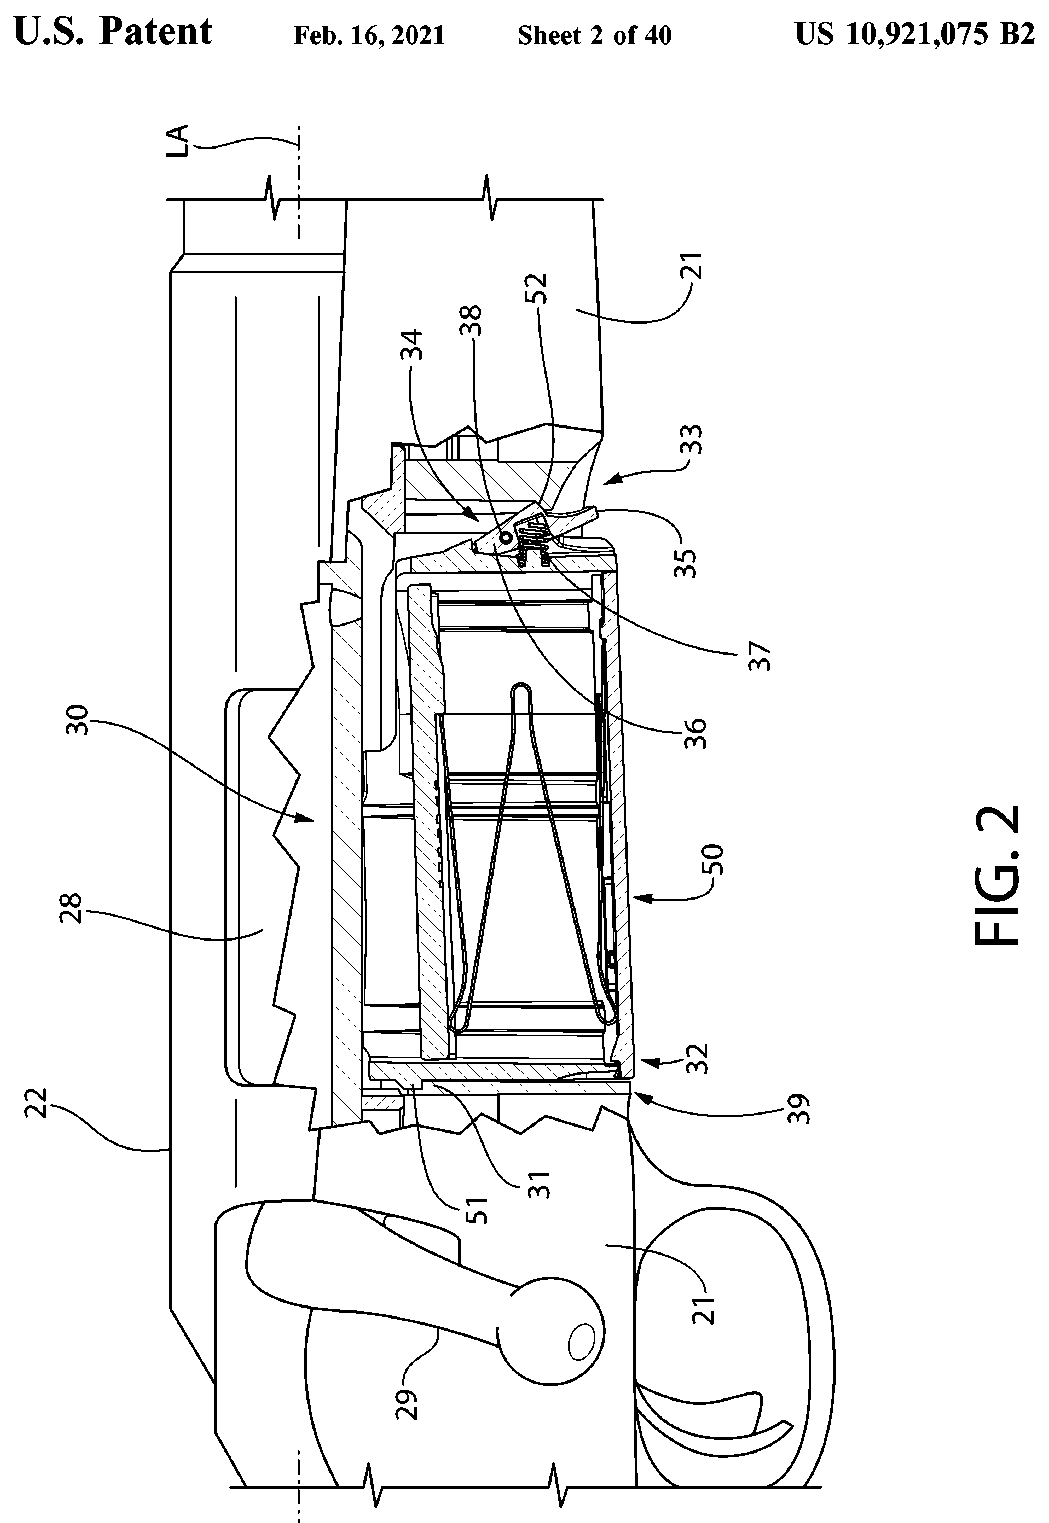
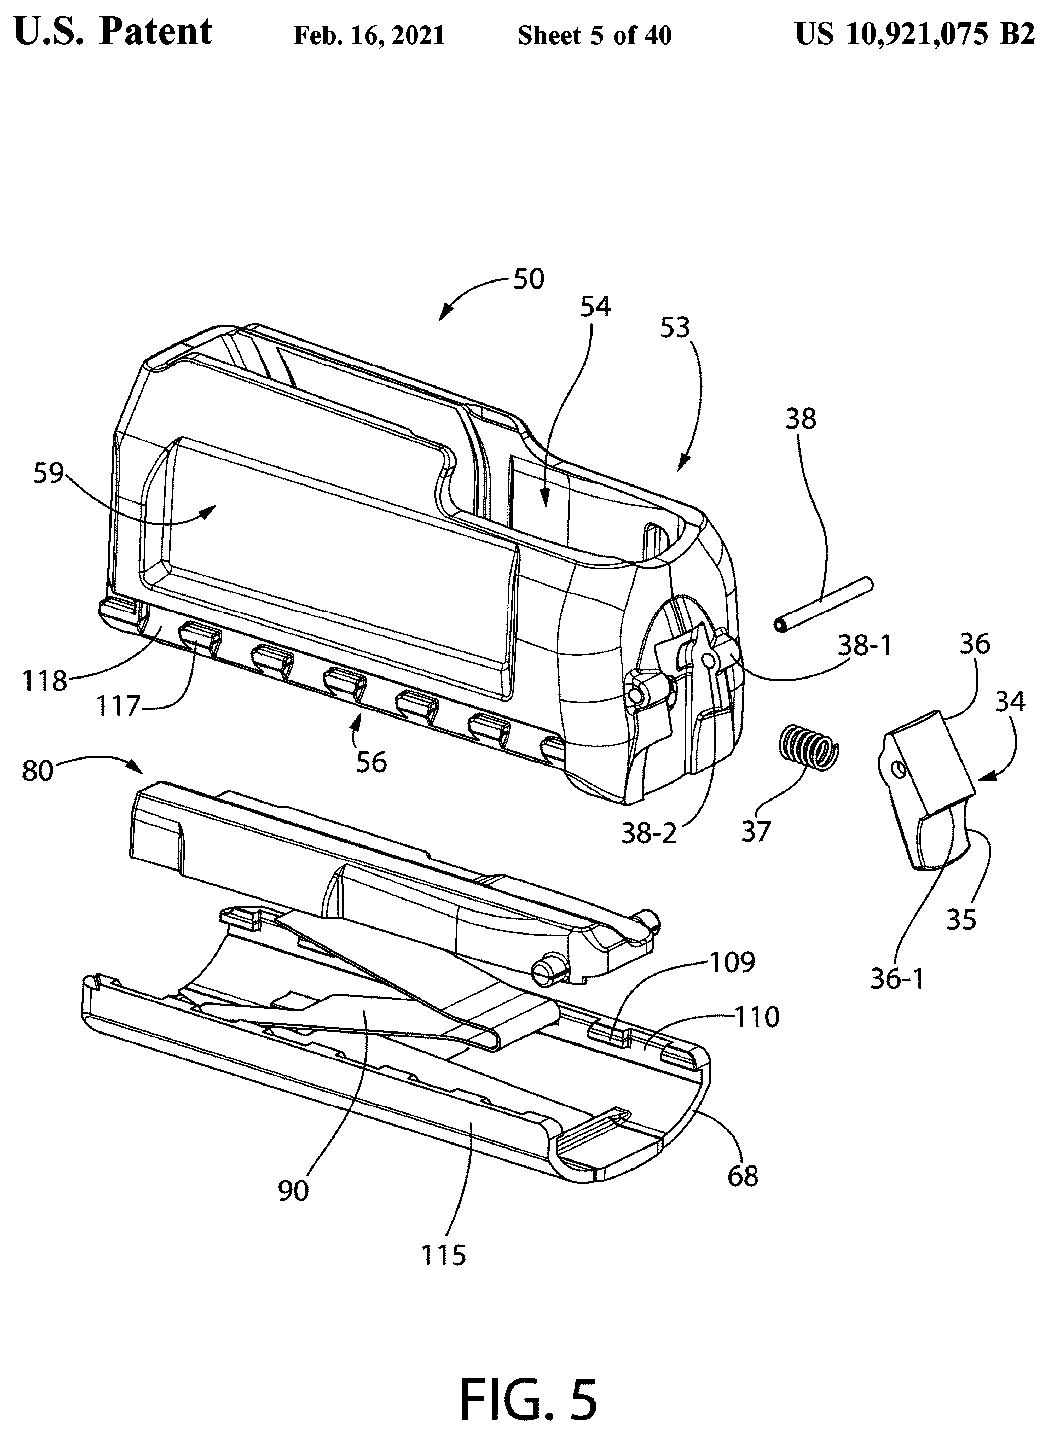
US Patent 10,921,075 — Magazine for firearm
Nathan Brown, Matthew S. Willson, Dean M. Cousino, Maksim Sakalouski · assigned to Sturm, Ruger & Company, Inc. · filed 2019-07-09 · granted 2021-02-16. Full patent (USPTO)
The Ruger American Rifle's detachable double-stack box magazine and how it sits in the breech area.
Why this is the Ruger American Rifle’s patent: listed on the maker’s patent-marking page — Ruger Patents — Sturm, Ruger & Co., Inc. ruger.com [13]: “Ruger American® Rifle 11,105,570; 10,921,075; 10,458,731; 9,885,528; 8,925,230; 8,881,444”
Torque specifications
| Fastener | Torque | Sequence, notes and the source's words | Where it comes from |
|---|---|---|---|
| Bedding (action) screws (2) Original Ruger American Rifle (before Generation II) |
60–80 in-lb 6.8–9 N·m · 5–6.7 ft-lb |
Loosely fit both screws first. Do not tighten one all the way and then the other: alternate, a partial turn at a time, so both come up equally. On modular stocks, refit the magazine well into the stock before the screws. “Instead, alternately tighten each one – a partial turn at a time – so that the screws will be tightened equally until both are snugly tightened to 60-80 in-lbs.” |
Instruction Manual for Ruger American Rifle — Sturm, Ruger & Co., Inc., p. 24 ruger-docs.s3.amazonaws.com [1] |
| Bedding (action) screws (2) Ruger American Rifle Generation II (modular stocks with removable magazine well; the same value is repeated for AI-style-magazine stocks) |
60–80 in-lb 6.8–9 N·m · 5–6.7 ft-lb |
Seat the barreled action so the two angled bedding blocks in the stock fit the receiver grooves; insert the magazine well; push the latch forward with a ball-end Allen wrench to reach the rear screw; loosely install both screws; do not tighten one all the way and then the other — alternately tighten each a partial turn at a time so both come up equally. “alternately tighten each one – a partial turn at a time – so that the screws will be tightened equally until both are snugly tightened to 60-80 in-lbs.” |
Instruction Manual for Ruger American Rifle Generation II — Sturm, Ruger & Co., p. 28 ruger-docs.s3.amazonaws.com [2] |
| Factory Picatinny scope base screws (4, #6-48) Ruger American Rifle Generation II (receiver fitted with Picatinny base at the factory) |
18 in-lb 2 N·m · 1.5 ft-lb |
T-10 Torx driver. “Factory hardware to mount the scope base is (4) #6-48 screws. Torque to 18 in-lb with a T-10 Torx® driver.” |
Instruction Manual for Ruger American Rifle Generation II — Sturm, Ruger & Co., p. 43 ruger-docs.s3.amazonaws.com [2] |
Notes: The original Ruger American Rifle manual and the Generation II manual both give 60–80 in-lb for the bedding screws; both are shown, each with the manual it came from. The scope-base value is from the Generation II manual. Ruger also lists the bedding screws first among its accuracy checks, before cleaning the bore or checking scope mounts.
Reported by other sources — not the manufacturer
| Fastener | Torque | Who says so, and their words | Where it comes from |
|---|---|---|---|
| Action screws (2), 1/4-28 socket head cap screws Ruger American short action in a Magpul Hunter American stock (MAG931 / MAG1207) |
60–80 in-lb 6.8–9 N·m · 5–6.7 ft-lb |
Reported by Magpul Industries Place the two Mounting Blocks into the Bedding Block, seat the receiver on them with the screw path aligned, insert the screws and tighten with a 3/16" hex. 'Caution: DO NOT overtighten the action screws as this may cause damage to the action and/or the stock.' “using a 3/16” hex wrench, tighten to the rifle manufacturer’s specification of 60-80 in-lbs. (Ruger specification).” |
Hunter American Stock (MAG931 / MAG1207) Installation Instructions, 072-0126-B — Magpul Industries, PDF p. 1 magpul.com [3] |
| Take down bolts (action screws), front and rear Ruger American Centerfire in a Boyds stock |
30–35 in-lb 3.4–4 N·m · 2.5–2.9 ft-lb |
Reported by Boyds Gunstocks Verify the action and barrel are centered in the inlet with barrel clearance; tighten starting with the rear screw (F) and then the front screw (E), alternating back and forth evenly until both reach 30-35 inch pounds. Boyds requires bedding the front and rear lugs during final assembly. “Tighten the take down bolts to 30 – 35 inch pounds, starting with the rear screw (F) and then the front screw (E) and alternate back and forth evenly until both are at the recommended 30-35 inch pounds).” |
Assembly Instructions for ONLY Ruger American Centerfire Boyds Stocks — Boyds Gunstocks, PDF p. 4 boydsgunstocks.com [4] |
| Take down screws (with AI-style floor plate kit) Ruger American Centerfire short action in a Boyds stock retro-fitted with the AI-style floor plate (kit PN A09158) |
30–35 in-lb 3.4–4 N·m · 2.5–2.9 ft-lb |
Reported by Boyds Gunstocks “Insert and torque the take down screws 30-35 inch pounds.” |
Addendum (6/24/19) to Instructions for Ruger American Centerfire Boyds Stocks with AI Style floor plate — Boyds Gunstocks, PDF p. 1 boydsgunstocks.com [5] |
| Action screws Ruger American Rifle |
60–80 in-lb 6.8–9 N·m · 5–6.7 ft-lb |
Reported by Fix It Sticks (compiled reference list) “Action screws: 60-80 in-lbs” |
Torque Specs (Torque Specs by Brand — Ruger American Rifle) — Fix It Sticks (compiled reference list) store.fixitsticks.com [6] |
| Action screws (front and rear) Ruger American SA/LA in an MDT Oryx chassis (replace bolt stop pin with supplied 20 mm pin first) |
60–65 in-lb 6.8–7.3 N·m · 5–5.4 ft-lb |
Reported by MDT Sporting Goods Ltd. (Modular Driven Technologies, MDT) Push the action rearward against the recoil lug and torque the front action screw first, then the rear (manual p. 1: 'first torquing the front then the rear action screw'). “Ruger American SA/LA — 3/16” Hex Wrench — 60-65 inch-pounds” |
MDT Oryx Chassis System — User Manual (13694, Version 07.14.26), attached to MDT help-centre article 'ORYX Chassis Installation Guides' — MDT Sporting Goods Ltd. (Modular Driven Technologies, MDT), PDF p. 2 (inlet-specific torque table) support.mdttac.com [8] |
| Action screws (1/4-28 FHCS front, 1/4-28 BHCS rear) Ruger American Short Action with MDT Core Bottom Metal in an MDT TIMBR Core stock |
65 in-lb 7.3 N·m · 5.4 ft-lb |
Reported by MDT Sporting Goods Ltd. (Modular Driven Technologies, MDT) Fit spacers in the action-screw holes; push the bottom metal forward for alignment before torquing. “7. Tighten the action screws using a 5/32” Hex Key or Torque wrench with a 5/32” Hex Bit (Torque to 65 inch-pounds).” |
MDT TIMBR Core & Core Bottom Metal — Ruger American Short Action — User Manual (Version 04.28.25), attached to MDT help-centre article 'Core Bottom Metal Installation' — MDT Sporting Goods Ltd. (Modular Driven Technologies, MDT), PDF p. 1, step 7 support.mdttac.com [9] |
| Bottom metal retaining screw (#8-15 x 0.5” flat head thread-forming screw) Ruger American Short Action with MDT Core Bottom Metal in an MDT TIMBR Core stock |
15 in-lb 1.7 N·m · 1.2 ft-lb |
Reported by MDT Sporting Goods Ltd. (Modular Driven Technologies, MDT) Only torque once you have confirmed a magazine can be inserted. Maker also allows 'hand tight'. “9. Use a phillips screws driver to install the bottom metal retaining screw (#8-15 x 0.5” FHTFS) Hand tight or torque to 15 inch-pounds.” |
MDT TIMBR Core & Core Bottom Metal — Ruger American Short Action — User Manual (Version 04.28.25), attached to MDT help-centre article 'Core Bottom Metal Installation' — MDT Sporting Goods Ltd. (Modular Driven Technologies, MDT), PDF p. 1, step 9 support.mdttac.com [9] |
| Action screws (front and rear) Ruger American in a KRG Ruger American Bravo chassis |
65 in-lb 7.3 N·m · 5.4 ft-lb |
Reported by Kinetic Research Group (KRG) Tighten alternately front/rear in increments until full torque is reached. “Step 5: Torque both screws to 65 in-lbs of torque in an incremental manner, moving back and forth between the two screws until full torque is reached.” |
KRG Ruger American Bravo Chassis — Installation Instructions (INST-BRV-RUG) — Kinetic Research Group (KRG), PDF p. 2 kineticresearchgroup.com [10] |
| Action screws (barreled action to UMC) Ruger American (Gen 2 and most Gen 1) in a Grayboe stock with Universal Mini Chassis (UMC) |
45 in-lb 5.1 N·m · 3.7 ft-lb |
Reported by Grayboe For Ruger American the barreled action goes into the UMC first, then the trigger bow, then the UMC into the stock (UMC-to-stock screws 60 in-lb). “Set the barreled action into the mini chassis. Install the two supplied action screws (same length front and rear). Torque both screws to 45 inch-pounds.” |
Grayboe — UMC (Universal Mini Chassis) Installation Instructions (web page) — Grayboe, p. Section 'Ruger American', Step 2 grayboe.com [11] |
| Rear trigger guard woodscrew (L, PN 100-923) Ruger American / Ranch / Predator centerfire short action in a Boyds stock with Boyds AR-style magazine conversion floorplate |
30 in-lb 3.4 N·m · 2.5 ft-lb |
Reported by Boyds Gunstocks Install the assembled magazine conversion floorplate, then the rear woodscrew; take-down bolts are then alternated to 30-35 in-lb (already recorded). “Install the assembled magazine conversion floorplate (I), Then rear Woodscrew (L) torque to 30 Inch lbs.” |
Boyds — Ruger American Centerfire Boyds Stocks with AR style floor plate — assembly instructions — Boyds Gunstocks, PDF p. 4 boydsgunstocks.com [12] |
Materials and factory finish
As stated by Sturm, Ruger & Co.. Prep, masking and cure depend on these; a polymer or aluminium part, a nitrided or anodised finish, and a blued steel part are each a different job. Variants with other finishes may exist — check the maker's page for the exact SKU on the bench.
| Component | Material | Factory finish | Where it comes from |
|---|---|---|---|
| Receiver Model 46902 (.308 Win) — 'Material' is the sheet's general material line | Alloy Steel | — | Ruger American Rifle Generation II Standard Bolt-Action Rifle — Specifications (model 46902) — Sturm, Ruger & Co. ruger.com [7] “Material Alloy Steel” |
| Barrel Model 46902 | Alloy Steel | Gun Metal Gray Cerakote | Ruger American Rifle Generation II Standard Bolt-Action Rifle — Specifications (model 46902) — Sturm, Ruger & Co. ruger.com [7] “Material Alloy Steel … Barrel Finish Gun Metal Gray Cerakote” |
| Receiver Model 46902 | — | Cerakote | Ruger American Rifle Generation II Standard Bolt-Action Rifle — Specifications (model 46902) — Sturm, Ruger & Co. ruger.com [7] “Professionally applied Cerakote coating on barrel, muzzle brake, receiver and bolt handle results in a durable, easy-to-maintain finish.” |
| Bolt Gen II | stainless steel | — | Ruger American Rifle Generation II Standard Bolt-Action Rifle — Specifications (model 46902) — Sturm, Ruger & Co. ruger.com [7] “The one-piece bolt is CNC machined from stainless steel for smooth operation and the familiar three-lug design with 70° throw provides ample scope clearance.” |
| Stock Model 46902 | — | Splatter | Ruger American Rifle Generation II Standard Bolt-Action Rifle — Specifications (model 46902) — Sturm, Ruger & Co. ruger.com [7] “Stock Gray Splatter Gen II American … Splatter finished stock provides excellent grip without being too sharp or abrasive.” |
Parts list
Transcribed from the manufacturer's parts list (Instruction Manual for Ruger American Rifle — Sturm, Ruger & Co., Inc., p. 32–33 ruger-docs.s3.amazonaws.com [1]) — Ruger American Rifle. Exploded views on pp. 34–38. Key numbers refer to the exploded view in that document.
50 parts
| Key | Part | Part no. | Qty | Group |
|---|---|---|---|---|
| 1 | Bolt / Firing Pin Assembly – Complete Parts so marked must be factory fit. | 1 | ||
| 2 | Bolt Shroud | 1 | ||
| 3 | Firing Pin Back | 1 | ||
| 4 | Firing Pin Spring Stop | 1 | ||
| 5 | Firing Pin | 1 | ||
| 6 | Bolt Stop Pin | 1 | ||
| 7 | Bolt Stop Spring | 1 | ||
| 8 | Bolt Stop Lever | 1 | ||
| 9 | Ejector/Firing Pin Back Pin | 1 | ||
| 10 | Ejector Spring | 1 | ||
| 11 | Ejector Plunger, Short Action | 1 | ||
| 12 | Extractor | 1 | ||
| 13 | Extractor Ball | 1 | ||
| 14 | Extractor Spring | 1 | ||
| 15 | Bolt Body Parts so marked must be factory fit. | 1 | ||
| 16 | Bolt Handle | 1 | ||
| 17 | Firing Pin Spring | 1 | ||
| 18 | Receiver, Long Action The receiver is a serial-numbered part and is not offered for sale. | 1 | ||
| 19 | Barrel Nut Parts so marked must be factory fit. | 1 | ||
| 20 | Barrels Parts so marked must be factory fit. | 1 | ||
| 21 | Trigger Assembly – Complete Parts so marked must be factory fit. | 1 | ||
| 22 | Safety Button | 1 | ||
| 23 | Sear Spring | 1 | ||
| 24 | Sear Parts so marked must be factory fit. | 1 | ||
| 25 | Safety Link Parts so marked must be factory fit. | 1 | ||
| 26 | Sear Stop Pin | 1 | ||
| 27 | Trigger Block Pin Parts so marked must be factory fit. | 1 | ||
| 28 | Trigger Sear Pin | 2 | ||
| 29 | Safety Shaft Parts so marked must be factory fit. | 1 | ||
| 30 | Safety Spring Parts so marked must be factory fit. | 1 | ||
| 31 | Trigger Housing Parts so marked must be factory fit. | 1 | ||
| 32 | Trigger Sear Pin E-Clip | 2 | ||
| 33 | Trigger Block Pin E-Clip | 1 | ||
| 34 | Safety Shaft E-Clip | 1 | ||
| 35 | Trigger Release Parts so marked must be factory fit. | 1 | ||
| 36 | Trigger Release Spring | 1 | ||
| 37 | Trigger Parts so marked must be factory fit. | 1 | ||
| 38 | Trigger Release Pin | 1 | ||
| 39 | Trigger Spring | 1 | ||
| 40 | Trigger Adjustment Screw | 1 | ||
| 41 | Trigger Housing Pin | 2 | ||
| 42 | Recoil Pad | 1 | ||
| 43 | Sling Swivel Stud | 1 | ||
| 44 | Action Screws | 2 | ||
| 45 | Magazine | 1 | ||
| 46 | Stock Assembly | 1 | ||
| 47 | Magazine Well | 1 | ||
| 48 | Magazine Button (AR-style magazine well) / Magazine Latch (Mini-30 & AI-style magazine well) | 1 | ||
| 49 | Magazine Latch Spring | 1 | ||
| 50 | Magazine Latch Pin | 1 |
Function check
- Verify the rifle is unloaded and the magazine is empty before each check.
- Cycle the bolt and confirm it cocks and closes fully into battery.
- With the action cocked, engage the safety and press the trigger. The firing pin must not release.
- Disengage the safety without touching the trigger. The firing pin must not release.
- Press the trigger and confirm the firing pin releases cleanly.
- Confirm the bolt release retains the bolt.
- Load dummy rounds and confirm they feed from the magazine and eject cleanly.
Maintenance
Lubrication points
- Bolt lugs and the locking recesses
- Bolt body where it rides in the raceway
- Cocking cam surfaces
- Extractor
Cleaning notes
Clean from the breech with a bore guide. Do not over-lubricate the firing pin assembly — heavy oil there congeals in cold weather and causes light strikes. Keep the chamber dry and free of oil before shooting, since oil in a chamber raises bolt thrust.
Suggested inspection interval: roughly every 500 rounds. This is a general guideline, not a manufacturer specification.
Wear parts to inspect
Extractor · Ejector and spring · Bolt lugs · Firing pin spring · Crown (inspect for cleaning rod wear)
Common issues
| Symptom | Likely cause | What to do |
|---|---|---|
| Group size opens up after cleaning or transport | Action screw torque changed | Retorque the action screws consistently, front first. |
| Light strikes in cold weather | Heavy or congealed oil in the firing pin assembly | Degrease the firing pin assembly and run it dry or with a light synthetic lubricant. |
| Bolt will not withdraw | Bolt release not operated, or the safety is blocking it | Move the safety to fire and operate the release. Do not force the bolt. |
Also covers
The procedures above are reported to apply to: Ruger American Predator · Ruger American Ranch · Ruger American Rifle Generation II. Verify against the manual for your specific model.
Similar manual of arms
Sourcing
- Confidence
- high — Cross-checked against a primary source such as the manufacturer's manual or an issuing military technical manual.
- Verification
- Checked against the manufacturer manual
- Last updated
- 2026-10-29
References
Every source this page draws on, with its web address so you can read it yourself. Numbers in brackets elsewhere on the page point here.
- [1] Instruction Manual for Ruger American Rifle — Sturm, Ruger & Co., Inc. manufacturer manual primary source
https://ruger-docs.s3.amazonaws.com/_manuals/americanRifle.pdf (checked 2026-09-14) - [2] Instruction Manual for Ruger American Rifle Generation II — Sturm, Ruger & Co. manufacturer manual primary source
https://ruger-docs.s3.amazonaws.com/_manuals/RAR-GenerationII.pdf (checked 2026-09-27) - [3] Hunter American Stock (MAG931 / MAG1207) Installation Instructions, 072-0126-B — Magpul Industries manufacturer manual secondary source
https://magpul.com/media/wysiwyg/Instructions/MAG931-MAG1207_Hunter_American_Stock_INSRT.pdf (checked 2026-09-27) - [4] Assembly Instructions for ONLY Ruger American Centerfire Boyds Stocks — Boyds Gunstocks manufacturer manual secondary source
https://www.boydsgunstocks.com/docs/default-source/default-document-library/assembly-instructions-ruger-american-series.pdf?sfvrsn=2ea2656d_2 (checked 2026-09-27) - [5] Addendum (6/24/19) to Instructions for Ruger American Centerfire Boyds Stocks with AI Style floor plate — Boyds Gunstocks manufacturer manual secondary source
https://www.boydsgunstocks.com/docs/default-source/default-document-library/assembly-instructions-ruger-acf-ai-style.pdf?sfvrsn=c1a2656d_0 (checked 2026-09-27) - [6] Torque Specs (Torque Specs by Brand — Ruger American Rifle) — Fix It Sticks (compiled reference list) website tertiary source
https://store.fixitsticks.com/pages/torque-specs (checked 2026-09-27) - [7] Ruger American Rifle Generation II Standard Bolt-Action Rifle — Specifications (model 46902) — Sturm, Ruger & Co. website primary source
https://ruger.com/products/americanRifleGenII/specSheets/46902.html (checked 2026-10-03) - [8] MDT Oryx Chassis System — User Manual (13694, Version 07.14.26), attached to MDT help-centre article 'ORYX Chassis Installation Guides' — MDT Sporting Goods Ltd. (Modular Driven Technologies, MDT) manufacturer manual secondary source
https://support.mdttac.com/hc/article_attachments/51468856863892 (checked 2026-10-11) - [9] MDT TIMBR Core & Core Bottom Metal — Ruger American Short Action — User Manual (Version 04.28.25), attached to MDT help-centre article 'Core Bottom Metal Installation' — MDT Sporting Goods Ltd. (Modular Driven Technologies, MDT) manufacturer manual secondary source
https://support.mdttac.com/hc/article_attachments/47356433181076 (checked 2026-10-11) - [10] KRG Ruger American Bravo Chassis — Installation Instructions (INST-BRV-RUG) — Kinetic Research Group (KRG) manufacturer manual secondary source
https://kineticresearchgroup.com/download/67002/ (checked 2026-10-11) - [11] Grayboe — UMC (Universal Mini Chassis) Installation Instructions (web page) — Grayboe website secondary source
https://www.grayboe.com/pages/umc-installation-instructions (checked 2026-10-11) - [12] Boyds — Ruger American Centerfire Boyds Stocks with AR style floor plate — assembly instructions — Boyds Gunstocks manufacturer manual secondary source
https://www.boydsgunstocks.com/docs/default-source/default-document-library/ruger-acf-predator-ranch-ar-mag-assembly.pdf?sfvrsn=7c1b2f6a_2 (checked 2026-10-11) - [13] Ruger Patents — Sturm, Ruger & Co., Inc. website primary source
https://ruger.com/micros/Patents/index.html (checked 2026-10-13)
Notes: CORRECTED on 2026-09-15 against the factory manual. The entry carried generic bolt-action boilerplate telling the reader to move the safety to the fire position. Ruger specifies the opposite — safety in the SAFE position if the firing pin is cocked. That boilerplate has now been checked against three different makers' manuals and been wrong on all three. Added the bolt stop's handedness and the manual's warning about over-rotating the cocking piece. Generation I and Generation II American rifles differ in stock, muzzle threading, and magazine. The bolt release and takedown are consistent.