← All firearms · Printable work order
Ruger AR-556
- easy
- Shop tier 2
- high confidence
- Rifle
- direct impingement
- modular
- toolless field strip
- budget ar
field strip ~2 min · reassembly ~3 min · detail strip ~25 min
Specifications
- Manufacturer
- Sturm, Ruger & Co.
- Origin
- United States
- Category
- Rifle
- Action
- Gas, direct impingement
- Calibers
- 5.56x45mm NATO, .223 Remington
- Capacity
- 30+1
- Production
- 2014–present (in-production)
- Also known as
- AR-556 MPR
Model-specific safety
- The bolt cam pin MUST be installed. Without it the bolt cannot lock into the barrel extension, and firing in that condition can destroy the rifle and seriously injure the shooter. The firing pin retaining pin will not install without the cam pin in place — that is a designed safeguard, so if the retaining pin will not go in, stop and find out why.
- The safety selector only engages when the hammer is cocked. If it will not rotate to SAFE, the hammer is down.
- The buffer and buffer spring are under compression. When you depress the buffer retainer, control the buffer.
- Gas system components are extremely hot immediately after firing.
- The upper receiver swings forward as soon as the rear takedown pin is disengaged. Ruger warns this can pinch fingers wrapped around the magazine well.
If it will not go back together
Common ways this firearm resists reassembly, and what is actually wrong. Forcing a part that will not seat is how firearms get damaged.
-
The firing pin retaining pin will not go in.
Why The cam pin is missing, or it is in but not rotated 90 degrees, so it blocks the retaining pin's hole.
Fix Pull the firing pin, seat the cam pin in its hole and rotate it a quarter turn, then reinstall the firing pin and the retaining pin.
Forcing it Never force or trim the retaining pin. Without the cam pin rotated the bolt cannot lock, and the rifle is unsafe to fire.
-
The bolt carrier group will not slide back into the upper receiver.
Why The charging handle is not in its channel ahead of the carrier, or the bolt is not pushed forward into its unlocked position on the carrier.
Fix Insert the charging handle part way, push the bolt fully forward in the carrier, then feed the carrier key into the charging handle's track and slide both home together.
-
The upper and lower will not close, or the rear takedown pin will not seat.
Why The bolt carrier group is not fully forward in the upper, or the hammer is forward and fouling the carrier.
Fix Push the carrier fully into battery. If the receivers still will not close, cock the hammer before mating them.
Forcing it Forcing the receivers shut on a hammer bends the disconnector and hammer hooks.
-
The takedown pins are extremely stiff on a new rifle.
Why New receiver holes and detents are tight.
Fix Ruger's own instruction is to use a punch and gently tap the pin through. It becomes easier to remove over time.
Under spring tension
- Buffer and buffer spring in the receiver extension
- Extractor spring
- Magazine springs
Easily lost parts
Bolt cam pin · Firing pin retaining pin · Extractor pin · Buffer retainer and spring
Tools
No tools required for the field strip.
Shop difficulty
Shop tier 2 Tier 2 — moderate among rifles and carbines, for the full job: strip to the parts that get coated and put it back together working. 72 parts, the standard AR-15 full strip. It needs several captive detents and plungers (takedown and pivot detents, buffer retainer, selector detent, bolt catch plunger), roll pins, and a hammer spring that only works one way round. These are common traps with common jigs, and nothing is timed.
Parts: 72 numbered parts (Complete rifle, standard handguard (72 line items; free-float supplement excluded)), from Ruger AR-556 Owner’s Manual — Sturm, Ruger & Co., Inc., p. 44–45 ruger-docs.s3.amazonaws.com [2].
Bench time: about 45 min to strip, 70 min to rebuild (estimate). Full AR strip: BCG, upper furniture and gas system, lower FCG, buffer, bolt catch, pivot/takedown detents. Rebuild time is driven by the detents and the roll pins.
Small parts: 13 pins, 12 springs, 8 detents or plungers (counted from the manufacturer's parts list (one per key number unless a quantity is given))
What comes off for coating
- Upper: handguard / delta ring or rail, gas block and gas tube, front sight (if fitted), flash hider, forward assist, ejection port cover and pin — armorer's wrench
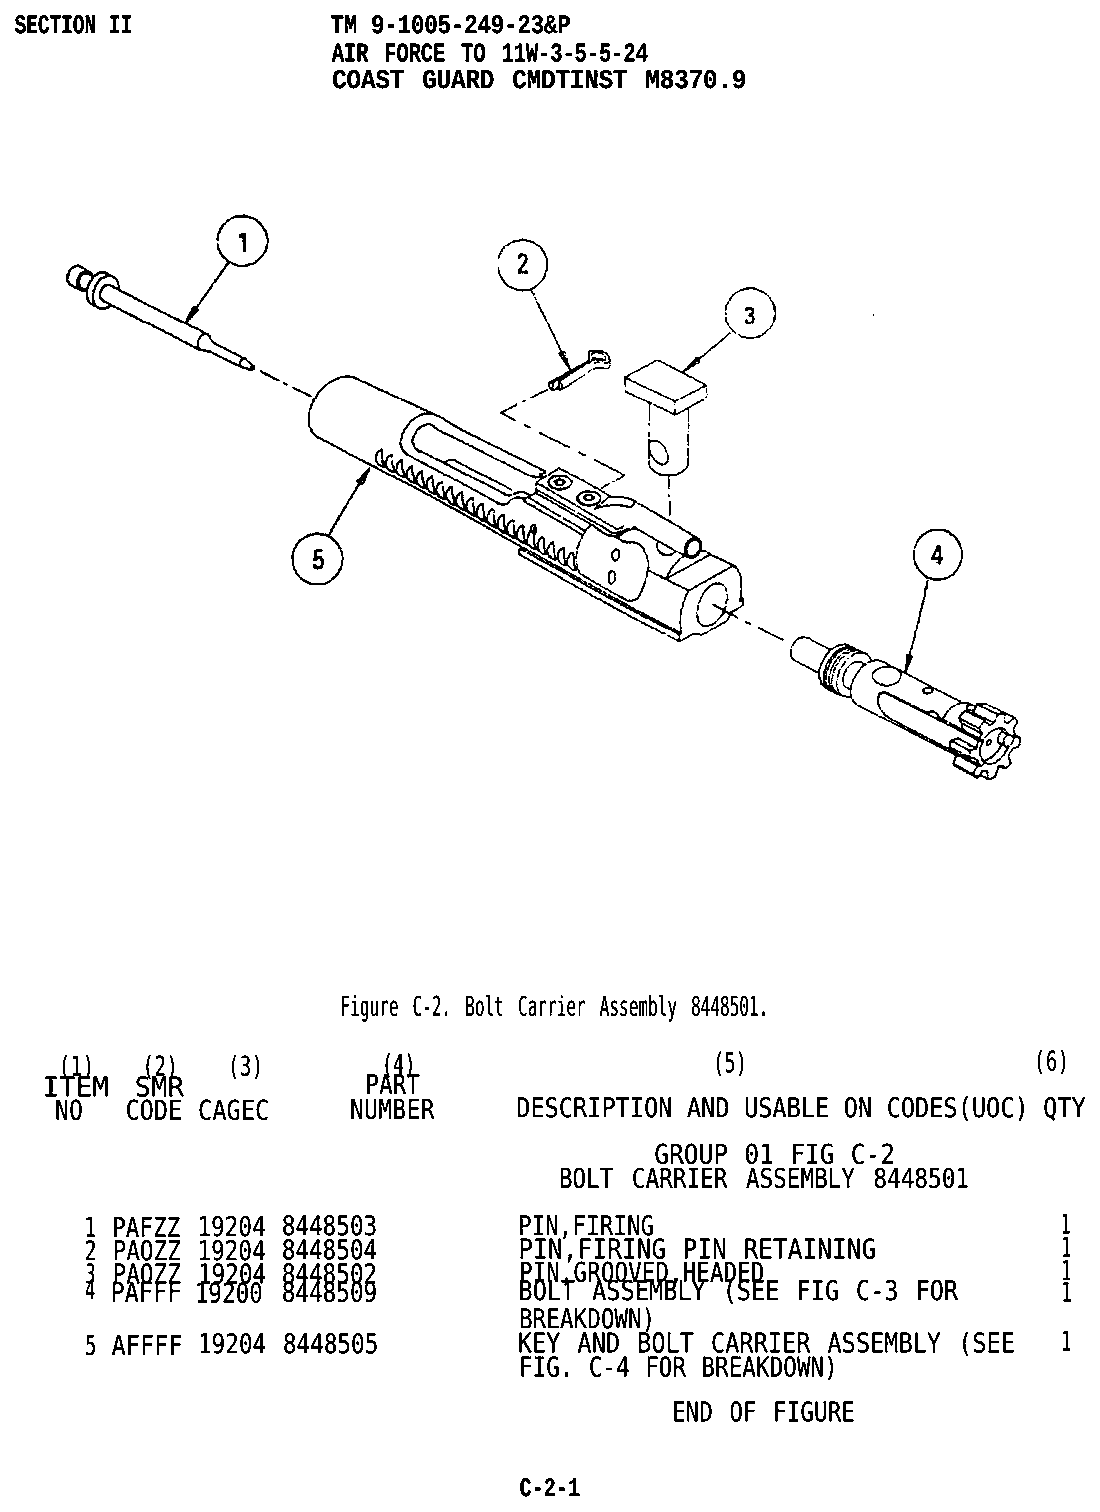
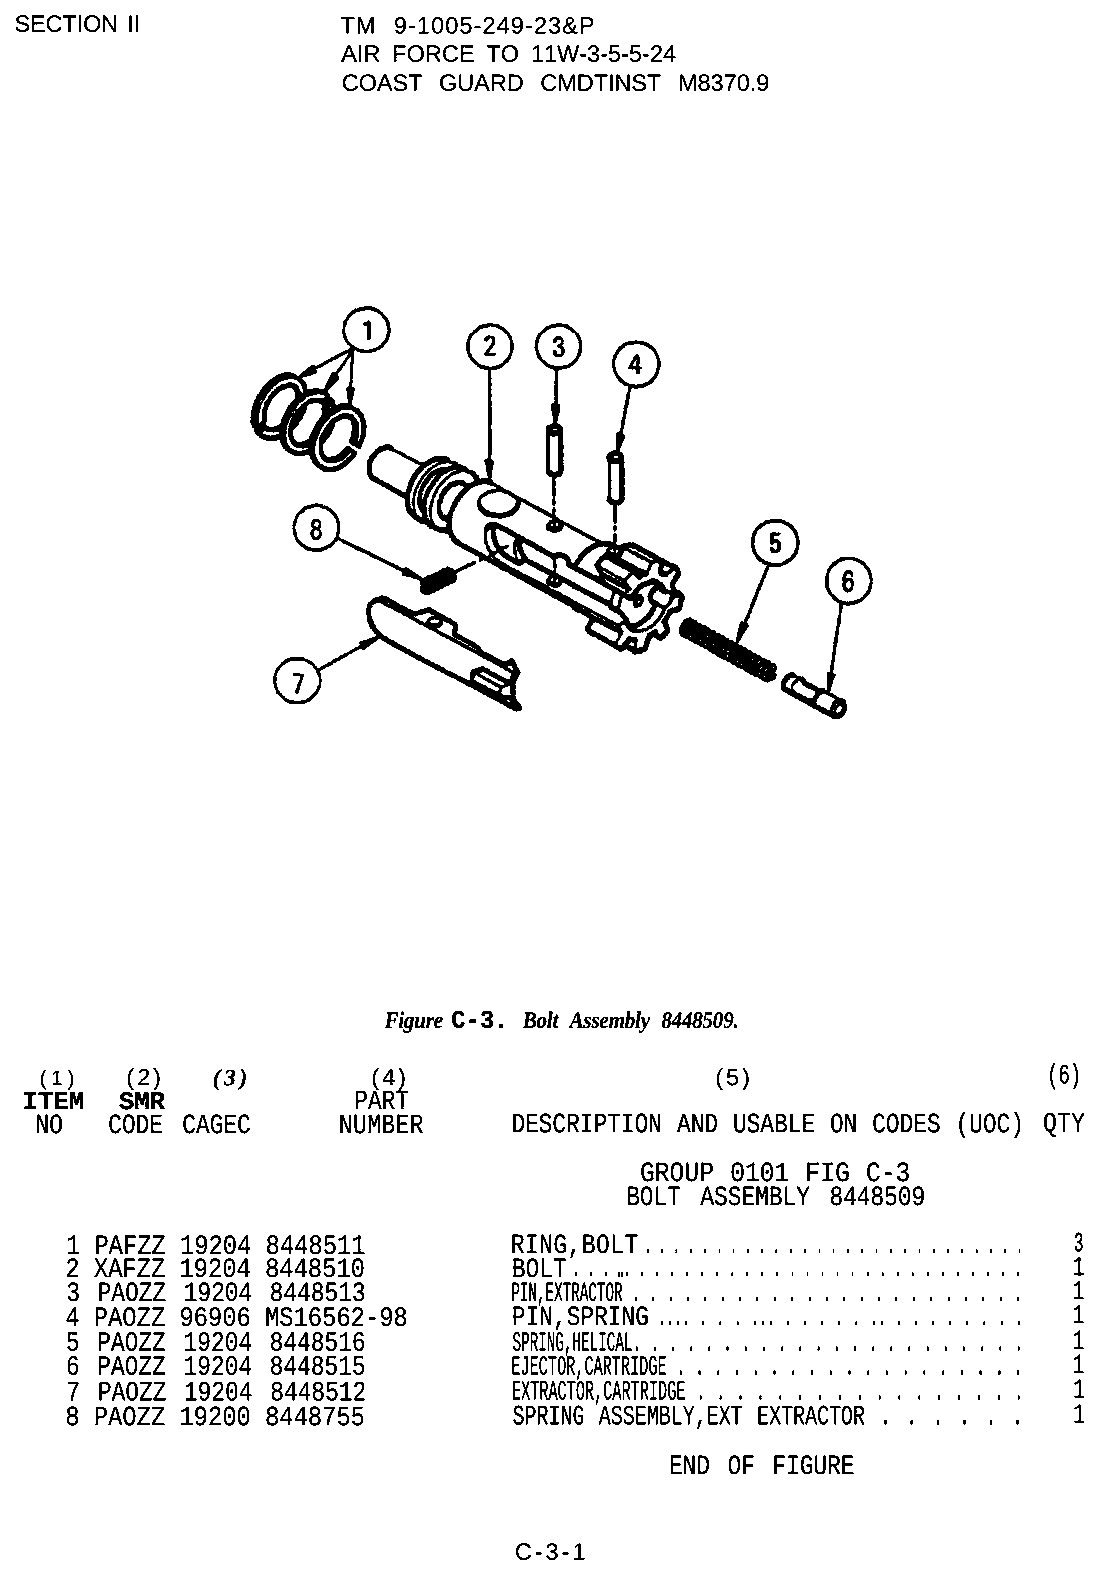
- Bolt carrier group: firing pin retaining pin, firing pin, cam pin, bolt, extractor pin, extractor, spring, ejector roll pin, ejector, spring
- Lower: buffer, buffer spring, buffer retainer and spring, castle nut / stock, pistol grip (selector detent and spring), selector, hammer, trigger, disconnector and springs, bolt catch roll pin, bolt catch, plunger, spring, magazine catch, trigger guard roll pin, front pivot pin and detent, rear takedown pin and detent — roll pin punches, vise block
Special tools
- AR armorer's wrench — Castle nut, barrel/muzzle
- upper and lower vise blocks — Holding receivers
- roll pin punches and starters (1/8, 3/32, 5/64 in) — Bolt catch, trigger guard, gas block roll pins
- pivot pin detent tool — Front pivot pin detent
- slave pin — Trigger/hammer reassembly
Known pain points
- The front pivot-pin detent and spring go in sideways under compression and launch across the room without a pivot-pin tool. (reassembly)
Source: DIY AR-15 Build: Pivot Pin Installation — ITS Tactical itstactical.com [3] — “When inserting the detent that holds in the Pivot Pin, it’s quite common for it to turn into a Pegasus Missile and shoot across the room along with the spring that’s under tension.” - A hammer spring fitted backwards can look right but will not detent the trigger pin. The result is light strikes and the pin walking out. (reassembly)
Source: (Gunsmithing the AR-15 #2) The 30-Second AR Check — Gun Tests gun-tests.com [4] — “A hammer spring installed backwards will give a light primer strike causing misfires, and although it may appear to be laying on and detenting the trigger pin, it in fact will not.”
See also 4 documented reassembly problems and their fixes.
Fit or check on rebuild
- Hammer spring orientation and pins flush — A reversed spring will not detent the trigger pin.
Source: (Gunsmithing the AR-15 #2) The 30-Second AR Check — Gun Tests gun-tests.com [4] — “Hammer spring is correctly installed with both legs horizontal, spread out against inside wall of receiver, and laying on top of trigger in properly in the at pin’s outboard groove, acting as a detent for same.” - Gas block alignment with port — A misaligned gas block short-strokes. Standard check.
- Function check (safety, trigger reset, feeding, extraction) — Standard after any detail strip. No single source.
- Re-zero sights or scope — Sights and optics come off for coating, and point of impact must be re-confirmed. This is a standard check, so no source.
This is Pew-Takedown's rating, not the manufacturer's. How tiers are rated. Forum reports are owners' experience, not specifications.
Manufacturer videos
Official videos from Sturm, Ruger & Co.'s own channels, linked rather than copied. Where a video and the steps on this page differ, follow the manufacturer's manual and video.
- Ruger® AR-556® Disassembly Tech Tip RugerFirearms field strip · 2015-06-10
- Ruger® AR-556® Reassembly Tech Tip RugerFirearms reassembly · 2015-06-10
- Ruger® AR-556® Cleaning Tech Tip RugerFirearms cleaning · 2015-06-09
- Ruger® AR-556® Delta Ring Tech Tip RugerFirearms detail strip · 2015-06-09
- Ruger® AR-556® MPR 450 Bushmaster Proper Magazine Alignment Tech Tip RugerFirearms
operation · 2021-11-22
Covers: Ruger AR-556 MPR in .450 Bushmaster (per description)
Procedures
Clear and Make Safe
Clear & Make Safe- Point the muzzle in a safe direction and keep your finger off the trigger.
- Press the magazine release and remove the magazine.Removed at this step:
Magazine - Pull the charging handle fully to the rear and lock the bolt back with the bolt catch.
- Visually inspect the chamber and magazine well, then physically feel the chamber to confirm it is empty.WarningCheck the magazine well as well as the chamber — a round can hang up there.
- If the hammer is cocked, place the selector on SAFE.
- Remove all live ammunition from the work area.
Field Strip
Field StripManufacturer’s video: Ruger® AR-556® Disassembly Tech Tip RugerFirearms
- Complete the Clear and Make Safe procedure and release the bolt forward.
- From the left-hand side of the lower receiver, push the rear takedown pin to the right, then pull it from the right side until the detent stops further travel.WarningRuger's caution: the upper receiver will move forward once the pin is disengaged and can pinch your fingers if you are holding the magazine well. Hold the upper and lower together until you are ready to open the rifle.TipIf the pin is stiff, Ruger sanctions using a punch and gently tapping with a hammer. It loosens with use.
- Pivot the upper receiver forward on the front pivot pin.TipTipping the upper forward on the front pivot pin is all Ruger's field strip requires. Driving the front pivot pin out as well fully separates the receivers, which is only needed to work on them separately.
- Push the front pivot pin out to its captured position and separate the upper from the lower receiver.Removed at this step:
Upper receiver assembly - Pull the charging handle partway rearward and withdraw the bolt carrier group.Removed at this step:
Bolt carrier group - Pull the charging handle down and out of its channel.WarningThe charging handle comes out after the carrier, never before.Removed at this step:
Charging handle
Reassembly
ReassemblyManufacturer’s video: Ruger® AR-556® Reassembly Tech Tip RugerFirearms
- Insert the bolt into the carrier with the extractor oriented toward the ejection port side.
- Push the bolt fully into the carrier, drop the cam pin into its hole, and rotate it 90 degrees.WarningIf the cam pin is not rotated, the firing pin will not seat. Never force the firing pin.
- Drop the firing pin into the rear of the carrier, tail first, and let it seat fully.
- Install the firing pin retaining pin. If it will not go in, the cam pin is missing or not rotated.WarningThis is the design’s built-in check. Do not defeat it.
- Insert the charging handle into its channel and push it partway forward.
- Insert the bolt carrier group into the charging handle’s track and slide both fully home.
- Mate the upper to the lower, press the front pivot pin home, close the receivers, and press the rear takedown pin home.
- Charge the rifle and perform the function check.
Diagrams
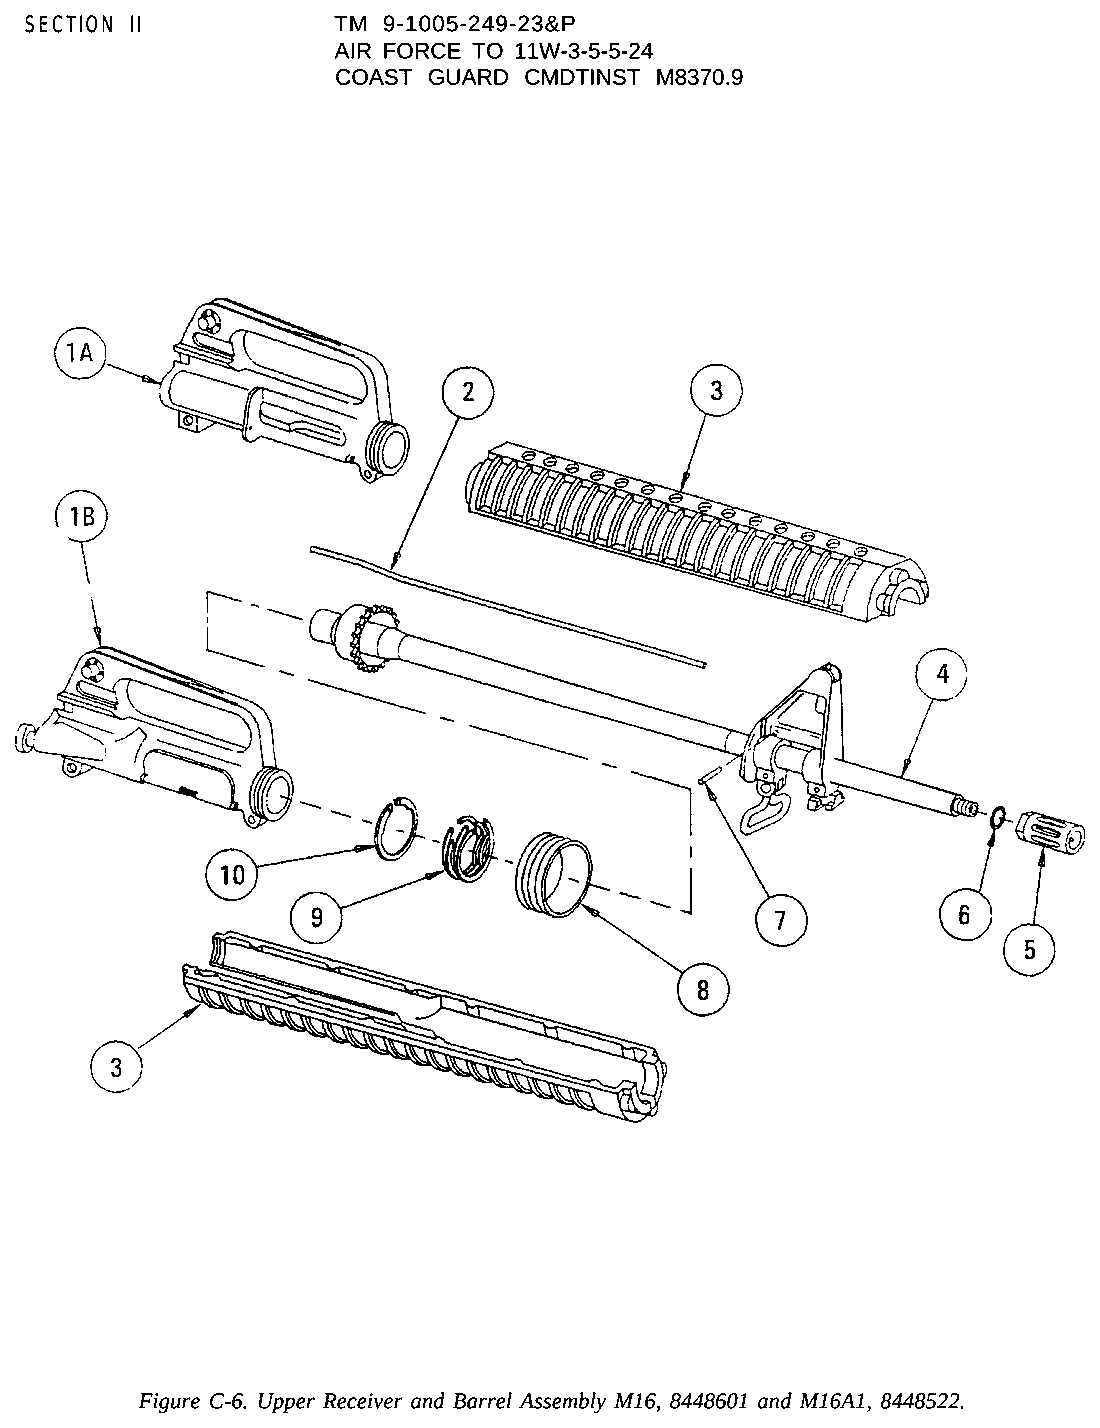
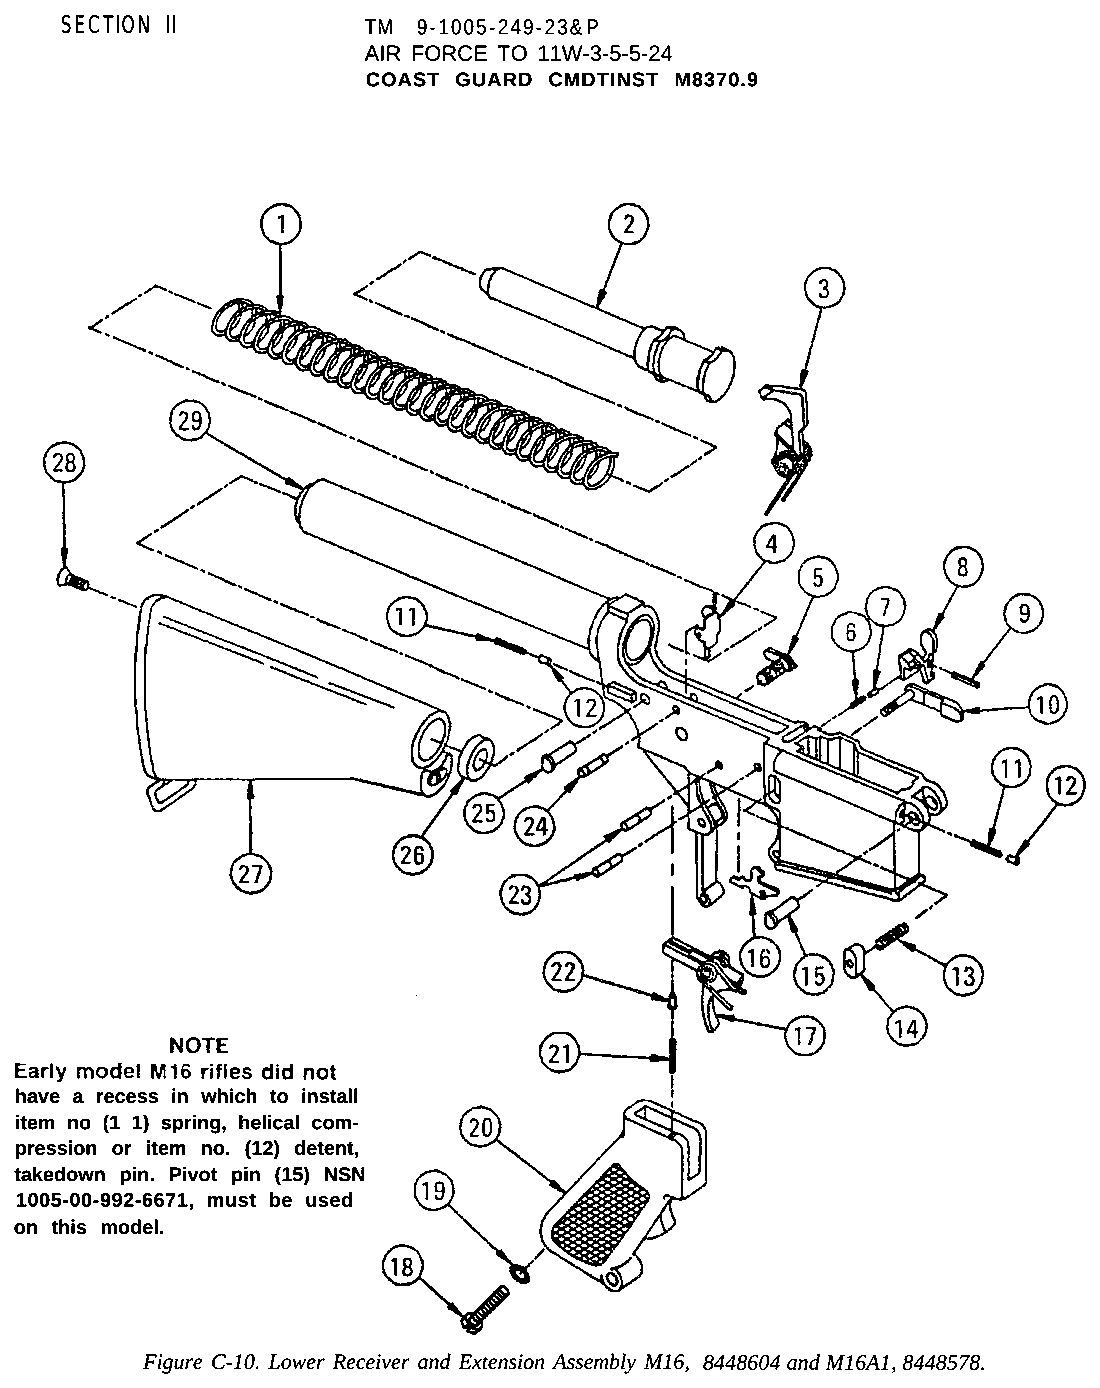
public domainThese are reproduced from government technical manuals, which are not subject to copyright. Manufacturer manual diagrams are not reproduced here — the entry links to the manual instead.
Torque specifications
No sourced torque values from the manufacturer are recorded for this firearm. Where a fastener has a specified torque — action screws, scope bases, muzzle devices, barrel nuts — get it from the manufacturer or a gunsmith rather than estimating it.
What the manufacturer does say: The manufacturer's documents give no torque value. They say: "Tighten the Delta Ring by turning it counterclockwise with your thumb and index finger (two-finger tight)." (Ruger AR-556 Owner’s Manual, PDF p. 37) "CAUTION: Do not over tighten the Delta Ring. Use two fingers only to tighten." (Ruger AR-556 Owner’s Manual, PDF p. 37)
Parts list
Transcribed from the manufacturer's parts list (Ruger AR-556 Owner’s Manual — Sturm, Ruger & Co., Inc., p. 44–45 ruger-docs.s3.amazonaws.com [2]) — AR-556 (standard handguard); the manual's free-float handguard supplemental list is not included. Exploded views on pp. 46, 47 & 48. Key numbers refer to the exploded view in that document.
72 parts
| Key | Part | Part no. | Qty | Group |
|---|---|---|---|---|
| 1 | Charging Handle Assembly | 1 | ||
| 2 | Forward Assist Retainer Pin | 1 | ||
| 3 | Rear Sight | 1 | ||
| 4 | Upper Receiver | 1 | ||
| 5 | Forward Assist Assembly | 1 | ||
| 6 | Forward Assist Spring | 1 | ||
| 7 | Ejection Port Cover | 1 | ||
| 8 | Ejection Port Cover Spring | 1 | ||
| 9 | Ejection Port Cover Rod | 1 | ||
| 10 | Ejection Port Cover Retaining Clip | 1 | ||
| 11 | Barrel Nut, 2 piece | 1 | ||
| 12 | Handguard | 1 | ||
| 13 | Delta Ring | 1 | ||
| 14 | Gas Tube Assembly | 1 | ||
| 15 | Barrel Assembly Parts so marked must be factory fitted. | 1 | ||
| 16 | Handguard Cap | 1 | ||
| 17 | Sight Post | 1 | ||
| 18 | Front Sight Detent | 1 | ||
| 19 | Front Sight Spring | 1 | ||
| 20 | Gas Block Parts so marked must be factory fitted. | 1 | ||
| 21 | Flash Suppresor Washer | 1 | ||
| 22 | Gas Block Taper Pin | 1 | ||
| 23 | Gas Block Roll Pin | 1 | ||
| 24 | Flash Suppressor – Not Available on State Compliant Model | 1 | ||
| 25 | Butt Stock Assembly – State Compliant Model Has Non-Adjustable Butt Stock | 1 | ||
| 26 | Buffer Spring | 1 | ||
| 27 | Receiver Extension Nut | 1 | ||
| 28 | Buffer | 1 | ||
| 29 | Receiver Endplate | 1 | ||
| 30 | Buffer Retainer Spring | 1 | ||
| 31 | Buffer Retainer Plunger | 1 | ||
| 32 | Disconnector Spring | 1 | ||
| 33 | Disconnector Parts so marked must be factory fitted. | 1 | ||
| 34 | Hammer Assembly Parts so marked must be factory fitted. | 1 | ||
| 35 | Trigger/Hammer Pin | 1 | ||
| 36 | Hammer Spring | 1 | ||
| 37 | Trigger Parts so marked must be factory fitted. | 1 | ||
| 38 | Trigger Spring | 1 | ||
| 39 | Bolt Catch | 1 | ||
| 40 | Bolt Catch Roll Pin | 1 | ||
| 41 | Selector Switch Parts so marked must be factory fitted. | 1 | ||
| 42 | Bolt Catch Plunger | 1 | ||
| 43 | Bolt Catch Plunger Spring | 1 | ||
| 44 | Magazine Catch Assembly | 1 | ||
| 45 | Lower Receiver Parts so marked must be factory fitted. | 1 | ||
| 46 | Takedown Detent | 1 | ||
| 47 | Takedown Detent Spring | 1 | ||
| 48 | Selector Detent | 1 | ||
| 49 | Selector Detent Spring | 1 | ||
| 50 | Takedown Pin | 1 | ||
| 51 | Pistol Grip | 1 | ||
| 52 | Grip Screw Washer | 1 | ||
| 53 | Pistol Grip Screw | 1 | ||
| 54 | Trigger Guard Roll Pin | 1 | ||
| 55 | Trigger Guard | 1 | ||
| 56 | Magazine Catch Button | 1 | ||
| 57 | Magazine Catch Spring | 1 | ||
| 58 | Pivot Pin | 1 | ||
| 59 | Firing Pin | 1 | ||
| 60 | Bolt Carrier Assembly | 1 | ||
| 61 | Cotter Pin | 1 | ||
| 62 | Bolt Cam Pin | 1 | ||
| 63 | Gas Ring | 1 | ||
| 64 | Bolt Parts so marked must be factory fitted. | 1 | ||
| 65 | Extractor Pin | 1 | ||
| 66 | Ejector Pin | 1 | ||
| 67 | Ejector Spring | 1 | ||
| 68 | Ejector | 1 | ||
| 69 | Extractor Buffer Spring | 1 | ||
| 70 | Extractor Spring | 1 | ||
| 71 | Extractor O-Ring | 1 | ||
| 72 | Extractor | 1 |
Function check
- Verify the rifle is unloaded with no magazine inserted before each step.
- Charge the rifle to cock the hammer, place the selector on SAFE, and press the trigger. The hammer must not fall.
- Move the selector to SEMI and press the trigger. The hammer should fall.
- Hold the trigger to the rear, charge the rifle, then release the trigger slowly and listen for the disconnector to release the hammer to the trigger.
- Press the trigger again. The hammer should fall.
- Insert an empty magazine, charge the rifle, and confirm the bolt locks back.
Maintenance
Lubrication points
- Bolt locking lugs and body
- Cam pin and its track
- Outside of the carrier
- Gas rings
- Charging handle rails
Cleaning notes
A direct-impingement AR runs better wet than dry. Carbon on the bolt tail is normal and does not all need removing — focus on the locking lugs, gas rings, chamber, and bore. Do not scrape the bolt tail with steel.
Suggested inspection interval: roughly every 1000 rounds. This is a general guideline, not a manufacturer specification.
Wear parts to inspect
Gas rings · Extractor and its spring insert · Bolt (check the cam pin hole and lugs for cracks) · Buffer spring · Gas key staking
Common issues
| Symptom | Likely cause | What to do |
|---|---|---|
| Firing pin retaining pin will not install | Cam pin missing or not rotated | Install and rotate the cam pin. Never force the retaining pin. |
| Charging handle will not come out | Trying to remove it before the bolt carrier group | Remove the carrier first. |
| Failure to lock back on an empty magazine | Worn gas rings, gas leak, or a fouled gas key | Check gas rings first, then gas block alignment and gas key staking. see a gunsmith |
Similar manual of arms
Legal notes
Sourcing
- Confidence
- high — Cross-checked against a primary source such as the manufacturer's manual or an issuing military technical manual.
- Verification
- Checked against an armorer/technical manual
- Last updated
- 2026-10-29
References
Every source this page draws on, with its web address so you can read it yourself. Numbers in brackets elsewhere on the page point here.
- [1] TM 9-1005-319-10: Rifle, 5.56mm, M16A2/M4 Carbine — U.S. Department of the Army military technical manual primary source
- [2] Ruger AR-556 Owner’s Manual — Sturm, Ruger & Co., Inc. manufacturer manual primary source
https://ruger-docs.s3.amazonaws.com/_manuals/AR-556.pdf (checked 2026-09-15) - [3] DIY AR-15 Build: Pivot Pin Installation — ITS Tactical website secondary source
https://www.itstactical.com/?p=10638 (checked 2026-10-29) - [4] (Gunsmithing the AR-15 #2) The 30-Second AR Check — Gun Tests website secondary source
https://www.gun-tests.com/?p=26007 (checked 2026-10-29)
Notes: Illustrated on 2026-09-14 with M16 figures from TM 9-1005-249-23&P (public domain, US Government work). Same pattern, same parts arrangement. Field strip and bolt carrier group disassembly follow the standard AR-15 pattern. Ruger AR-556 rifles use a standard mil-spec-pattern bolt carrier group and buffer system, so the procedure is unchanged from a mil-spec AR-15. Re-verified on 2026-09-15 against Ruger's own AR-556 manual (57 pages), "Disassembly" pp. 27-30, which is now cited by URL alongside the military technical manual. The procedure as written matched Ruger's; what was added is Ruger's caution that the upper swings forward and can pinch fingers on the magazine well, and their sanction for tapping a stiff takedown pin through with a punch. Ruger publishes separate manuals for the AR-556 Fixed Magazine and AR-556 Pistol variants.