← All firearms · Printable work order
Smith & Wesson Model 19
- moderate
- Shop tier 2
- medium confidence
- Revolver
- revolver
- double action
- sideplate
- k frame
- magnum
- historic
field strip ~3 min · reassembly ~4 min · detail strip ~45 min
Specifications
- Manufacturer
- Smith & Wesson
- Origin
- United States
- Category
- Revolver
- Action
- Double-action revolver
- Calibers
- .357 Magnum, .38 Special
- Capacity
- 6 rounds
- Production
- 1955–present (in-production)
- Also known as
- Combat Magnum, Model 66 (stainless)
Model-specific safety
- A revolver is not cleared by opening the cylinder. Look through every chamber and count them.
- Revolver internals are gunsmith territory. Removing the sideplate to reach the lockwork is easy to do and very easy to do damage with. Unless you know what you are doing, stop at cylinder and yoke removal.
- Never pry the sideplate off. Loosen the screws and tap the grip frame with a non-marring mallet until the plate lifts free. Prying permanently marks a fitted surface.
- Smith & Wesson sideplate screws are not interchangeable. Keep them in order.
- Never close the cylinder by flicking the wrist. It springs the yoke and puts the revolver out of time.
- The original K-frame Model 19 has a known forcing cone weakness at the flat cut on the underside, associated with sustained use of light-bullet .357 Magnum loads. Inspect the forcing cone for cracks. Later Model 19 Classic and Carry Comp rifles revised this area.
Under spring tension
- Rebound slide spring (sideplate removal — it launches)
- Mainspring
- Cylinder stop spring
Easily lost parts
Yoke retaining screw · Sideplate screws · Rebound slide and spring · Cylinder stop
Tools
| Tool | Required | Used for | Substitute |
|---|---|---|---|
| Hollow-ground gunsmith screwdriver | Yes | The yoke retaining screw. A tapered hardware-store blade will burr the screw head permanently. | None worth using. |
Shop difficulty
Shop tier 2 Tier 2 — moderate among revolvers, for the full job: strip to the parts that get coated and put it back together working. K-frame sideplate lockwork (same rebound slide spring, hammer block and hand-spring traps as the Model 10) plus an adjustable rear sight with tiny springs and a plunger. No maker parts list found, but the K-frame M10 runs about 59 pieces, so moderate.
Parts: 69 numbered parts (complete Model 19 in one configuration (4-inch barrel, square butt, Goncalo Alves target stocks, standard hammer and trigger) from the S&W factory Model 19 parts list. The sheet has 85 lines; left out), from Smith & Wesson .357 Combat Magnum Model No. 19 - factory Parts List sheet (scanned image; exploded view at SW19.jpg) — Smith & Wesson (factory sheet), scan hosted by CFN Parts (cfnparts.com Model 19 category page, 'Click Here To See - Parts List') cfnparts.com [9].

Bench time: about 40 min to strip, 60 min to rebuild (estimate). Estimated for an experienced tech with the right tools: grips, sideplate, lockwork, crane/cylinder, thumbpiece/bolt, locking bolt and sights. Rebuild is longer for the rebound slide spring, hand spring engagement, hammer block and sideplate seating plus a timing/carry-up and end-shake check. The TM work-time figures (hours) are given as a cross-check, not as the job time. Five extra minutes each w
Small parts: 12 pins, 10 springs, 2 detents or plungers (counted by name in the same list for that configuration. Pins: 5002 Barrel Pin, 5014 Extractor Pin, 5053 Hand Spring Pin, 5053 Hand Torsion Spring Pin, 5053 Sear Pin, 5053 Stirrup Pin, 5053 Trigger Le)
What comes off for coating
- Grips and sideplate: stock screw and stocks, sideplate screws (kept in their holes; the front one retains the crane), sideplate (tapped free, never pried), hammer block — fitted hollow-ground screwdrivers, nylon/brass or rawhide mallet
- Lockwork: mainspring and strain screw, rebound slide, rebound slide spring and pin, hammer (with sear, stirrup, hammer nose), trigger with hand and hand torsion spring, trigger lever, cylinder stop and cylinder stop spring, trigger stop rod (if fitted), internal-lock flag, spring and cam (IL guns) — rebound slide spring tool or small Phillips screwdriver
- Cylinder and crane: cylinder and yoke/crane out of the frame, extractor rod (left-hand thread) and center pin with springs if the cylinder is coated — padded vise or extractor-rod collar tool
- Frame: thumbpiece nut and thumbpiece, bolt, bolt plunger and spring, locking bolt, spring and pin (under the barrel), rear sight (adjustable models: leaf, elevation/windage parts, plunger and spring), front sight (pinned or plunger-retained on some models) — punch set, pin punch for sight and locking-bolt pins
Special tools
- Rebound slide spring tool (Brownells S&W tool) or a Phillips screwdriver just larger than the spring ID — Compressing and re-seating the rebound slide spring over its stud
- Fitted hollow-ground (gunsmith) screwdrivers — Sideplate, strain, thumbpiece and stock screws without burring
- Nylon/brass or rawhide mallet — Tapping the frame to lift a tight sideplate
- Large clear plastic bag — Containing the rebound spring and small springs on removal
Known pain points
- The rebound slide spring is under heavy tension; it launches when the slide is pried off and must be compressed back over its stud on reassembly. (both)
Source: Installing Smith & Wesson Spring Kit — Shooting Times shootingtimes.com [6] — “The best way to remove the rebound slide is to just pry it up a bit, but be aware that the spring is under considerable tension and could do real harm if it hit you in the wrong place.” - The hammer block lies loose under the sideplate and must be seated up on the rebound slide pin while the sideplate is fitted. (reassembly)
Source: Installing Smith & Wesson Spring Kit — Shooting Times shootingtimes.com [6] — “The hammer-block safety will be lying loose under it, so take care to note how it goes in. There is a small pin on the rebound slide where it rides.” - The hand must keep its torsion-spring tension when the trigger goes back in, or the cylinder will not index. (reassembly)
Owners report: Change of a 686 rebound spring — Smith & Wesson Forum smith-wessonforum.com [7] — “make certain you still have spring tension on the hand (some people accidentally pull the hand back too far when removing or installing the trigger, causing the internal stud on the hand to slip past the spring inside the trigger).” - An old sideplate that has never been off is very tight and has to be rapped loose without marring. (disassembly)
Owners report: My experience installing a Wolff spring kit — Smith & Wesson Forum smith-wessonforum.com [8] — “The machining on the side plate is so precise that I had difficulty removing the plate once the screws were removed.” - Smith & Wesson tells owners not to go beyond the field strip; lockwork work is for a qualified gunsmith. (both)
Source: Safety & Instruction Manual, Revolvers - Modern Style - J, K, L and N Frame (p/n 416560000, REV S&W_REVOLVER_112119), linked from smith-wesson.com revolver product pages — Smith & Wesson smith-wesson.canto.com [2] — “NEVER DISASSEMBLE YOUR FIREARM beyond the field stripping procedure outlined in this manual. Improper disassembly or reassembly of your firearm may be dangerous and can lead to serious injury or death.”
Fit or check on rebuild
- Timing / carry-up: each chamber must lock before the hammer falls, single and double action — The hand torsion spring must engage the hand; a hand pulled back too far loses spring tension and the cylinder will not index.
Source: Change of a 686 rebound spring — Smith & Wesson Forum smith-wessonforum.com [7] — “make certain you still have spring tension on the hand (some people accidentally pull the hand back too far when removing or installing the trigger, causing the internal stud on the hand to slip past the spring inside the trigger).” - Cylinder gap (barrel-cylinder) and end shake; crane alignment — The Army issues gauges for exactly these checks when the cylinder/yoke group is replaced.
- Firing-pin (hammer-nose) protrusion and hammer-block function — Same TM lists a firing-pin protrusion gauge; the hammer block must ride up on the rebound slide pin before the sideplate goes on.
Source: Installing Smith & Wesson Spring Kit — Shooting Times shootingtimes.com [6] — “The hammer-block safety will be lying loose under it, so take care to note how it goes in. There is a small pin on the rebound slide where it rides.” - Sideplate seats flush with no forcing; strain screw fully tightened — A sideplate that is not flush binds the grips and parts behind it; a backed-out strain screw gives light strikes (well-known S&W check).
- Trigger reset with the rebound spring fitted — The rebound slide spring is also the trigger return spring.
Source: Installing Smith & Wesson Spring Kit — Shooting Times shootingtimes.com [6] — “The downside is that the rebound also serves as the trigger return spring”
This is Pew-Takedown's rating, not the manufacturer's. How tiers are rated. Forum reports are owners' experience, not specifications.
Manufacturer videos
Official videos from Smith & Wesson's own channels, linked rather than copied. Where a video and the steps on this page differ, follow the manufacturer's manual and video.
- How To Clean a Revolver | Smith & Wesson® Smith & Wesson
cleaning, maintenance · 2026-02-23
Covers: Revolvers in general (S&W's own generic guide; no model named in title/description) - Unloading & Reloading Revolvers Smith & Wesson
clearing, operation · 2021-07-13
Covers: Revolvers in general (GUNSMARTS series, Jerry Miculek; no model named)
Procedures
Clear and Make Safe
Clear & Make SafeManufacturer’s video: Unloading & Reloading Revolvers Smith & Wesson
- Point the muzzle in a safe direction and keep your finger off the trigger.
- Push the thumbpiece forward and swing the cylinder out.
- Press the ejector rod firmly to eject all cartridges or cases from the chambers.TipPoint the muzzle up and strike the rod briskly so the cases clear fully.Removed at this step:
Cartridges or cases - Look through every chamber, one at a time, and confirm each is empty.WarningEvery chamber, counted. A revolver with one loaded chamber looks identical to an empty one from most angles.
- Confirm the bore is clear of obstruction.
- Remove all live ammunition from the work area.
Routine cleaning (what Smith & Wesson documents)
Field Strip tools requiredS&W's revolver manual publishes no takedown. This is the maintenance it does prescribe.
- Complete the Clear and Make Safe procedure and leave the cylinder swung out.
- Clean the bore and each chamber with a solvent-wetted patch and bronze brush, then dry patches until they come out clean.
- Clean the front face of the cylinder, the forcing cone, and the recoil shield, where fouling and lead build up fastest.
- Restrict your choice of solvent to products made for firearms, and avoid prolonged solvent immersion or ultrasonic cleaning — S&W records finish damage from both.WarningNever use ammoniated or other strong alkaline solvents on a Smith & Wesson.TipS&W's rule of thumb: if you would be happy putting it on your car's paint, it is probably safe on the gun.
- Come back in 24 to 48 hours. Residue works its way out of the barrel and chambers after the first clean; remove it with a bristle brush and a light re-application of solvent, then re-oil.
- Apply a light film of good gun oil to all external metal surfaces and wipe clean. In cold climates use an oil that will not thicken.
- Stop here. S&W publishes no disassembly procedure for this revolver and directs additional maintenance to a qualified gunsmith.
Reassembly
Reassembly- Slide the yoke and cylinder assembly back into the frame, seating the yoke fully in its frame cut.
- Start the yoke retaining screw by hand, then tighten it snugly with the correct screwdriver.WarningDo not overtighten.
- Close the cylinder gently by hand.WarningNever flick the cylinder closed — it springs the yoke and puts the revolver out of time.
- Perform the function check.
Yoke and cylinder removal (not documented by S&W)
Detail StripCommon practice, recorded with that caveat attached.
- Read this first: Smith & Wesson does not publish this procedure. It is common gunsmith and armorer practice, recorded here because people do it, not because S&W sanctions it.WarningS&W's manual directs additional maintenance to a qualified gunsmith. The wrong screwdriver on a sideplate screw marks the frame permanently.
- Complete the Clear and Make Safe procedure and leave the cylinder open.
- Identify the yoke retaining screw — the forward-most sideplate screw on the right side of the frame, ahead of the trigger.TipScrew positions differ across frame sizes and eras. Confirm against a parts diagram for your exact model before turning anything. The model and internal serial numbers are stamped inside the yoke, visible with the cylinder open.
- Using a properly fitting hollow-ground screwdriver, remove the yoke retaining screw.Removed at this step:
Yoke retaining screw - Draw the yoke and cylinder assembly forward and out of the frame as a unit.Removed at this step:
Yoke and cylinder assembly - Clean the yoke bearing surfaces and the inside of the cylinder's bore, then reverse the order to reassemble.
- Go no further. Removing the sideplate to reach the lockwork is genuinely gunsmith territory, and prying it off rather than tapping the grip frame will bend it.
Patent drawings
not under copyrightDrawings from US patents on this design. A patent shows the invention as the inventor filed it; the firearm that shipped can differ in detail, and later production often does. Use them to see how the parts relate, not as a parts reference or a procedure. Per the USPTO, the text and drawings of a patent are typically not subject to copyright; each patent here was checked for a copyright notice.
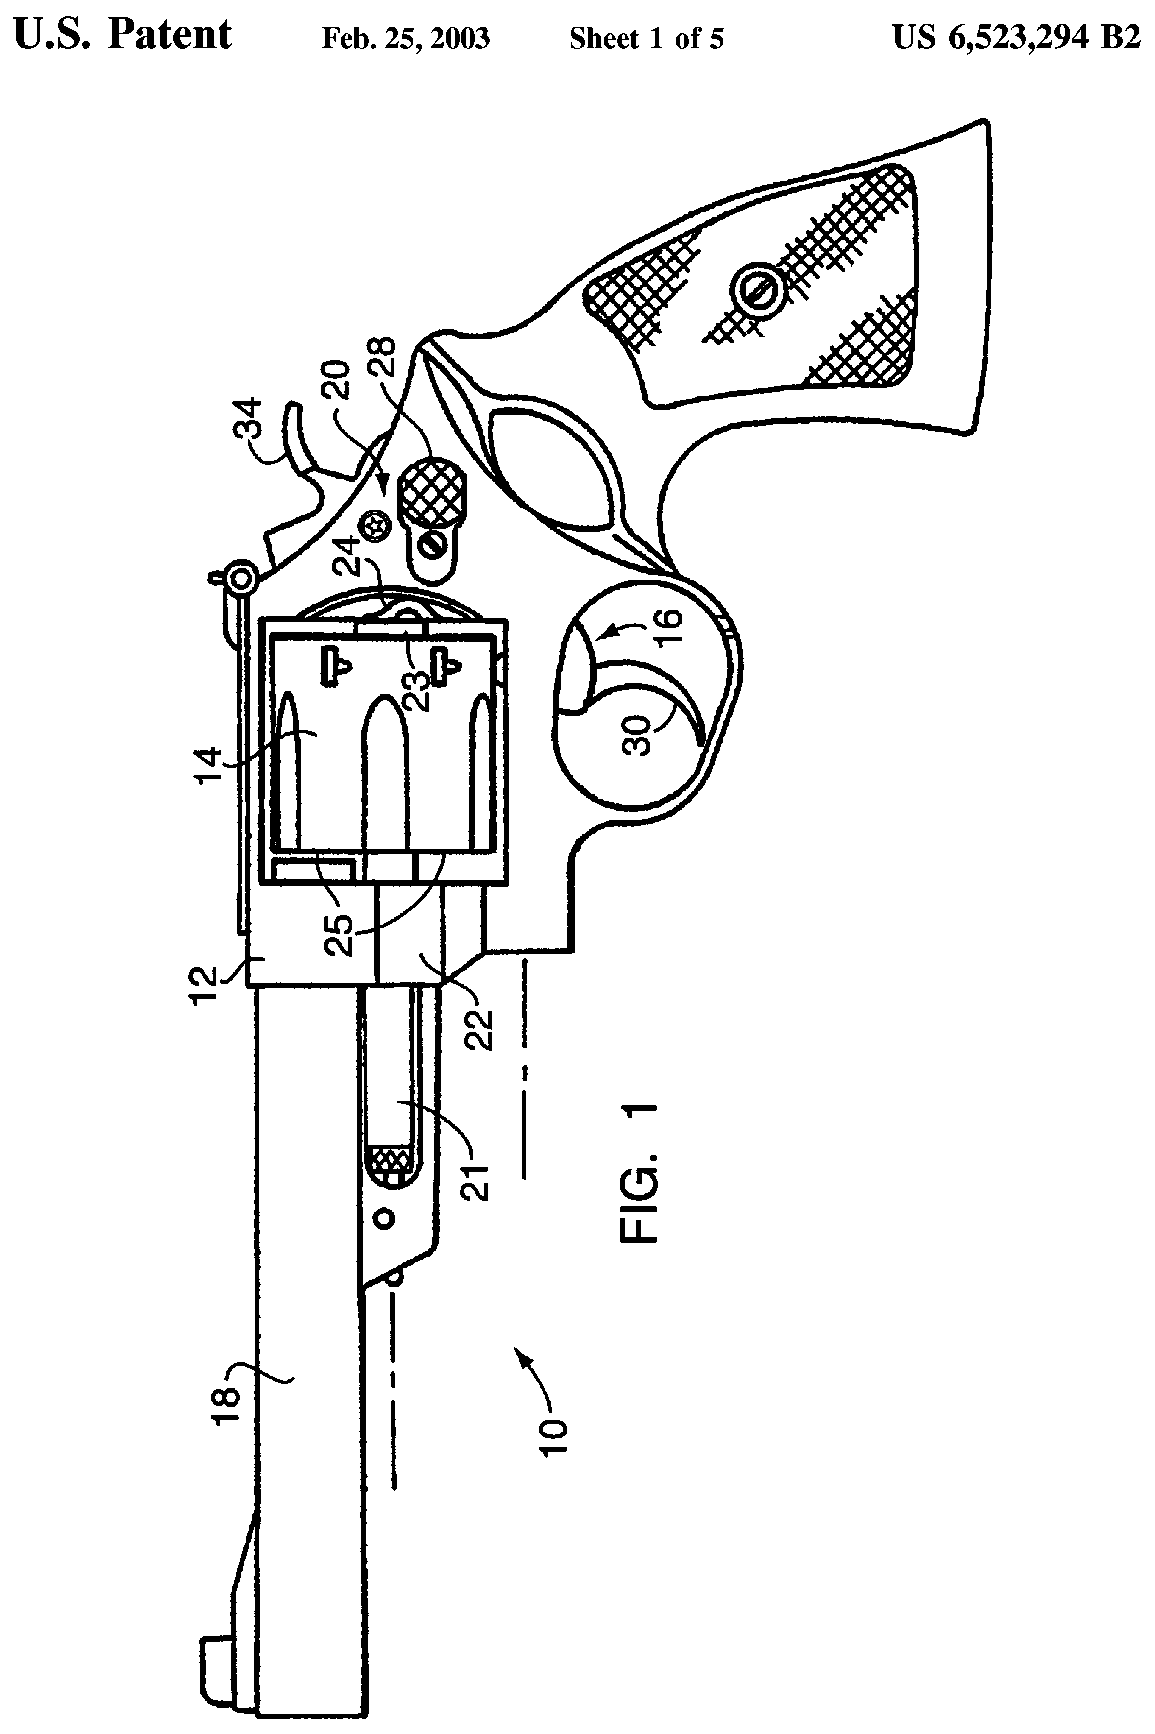
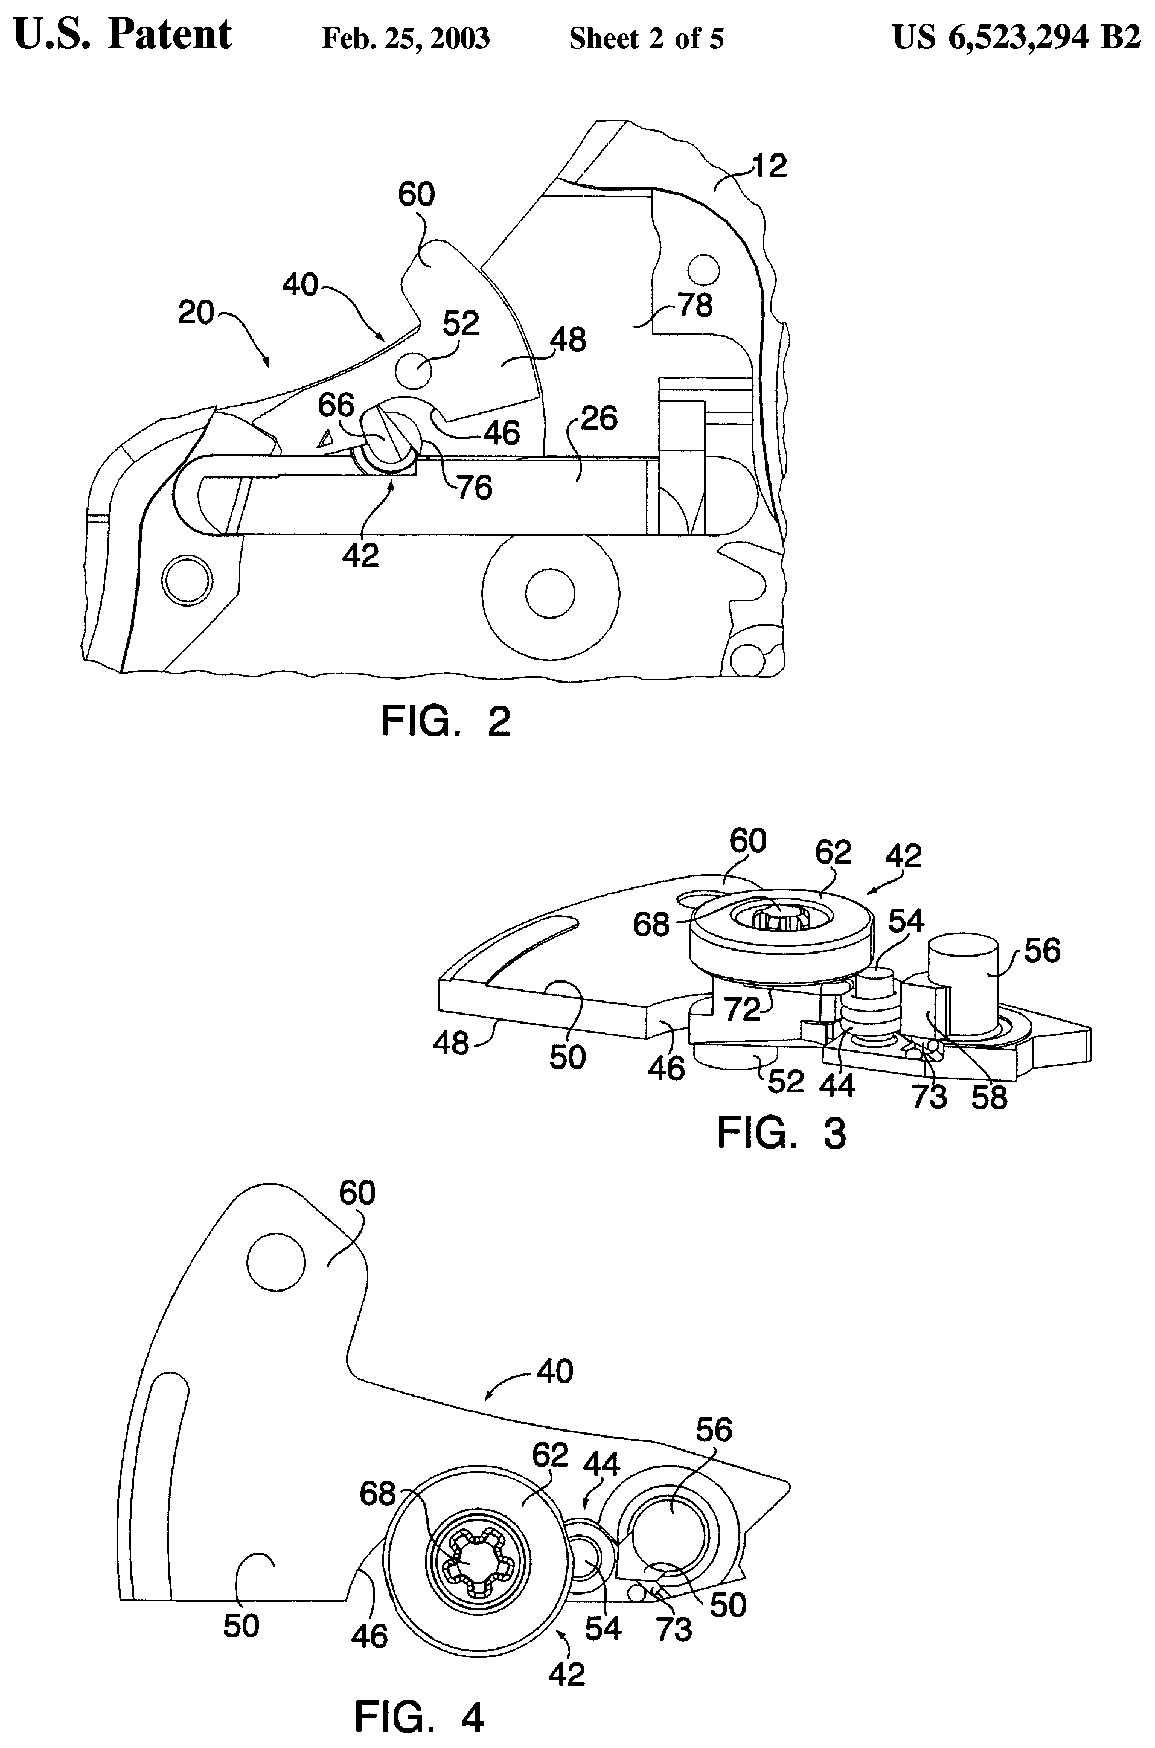
US Patent 6,523,294 — Revolver-safety lock mechanism
Brett Curry, Owen Patrick Cramer, Richard F. Mikuta, James M. Quill, Kevin R. Fleury · assigned to Smith & Wesson Corp. · filed 2001-04-12 · granted 2003-02-25. Full patent (USPTO)
The internal key-lock (lockarm and actuator) built into the frame of S&W revolvers, shown on a side view of a S&W revolver and in partial section at the hammer. Applies only to revolvers built with the internal lock.
Why this is the Smith & Wesson Model 19’s patent: listed on the maker’s patent-marking page — Virtual Patent Marking | Smith & Wesson — Smith & Wesson smith-wesson.com [5]: “6,523,294 All S&W® revolvers with internal locks”
Torque specifications
No sourced torque values from the manufacturer are recorded for this firearm. Where a fastener has a specified torque — action screws, scope bases, muzzle devices, barrel nuts — get it from the manufacturer or a gunsmith rather than estimating it.
What the manufacturer does say: The manufacturer's documents give no torque value. They say: "The barrel assembly is re-installed using the same tool and an accurate torque wrench." (Safety & Instruction Manual, Revolvers - Modern Style - J, K, L and N Frame (p/n 416560000, REV S&W_REVOLVER_112119), linked from smith-wesson.com revolver product pages, p. 26 (Gunsmith Advisory)) "We recommend the use of a thread adhesive on the base mounting screws." (Optical Sight Mounts - For S&W Revolvers that have an adjustable rear sight (p/n 3016650, REV 10/16/2025), linked from smith-wesson.com revolver red-dot mount product pages, p. 1)
Materials and factory finish
As stated by Smith & Wesson. Prep, masking and cure depend on these; a polymer or aluminium part, a nitrided or anodised finish, and a blued steel part are each a different job. Variants with other finishes may exist — check the maker's page for the exact SKU on the bench.
| Component | Material | Factory finish | Where it comes from |
|---|---|---|---|
| Frame Model 19 Classic, 4.25in, no internal lock, SKU 14046 | CARBON STEEL | BLUED | Smith & Wesson Model 19 Classic (No Internal Lock) — product specifications, SKU 14046 — Smith & Wesson Brands, Inc. smith-wesson.com [4] “FRAME MATERIAL … CARBON STEEL … COLOR/FINISH … BLUED” |
| Grips Model 19 Classic, 4.25in, no internal lock, SKU 14046 | WOOD | — | Smith & Wesson Model 19 Classic (No Internal Lock) — product specifications, SKU 14046 — Smith & Wesson Brands, Inc. smith-wesson.com [4] “GRIP … WOOD” |
Parts
No parts list from Smith & Wesson is transcribed for this firearm.
Smith & Wesson's own documents label the parts on these pages — the links open each document at the page:
- Model and features identification (labelled photo of the revolver): Smith & Wesson Revolvers (Modern Style) Safety & Instruction Manual — Smith & Wesson, p. 14 mcarbo.com [1]
Function check
- Verify every chamber is empty before each check.
- Cock the hammer slowly and confirm the cylinder locks up at each chamber before the hammer reaches full cock — this is carry-up.
- With the hammer at full cock, try to rotate the cylinder by hand. It should be locked, with only minimal play.
- Press the trigger in single action and confirm a clean hammer fall.
- Cycle the action in double action through every chamber and confirm the cylinder indexes and locks each time.
- Confirm the cylinder latches closed securely and the release frees it cleanly.
- Check that cylinder endshake is minimal and the cylinder gap looks even. If either seems off, see a gunsmith.
Maintenance
Lubrication points
- Yoke or crane barrel where the cylinder rides
- Ejector rod
- Hammer and trigger pivot pins (a single drop each)
- Cylinder stop
Cleaning notes
Lead and carbon build up on the front face of the cylinder and in the forcing cone, and left alone they eventually bind the cylinder. Clean the chambers thoroughly — a fouled chamber makes extraction difficult and is often mistaken for a timing problem. Keep lubrication sparing; revolver lockwork does not want to be wet.
Suggested inspection interval: roughly every 2000 rounds. This is a general guideline, not a manufacturer specification.
Wear parts to inspect
Hand · Cylinder stop · Ejector rod (confirm it has not unscrewed) · Forcing cone (inspect for cracks) · Yoke or crane alignment
Common issues
| Symptom | Likely cause | What to do |
|---|---|---|
| Cylinder binds or the action locks up while shooting | Ejector rod backing out under recoil, or carbon and lead fouling on the cylinder face | Check the ejector rod is tight and clean the cylinder face and forcing cone. |
| Cylinder does not lock up before the hammer falls | Worn hand or cylinder stop — a timing fault | Stop shooting the revolver. Firing out of time can shave lead sideways out of the cylinder gap. see a gunsmith |
| Difficult extraction of fired cases | Fouled or rough chambers, or high-pressure loads | Clean the chambers thoroughly with a bronze brush. see a gunsmith |
Also covers
The procedures above are reported to apply to: Model 66 · Model 19 Classic · Model 19 Carry Comp. Verify against the manual for your specific model.
Similar manual of arms
Sourcing
- Confidence
- medium — Drawn from reliable secondary sources and consistent across references, but not confirmed against a primary source.
- Verification
- Checked against the manufacturer manual
- Last updated
- 2026-10-29
References
Every source this page draws on, with its web address so you can read it yourself. Numbers in brackets elsewhere on the page point here.
- [1] Smith & Wesson Revolvers (Modern Style) Safety & Instruction Manual — Smith & Wesson manufacturer manual primary source
https://www.mcarbo.com/.Owners%20Manuals/S-W_Revolver_Owners-Manual.pdf (checked 2026-09-15) - [2] Safety & Instruction Manual, Revolvers - Modern Style - J, K, L and N Frame (p/n 416560000, REV S&W_REVOLVER_112119), linked from smith-wesson.com revolver product pages — Smith & Wesson manufacturer manual primary source
https://smith-wesson.canto.com/direct/document/tquc8lb05d2hl96gi51fuh2m46/2Ppiam-m3ty8iZtHw_DoQfTzAsI/original?content-type=application%2Fpdf (checked 2026-09-27) - [3] Optical Sight Mounts - For S&W Revolvers that have an adjustable rear sight (p/n 3016650, REV 10/16/2025), linked from smith-wesson.com revolver red-dot mount product pages — Smith & Wesson manufacturer manual primary source
https://smith-wesson.canto.com/direct/document/lv4rggiir1727cndbc5bck1356/y4sYs1fNQHwoZBJ6DnA9ZXlMumM/original?content-type=application%2Fpdf (checked 2026-09-27) - [4] Smith & Wesson Model 19 Classic (No Internal Lock) — product specifications, SKU 14046 — Smith & Wesson Brands, Inc. website primary source
https://www.smith-wesson.com/product/model-19-classic-no-internal-lock (checked 2026-10-03) - [5] Virtual Patent Marking | Smith & Wesson — Smith & Wesson website primary source
https://www.smith-wesson.com/company/virtual-patent-marking (checked 2026-10-13) - [6] Installing Smith & Wesson Spring Kit — Shooting Times website secondary source
https://www.shootingtimes.com/editorial/gunsmithing_st_installswspringkit_200812/100181 (checked 2026-10-29) - [7] Change of a 686 rebound spring — Smith & Wesson Forum community anecdotal source
https://smith-wessonforum.com/threads/change-of-a-686-rebound-spring.330582 (checked 2026-10-29) - [8] My experience installing a Wolff spring kit — Smith & Wesson Forum community anecdotal source
https://smith-wessonforum.com/threads/my-experience-installing-a-wolff-spring-kit.222810 (checked 2026-10-29) - [9] Smith & Wesson .357 Combat Magnum Model No. 19 - factory Parts List sheet (scanned image; exploded view at SW19.jpg) — Smith & Wesson (factory sheet), scan hosted by CFN Parts (cfnparts.com Model 19 category page, 'Click Here To See - Parts List') manufacturer manual primary source
https://cfnparts.com/image/catalog/products/data/Instruction%20Manuals/SmithWesson/SW19PL.jpg (checked 2026-10-29)
Notes: CORRECTED on 2026-09-15 against S&W's revolver manual, matching the fix already applied to the Model 10. The entry presented yoke and cylinder removal as the routine field strip. S&W publishes no disassembly procedure for its revolvers at all — the maintenance section is cleaning only, and anything further is directed to a qualified gunsmith. The routine procedure is now S&W's own cleaning sequence; the yoke removal is kept as a detail strip labelled as unsanctioned practice. Confidence is medium, not high: this manual covers S&W revolvers generally rather than this model specifically, and only a third-party HTTPS mirror is reachable from here. Cylinder and yoke removal is owner-level and common to the S&W double-action line. Anything inside the sideplate is gunsmith work and is deliberately not described here.