← All firearms · Printable work order
Smith & Wesson SD9 VE
- easy
- Shop tier 2
- medium confidence
- Pistol
- striker fired
- polymer frame
- budget
field strip ~1 min · reassembly ~2 min · detail strip ~20 min
Specifications
- Manufacturer
- Smith & Wesson
- Origin
- United States
- Category
- Pistol
- Action
- Striker-fired, short recoil
- Calibers
- 9x19mm Parabellum, .40 S&W
- Capacity
- 16+1 in 9mm
- Production
- 2012–present (in-production)
- Also known as
- SD9, SD40 VE, Sigma (predecessor)
Model-specific safety
- The trigger must be pressed to field strip this pistol. Remove the magazine, verify the chamber is empty by sight and by touch, and only then press the trigger with the muzzle in a safe direction.
- The SD series has a long, heavy self-defence trigger by design. That is not a fault, but it does mean the trigger press during takedown is a deliberate, firm action — which is exactly when people get careless.
- The recoil spring assembly is under tension when the slide is off.
Under spring tension
- Recoil spring assembly
Easily lost parts
Takedown lever · Recoil spring assembly
Tools
No tools required for the field strip.
Shop difficulty
Shop tier 2 Tier 2 — moderate among pistols, for the full job: strip to the parts that get coated and put it back together working. Glock-like layout, but the sear block's spring is a known fight: owners recommend a vise to hold the sear block and use slave pins for reassembly, and there is 'a trick' to refitting the sear spring. That jig requirement puts it at the bottom of Tier 2.
Parts: 28 numbered parts (complete pistol incl. magazine (keys 4-8) per the MCARBO 'S&W SD9VE / SD40VE' exploded view: drawing callouts 1-28; the legend lists 1-27 and callout 28 (drawn on the slide) has no legend line. Severa), from S&W SD9VE / SD40VE Exploded View (linked from the MCARBO SD9VE/SD40VE Trigger Spring Kit page) — MCARBO, p. 1 mcarbo.com [9].
Bench time: about 20 min to strip, 35 min to rebuild (estimate). Slide (striker, extractor, sights) and frame (sear block, sear and spring, trigger and pins, slide stop); rebuild longer for the sear spring with slave pins.
Small parts: 2 pins, 5 springs, 1 detents or plungers (counted by name in the same list: pins = 16 trigger pin, 17 sear housing block assembly pin; springs = 5 magazine spring, 9 barrel stop spring, 18 safety plunger spring, 22 extractor spring assembly, )
What comes off for coating
- Slide: slide cap / striker assembly, striker safety, extractor, rear sight, front sight — sight pusher, pin punch
- Frame: sear block, sear and sear spring, trigger, trigger bar and return spring, slide stop, takedown lever, magazine catch — pin punches, slave pins, vise
Special tools
- slave pins — Holding the sear block parts while the frame pins go in
- vise or clamp — Holding the sear block
- dovetail sight pusher (or brass drift and padded vise) — Removing and refitting dovetailed sights for coating
Known pain points
- The sear spring is a chore to refit; a vise or clamp holding the sear block helps. (reassembly)
Owners report: Galloway Precision Trigger Review — Smith & Wesson Forum smith-wessonforum.com [7] — “Sear spring assembly can be a chore but with some patience it will go right back together. I suggest the use of a vise or other clamping system to hold the sear block.” - Reassembly is done with a slave pin, which trigger kits do not always include. (reassembly)
Owners report: Galloway Precision Trigger Review — Smith & Wesson Forum smith-wessonforum.com [7] — “Installation was as one might expect except for the fact that the galloway doesn't have a slave pin included for reassembly.” - Owners who pull the sear spring report there is a trick to getting it back in. (reassembly)
Owners report: Trigger work on SD9VE — Smith & Wesson Forum smith-wessonforum.com [8] — “and Yes there is a trick to putting in Back in” - S&W tells owners not to go past the field strip. (both)
Source: Safety & Instruction Manual for the SD, SD 2.0 and SD VE Pistols, linked from smith-wesson.com/products/sdve — Smith & Wesson smith-wesson.canto.com [2] — “CAUTION: Never disassemble your firearm beyond the instructions in the Field Stripping and Inspection sections of this manual.”
Fit or check on rebuild
- Function check: trigger reset, sear/striker engagement, safeties — Standard post-reassembly check on any pistol whose fire-control parts were removed; a mis-seated spring shows up here, not on the bench
This is Pew-Takedown's rating, not the manufacturer's. How tiers are rated. Forum reports are owners' experience, not specifications.
Procedures
Clear and Make Safe
Clear & Make Safe- Point the muzzle in a safe direction and keep your finger off the trigger.
- Press the magazine release and remove the magazine.Removed at this step:
Magazine - Retract the slide fully to eject any chambered round and lock it open.
- Visually inspect the chamber and magazine well, then physically feel the chamber to confirm it is empty.WarningLook and feel. Both, every time.
- Remove all live ammunition from the work area.
Field Strip
Field Strip- Complete the Clear and Make Safe procedure and verify the chamber a second time.
- With the slide locked back, rotate the takedown lever downward until it stops.
- Release the slide forward, point the muzzle in a safe direction, and press the trigger to release the sear.WarningChamber verified empty, muzzle in a safe direction. This is the step that injures people.
- Push the slide forward off the frame.Removed at this step:
Slide assembly - Lift the recoil spring assembly out of the slide.Removed at this step:
Recoil spring assembly - Lift the barrel out of the slide.Removed at this step:
Barrel
Reassembly
Reassembly- Set the barrel into the inverted slide and seat it fully forward.
- Seat the recoil spring assembly into the cut in the barrel lug and press it down into the slide channel.TipIt seats in the lug cut, not on the barrel itself.
- Set the slide onto the frame rails and push it rearward until it seats.
- Return the takedown lever to its locked position.WarningConfirm the takedown lever is fully returned before the pistol goes back into service.
- Rack the slide several times and perform the function check.
Patent drawings
not under copyrightDrawings from US patents on this design. A patent shows the invention as the inventor filed it; the firearm that shipped can differ in detail, and later production often does. Use them to see how the parts relate, not as a parts reference or a procedure. Per the USPTO, the text and drawings of a patent are typically not subject to copyright; each patent here was checked for a copyright notice.
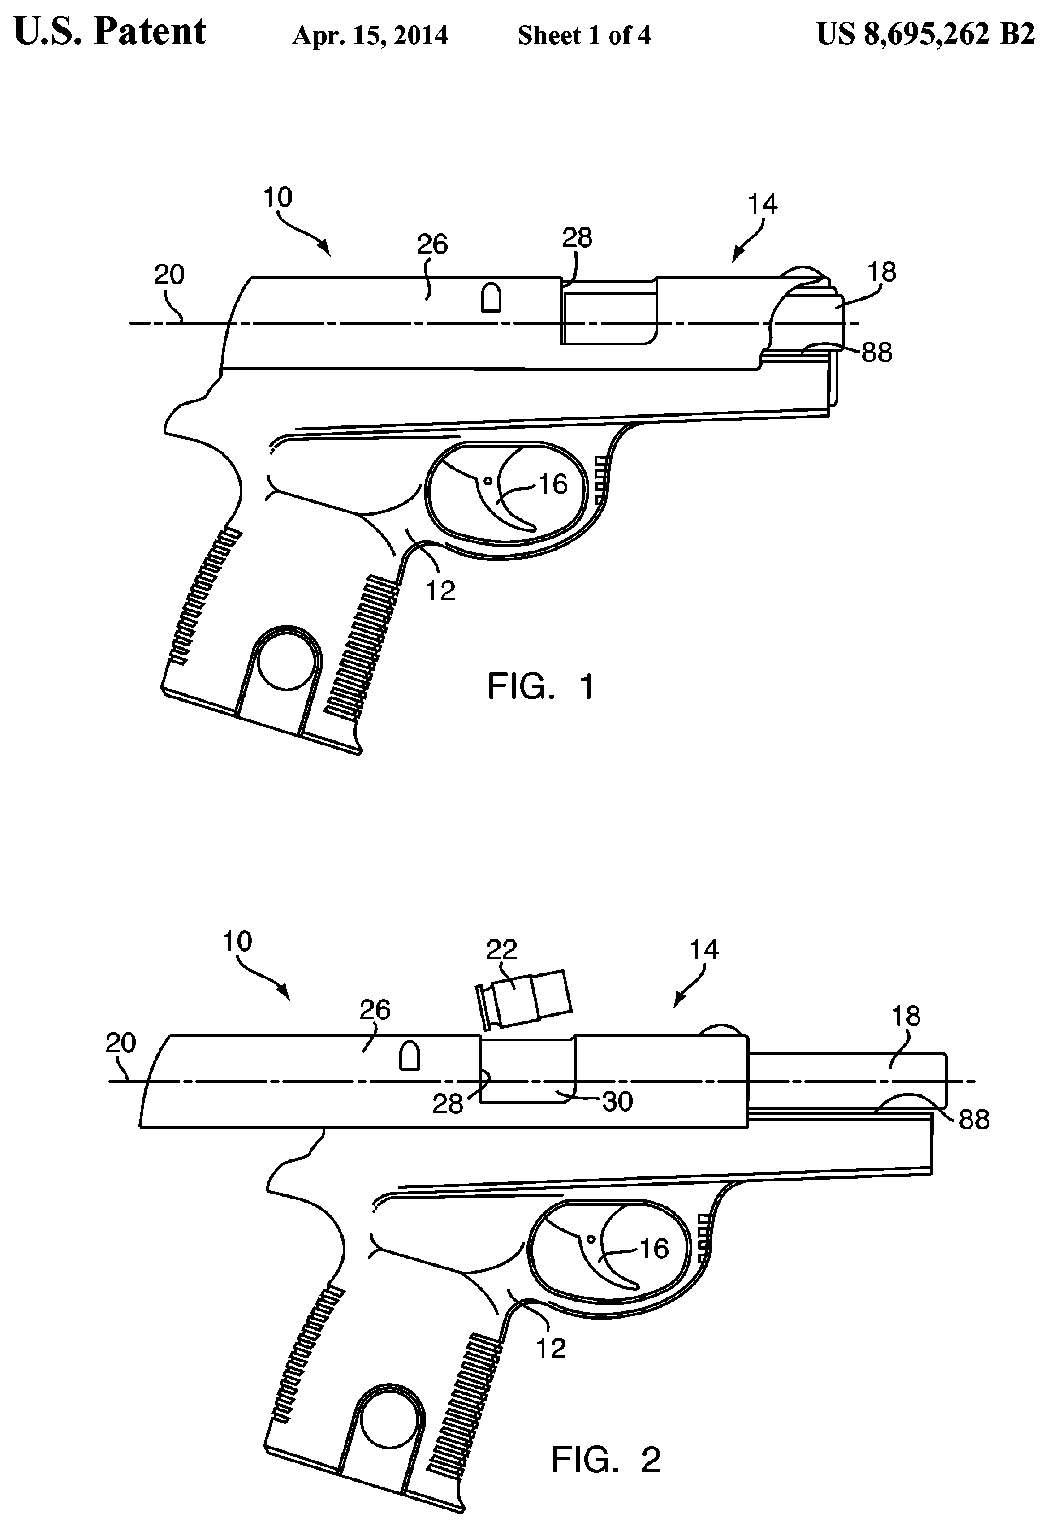
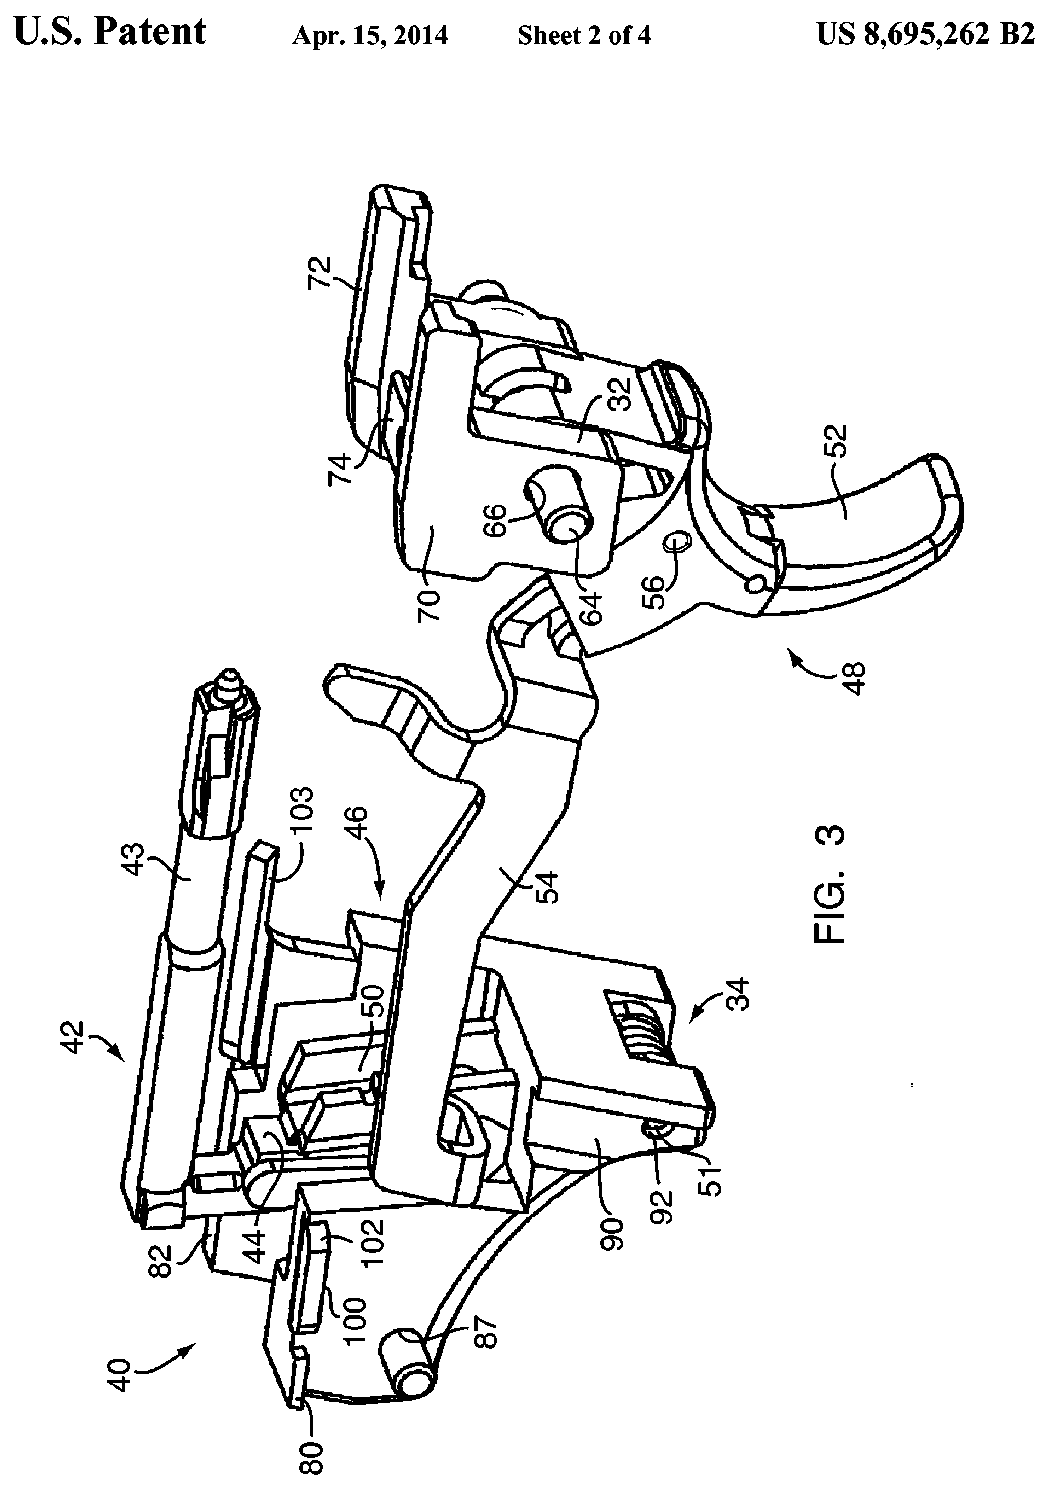
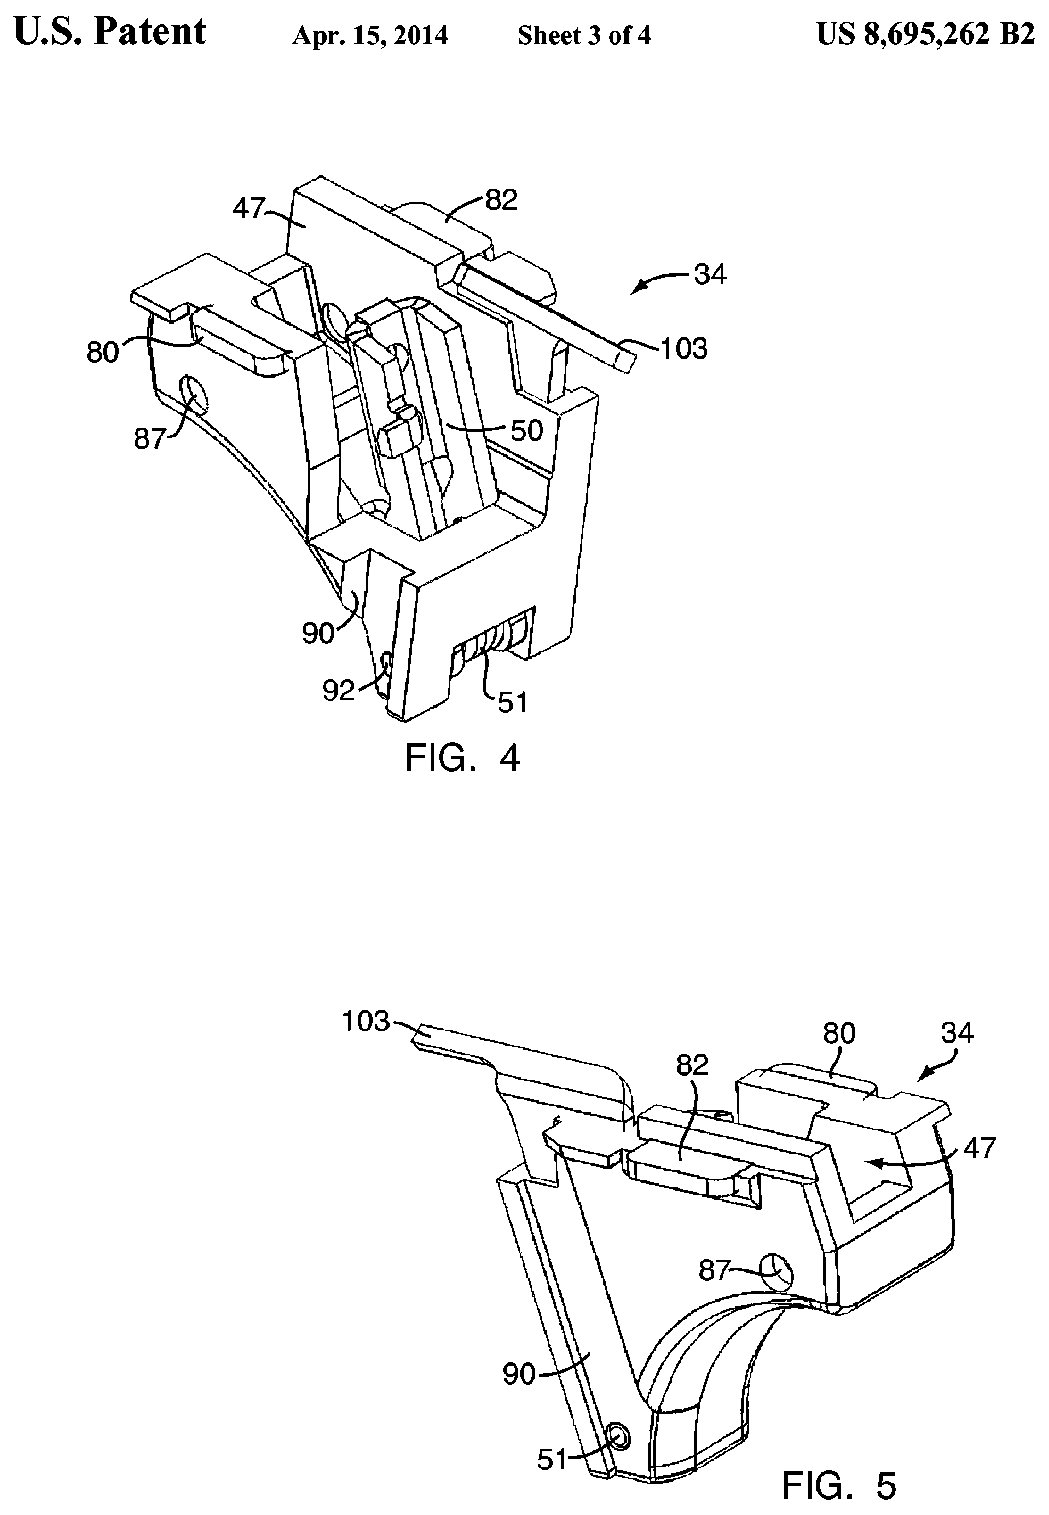
US Patent 8,695,262 — Unitary sear housing block
Sean O'Clair, Gary Zukowski, Brett Curry · assigned to Smith & Wesson Corp. · filed 2011-11-11 · granted 2014-04-15. Full patent (USPTO)
The SD VE fire control: a one-piece (unitary) sear housing block holding the sear and striker parts in the polymer frame.
Why this is the Smith & Wesson SD9 VE’s patent: listed on the maker’s patent-marking page — Virtual Patent Marking | Smith & Wesson — Smith & Wesson smith-wesson.com [6]: “8,695,262 SDVE Series pistols”
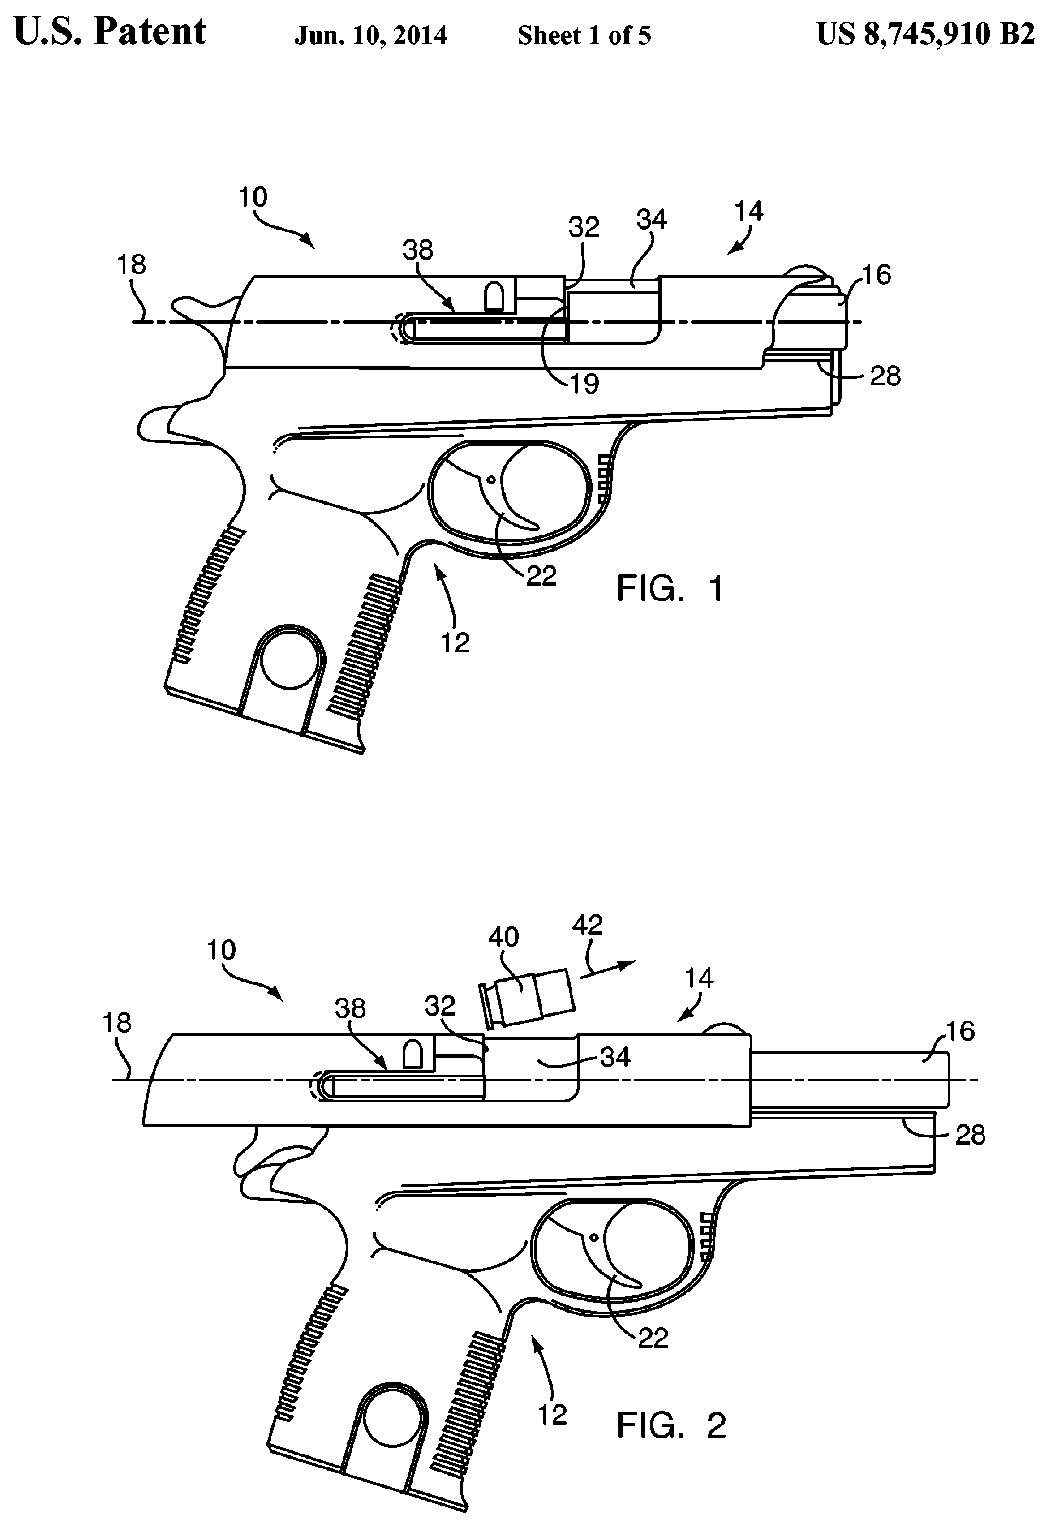
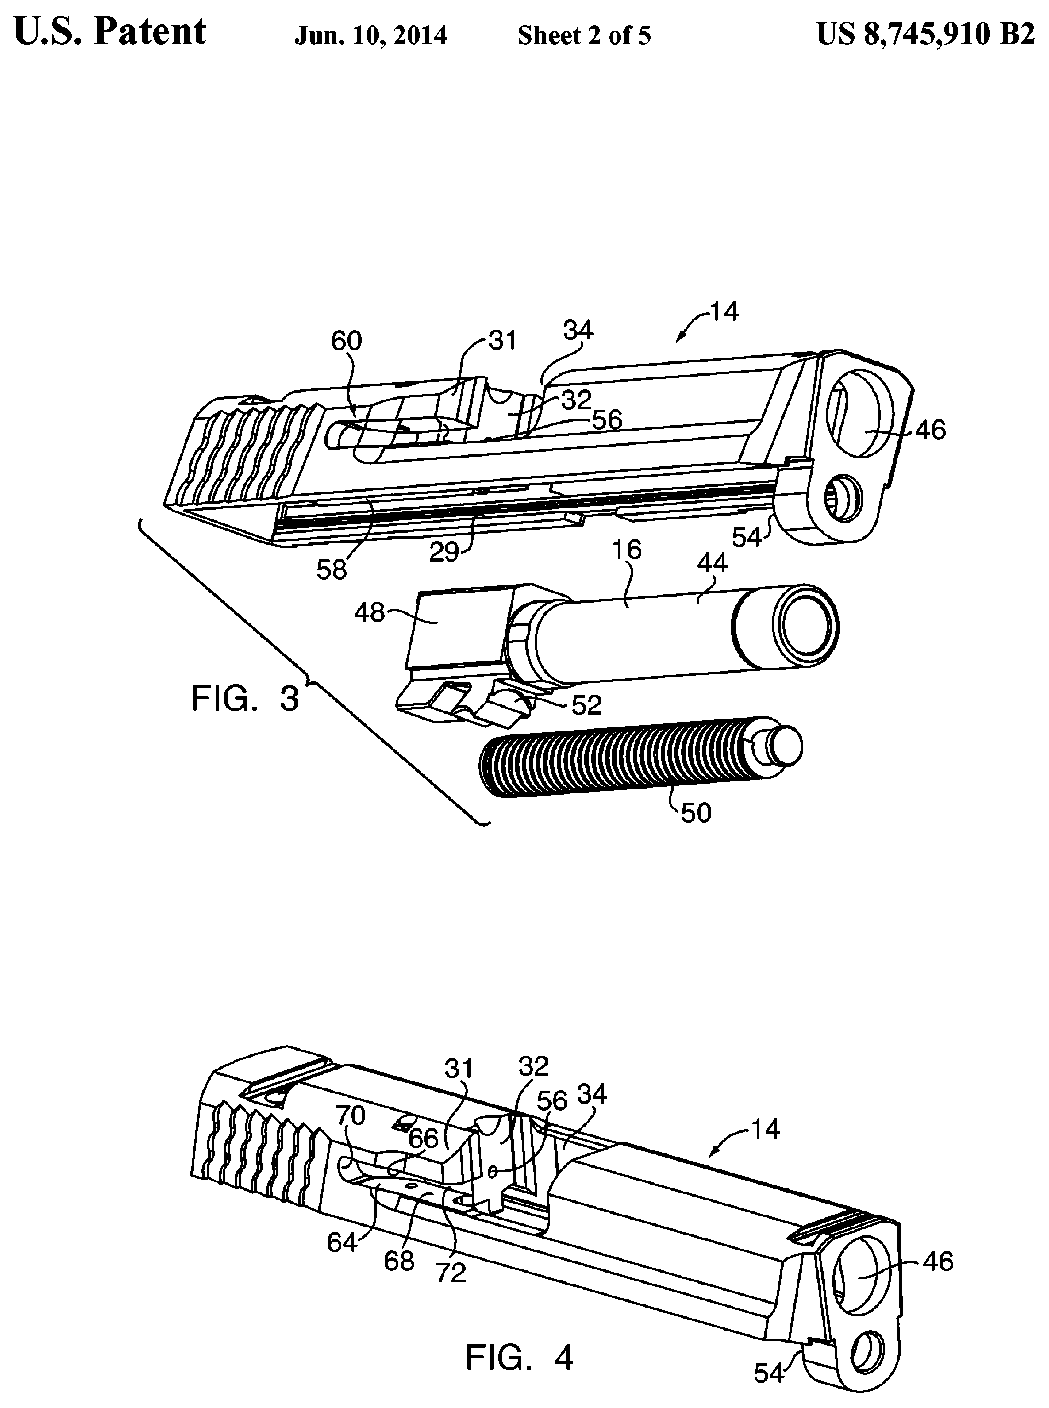
US Patent 8,745,910 — Rotating and translating extractor mechanism
Gary Zukowski, Brett Curry, Sean O'Clair · assigned to Smith & Wesson Corp. · filed 2011-11-15 · granted 2014-06-10. Full patent (USPTO)
The extractor housed in the slide of the SD VE / Shield-type pistol, with an exploded view of slide, barrel and recoil spring.
Why this is the Smith & Wesson SD9 VE’s patent: listed on the maker’s patent-marking page — Virtual Patent Marking | Smith & Wesson — Smith & Wesson smith-wesson.com [6]: “8,745,910 SDVE Series pistols and M&P® Shield™ pistols”
Torque specifications
No sourced torque values from the manufacturer are recorded for this firearm. Where a fastener has a specified torque — action screws, scope bases, muzzle devices, barrel nuts — get it from the manufacturer or a gunsmith rather than estimating it.
What the manufacturer does say: The manufacturer's documents give no torque value. They say: "Tighten the set screw after the sight has been adjusted to the desired position." (Safety & Instruction Manual for the SD, SD 2.0 and SD VE Pistols, linked from smith-wesson.com/products/sdve, p. 34)
Reported by other sources — not the manufacturer
| Fastener | Torque | Who says so, and their words | Where it comes from |
|---|---|---|---|
| Red-dot optic mounting screws (6-32 flat head, supplied) into EGW rear-dovetail sight mount Smith & Wesson SD9VE (listed on EGW's M&P dovetail mount; SW9VE is listed as NOT fitting) with the EGW 'Red Dot Sight Mount for Smith and Wesson (S&W) M&P (fits Trijicon RMR / SRO, Holosun 407c / 507c |
15 in-lb 1.7 N·m · 1.2 ft-lb |
Reported by Evolution Gun Works (EGW) Remove the rear sight, install the EGW mount in the dovetail, tighten the set screw if applicable, place the optic on the mount, then apply blue Loctite and torque the optic screws. Threadlocker: Blue Loctite on the provided mounting screws (EGW instructions) “Torque mounting screws to 15in/lbs” |
Red Dot Sight Mount for Smith and Wesson (S&W) M&P (fits Trijicon RMR / SRO, Holosun 407c / 507c) (EGW product page, installation instructions section) — Evolution Gun Works (EGW) egwguns.com [4] |
| Red-dot optic mounting screws (supplied) into EGW rear-dovetail sight mount (Docter/Venom/Viper/FastFire footprint) Smith & Wesson SD9VE (listed on EGW's M&P dovetail mount; SW9VE is listed as NOT fitting) with the EGW 'Smith & Wesson M&P Red Dot Mount | EGW Vortex Venom Plate' (replaces the rear sight) |
15 in-lb 1.7 N·m · 1.2 ft-lb |
Reported by Evolution Gun Works (EGW) Remove the rear sight, install the EGW mount in the dovetail, tighten the set screw if applicable, place the optic on the mount, then apply blue Loctite and torque the optic screws. Threadlocker: Blue Loctite on the provided mounting screws (EGW instructions) “Torque mounting screws to 15 in/lbs” |
Smith & Wesson M&P Red Dot Mount | EGW Vortex Venom Plate (EGW product page, installation instructions section) — Evolution Gun Works (EGW) egwguns.com [5] |
Materials and factory finish
As stated by Smith & Wesson. Prep, masking and cure depend on these; a polymer or aluminium part, a nitrided or anodised finish, and a blued steel part are each a different job. Variants with other finishes may exist — check the maker's page for the exact SKU on the bench.
| Component | Material | Factory finish | Where it comes from |
|---|---|---|---|
| Frame SD9 VE, standard capacity, 4in, SKU 223900 | POLYMER | — | Smith & Wesson SD9 VE Standard Capacity — product specifications, SKU 223900 — Smith & Wesson Brands, Inc. smith-wesson.com [3] “FRAME MATERIAL … POLYMER” |
| Barrel SD9 VE, standard capacity, 4in, SKU 223900 | STAINLESS STEEL | — | Smith & Wesson SD9 VE Standard Capacity — product specifications, SKU 223900 — Smith & Wesson Brands, Inc. smith-wesson.com [3] “BARREL MATERIAL … STAINLESS STEEL” |
| Slide SD9 VE, standard capacity, 4in, SKU 223900 | — | TWO TONE | Smith & Wesson SD9 VE Standard Capacity — product specifications, SKU 223900 — Smith & Wesson Brands, Inc. smith-wesson.com [3] “COLOR/FINISH … TWO TONE” |
| Grips SD9 VE, standard capacity, 4in, SKU 223900 | POLYMER | — | Smith & Wesson SD9 VE Standard Capacity — product specifications, SKU 223900 — Smith & Wesson Brands, Inc. smith-wesson.com [3] “GRIP … POLYMER” |
Parts
No parts list from Smith & Wesson is transcribed for this firearm.
Smith & Wesson's own documents label the parts on these pages — the links open each document at the page:
- Model and features identification (labelled photo of the pistol): Safety & Instruction Manual for the SD, SD 2.0 and SD VE Pistols, linked from smith-wesson.com/products/sdve — Smith & Wesson, p. 12 smith-wesson.canto.com [2]
Function check
- Verify the pistol is unloaded with no magazine inserted before each check.
- Rack the slide and press the trigger. The striker should release cleanly.
- Hold the trigger to the rear, rack the slide, then release slowly and confirm the reset.
- Press the trigger again to confirm the striker releases.
- Confirm the slide locks open on an empty magazine and the magazine drops free.
Maintenance
Lubrication points
- Frame rails where the slide rides
- Barrel hood and locking lug
- Outside of the barrel at the muzzle end
- Rear barrel lug where the recoil spring assembly bears
Cleaning notes
Light lubrication only — a thin film on the rails and barrel. Keep the striker or firing pin channel dry and free of solvent, since oil there collects fouling and causes light strikes.
Suggested inspection interval: roughly every 5000 rounds. This is a general guideline, not a manufacturer specification.
Wear parts to inspect
Recoil spring assembly · Extractor · Magazine springs and followers
Common issues
| Symptom | Likely cause | What to do |
|---|---|---|
| Takedown lever will not rotate | Slide not fully locked to the rear | Lock the slide fully open and try again. |
Also covers
The procedures above are reported to apply to: SD40 VE · S&W Sigma series (predecessor). Verify against the manual for your specific model.
Similar manual of arms
Sourcing
- Confidence
- medium — Drawn from reliable secondary sources and consistent across references, but not confirmed against a primary source.
- Verification
- Community reviewed only
- Last updated
- 2026-10-29
References
Every source this page draws on, with its web address so you can read it yourself. Numbers in brackets elsewhere on the page point here.
- [1] Smith & Wesson SD9 VE Owner’s Manual — Smith & Wesson manufacturer manual primary source
- [2] Safety & Instruction Manual for the SD, SD 2.0 and SD VE Pistols, linked from smith-wesson.com/products/sdve — Smith & Wesson manufacturer manual primary source
https://smith-wesson.canto.com/direct/document/6224qp197t7g72ongbkvn3p44s/bQtPewI3caoPPNANwohwfA-gjOw/original?content-type=application%2Fpdf (checked 2026-09-27) - [3] Smith & Wesson SD9 VE Standard Capacity — product specifications, SKU 223900 — Smith & Wesson Brands, Inc. website primary source
https://www.smith-wesson.com/product/s-w-sd9-ve-std-capacity (checked 2026-10-03) - [4] Red Dot Sight Mount for Smith and Wesson (S&W) M&P (fits Trijicon RMR / SRO, Holosun 407c / 507c) (EGW product page, installation instructions section) — Evolution Gun Works (EGW) website secondary source
https://egwguns.com/trijicon-rmr-sro-holosun-407c-507c-mount-for-s-w-m-p (checked 2026-10-11) - [5] Smith & Wesson M&P Red Dot Mount | EGW Vortex Venom Plate (EGW product page, installation instructions section) — Evolution Gun Works (EGW) website secondary source
https://egwguns.com/vortex-viper-venom-s-w-m-p-sight-mount-fits-burris-fastfire-and-docter (checked 2026-10-11) - [6] Virtual Patent Marking | Smith & Wesson — Smith & Wesson website primary source
https://www.smith-wesson.com/company/virtual-patent-marking (checked 2026-10-13) - [7] Galloway Precision Trigger Review — Smith & Wesson Forum community anecdotal source
https://smith-wessonforum.com/threads/galloway-precision-trigger-review.334870/ (checked 2026-10-29) - [8] Trigger work on SD9VE — Smith & Wesson Forum community anecdotal source
https://smith-wessonforum.com/threads/trigger-work-on-sd9ve.292019/ (checked 2026-10-29) - [9] S&W SD9VE / SD40VE Exploded View (linked from the MCARBO SD9VE/SD40VE Trigger Spring Kit page) — MCARBO website secondary source
https://www.mcarbo.com/.Exploded%20View/S-W-SD9VE-Exploded-View.pdf (checked 2026-10-29)
Notes: The SD series descends from the Sigma. Its takedown requires a trigger press, unlike the full-size M&P which offers the sear deactivation lever.