← All firearms · Printable work order
Winchester Model 12
- advanced
- Shop tier 3
- medium confidence
- Shotgun
- pump action
- hammerless
- slam fire
- takedown
- historic
- collectible
field strip ~5 min · reassembly ~8 min · detail strip ~40 min
Specifications
- Manufacturer
- Winchester Repeating Arms
- Origin
- United States
- Category
- Shotgun
- Action
- Pump action
- Calibers
- 12 gauge, 16 gauge, 20 gauge, 28 gauge
- Capacity
- 5+1 typical
- Production
- 1912–1980 (discontinued)
- Also known as
- Model 1912, The Perfect Repeater
Model-specific safety
- This shotgun has no trigger disconnector. Holding the trigger down and closing the action WILL fire it. That is how the gun was designed, not a fault — but it means the gun behaves differently from every modern pump, and it is genuinely dangerous if you do not know. Determine by function check whether your gun does this before you load it.
- The Model 12 is hammerless — the hammer is internal — so unlike the Model 97 there is no external indicator of its state. The chamber check is the only check.
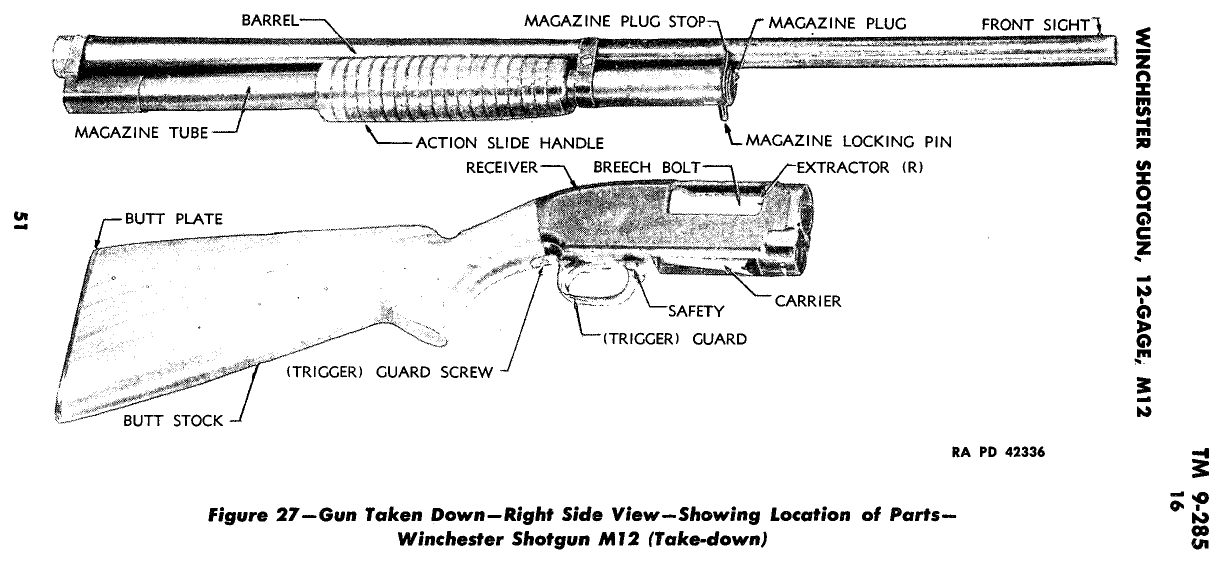
- The Model 12 is a takedown design: the barrel and magazine assembly separate from the receiver by rotating after releasing the takedown collar. A loose takedown joint is dangerous.
- Unloading a tube magazine takes several cycles. Verify the chamber and the tube.
- These guns are 45 to 110 years old. Do not fire steel shot or modern high-pressure loads in a barrel never designed for them, and have one of unknown history checked.
Under spring tension
- Magazine tube spring
- Hammer spring
- Action spring
Easily lost parts
Takedown collar components · Action slide lock · Carrier components
Tools
No tools required for the field strip.
Shop difficulty
Shop tier 3 Tier 3 — hardest among shotguns, for the full job: strip to the parts that get coated and put it back together working. At least 65 key-numbered parts in a fitted, hammerless pump whose trigger guard parts American Rifleman says are gunsmith-only, with staked music-wire springs in the slide release, a left-hand-threaded carrier pivot, and an order-dependent reassembly (bolt fully seated before the retaining lever enters, cut-off that falls out until the guard is in). Older guns also need the takedown adjusting sleeve set.
Parts: 65 numbered parts (LOWER BOUND: highest key number cited in the text of American Rifleman's labelled exploded view (carrier assembly 60-65); the legend itself is an image and was not read. The entry's own list (TM 9-285), from Exploded View: Winchester Model 12 — American Rifleman (NRA) americanrifleman.org [4].
Bench time: about 75 min to strip, 110 min to rebuild (estimate). Strip of takedown joint, magazine and slide groups, trigger guard group (carrier on left-hand pivot), breech bolt (retractor, extractors, retaining lever), ejector and cut-off; rebuild long for order dependency and the adjusting sleeve.
Small parts: 1 pins, 3 springs, 0 detents or plungers (counted from the manufacturer's parts list (one per key number unless a quantity is given))
What comes off for coating
- Barrel / magazine / slide: takedown: magazine locking pin and barrel quarter turn, magazine plug screw, spring and follower, action slide and handle, adjusting sleeve and lock screw
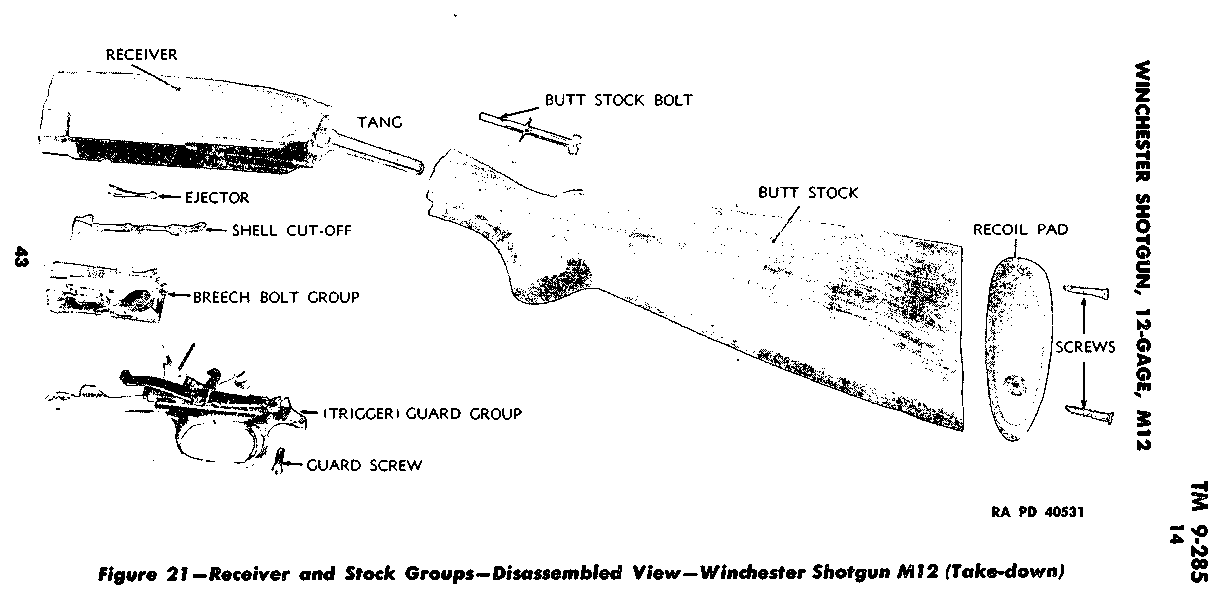
- Receiver: guard screw and trigger guard group, breech bolt (retaining lever), ejector and shell cut-off
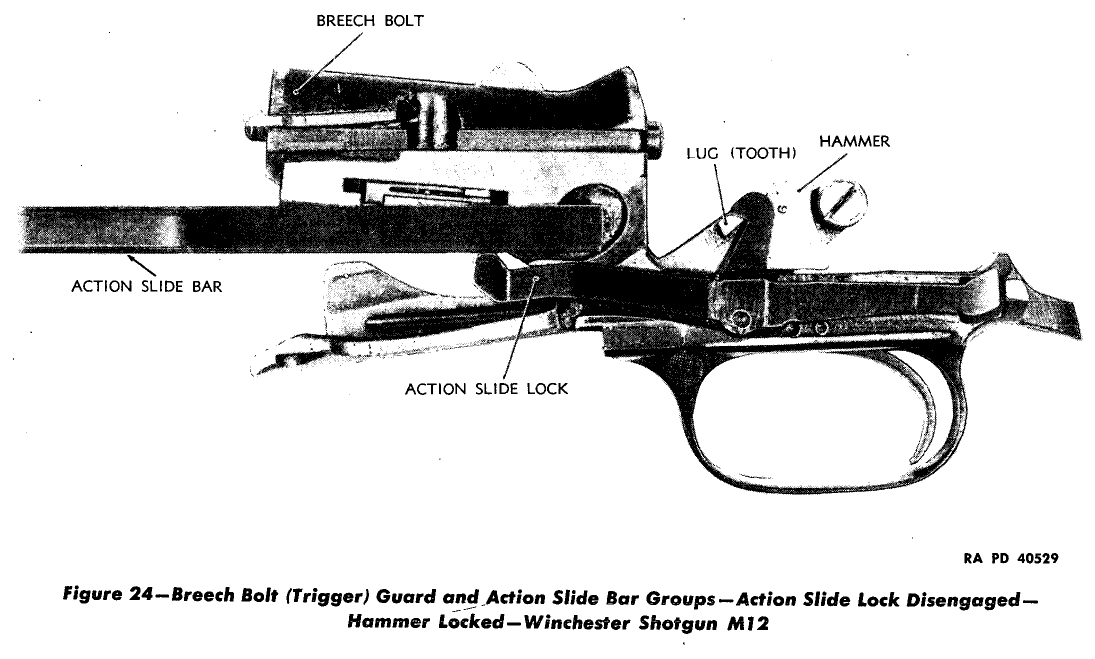
- Trigger guard group: carrier assembly off the left-hand-thread carrier pivot, slide release and its staked wire springs (leave unless broken), parts 50-59 (gunsmith only per American Rifleman)
- Breech bolt: firing pin retractor screw, retractor and spring, left extractor, spring and pin, right extractor, plunger and spring, breech bolt retaining lever and pin
- Stock: butt plate screws, stock bolt
Special tools
- Long-shank screwdriver / stock tool — Stock bolt
- Punch set — Extractor and retaining lever pins
- Takedown adjusting sleeve wrench or drift — Adjusting sleeve on the barrel extension
Known pain points
- American Rifleman warns the guard assembly parts are not to be stripped and parts 50-59 are for a qualified gunsmith; the carrier pivot also has a left-hand thread that is easy to strip by turning the wrong way. (both)
Source: Exploded View: Winchester Model 12 — American Rifleman (NRA) americanrifleman.org [4] — “Further disassembly of parts contained within the guard assembly should not be attempted, and replacement of parts 50 through 59 should be made only by a qualified gunsmith.” - The bolt has to be fully seated before the friction-held retaining lever will enter its groove, and the shell cut-off is loose and falls out until the trigger guard group is installed, so the order is fixed. (reassembly)
Source: TM 9-285, Shotguns, All Types — War Department archive.org [3] — “The cut-off is liable to fall out, until the trigger guard is in place.” - The bolt retaining lever must be depressed with a tool and the bolt fully forward; forcing it damages the gun. (reassembly)
Source: TM 9-285, Shotguns, All Types — War Department archive.org [3] — “end of the bolt must be fully seated before the rear end of the lever will enter its groove in receiver. Do not force).” - The slide release in the trigger group is controlled by two tiny straight wire springs set in grooves and staked in place, a semi-permanent assembly that is hard to service. (both)
Owners report: Winchester Model 12 Trigger Group Repair — Canadian Gun Nutz canadiangunnutz.com [5] — “The springs are set in tiny grooves, the butt end fitting into a tiny hole, and the edges of the grooves are staked to secure them. Semi-permanent assembly.”
Fit or check on rebuild
- Takedown joint adjusted tight — A loose joint batters the gun and is dangerous; the adjusting sleeve is reset rather than shooting it loose.
- Bolt fully seated before the retaining lever enters its groove — Forcing it damages the gun.
Source: TM 9-285, Shotguns, All Types — War Department archive.org [3] — “end of the bolt must be fully seated before the rear end of the lever will enter its groove in receiver. Do not force).” - Function check: safety, trigger/sear release, disconnector and feeding with dummy rounds — Standard after any detail strip; a mis-assembled sear or disconnector can double or fail to fire.
This is Pew-Takedown's rating, not the manufacturer's. How tiers are rated. Forum reports are owners' experience, not specifications.
Procedures
Clear and Make Safe
Clear & Make Safe- Point the muzzle in a safe direction and keep your finger off the trigger.
- Engage the crossbolt safety in the trigger guard.
- Press the action slide lock and pull the forend rearward to open the action.Removed at this step:
Chambered shell, if present - Cycle the action repeatedly, catching each shell as it ejects, until no more shells feed from the magazine tube.
- With the action open, inspect the chamber and look up the magazine tube with a light.WarningThe chamber AND the tube.
- Physically confirm the chamber is empty and remove all live ammunition from the work area.
Field Strip — Takedown
Field Strip- Complete the Clear and Make Safe procedure.
- Pull the action slide lock and move the forend partway rearward.
- Unscrew or release the takedown collar at the front of the receiver.Removed at this step:
(collar released) - Rotate the barrel and magazine assembly a quarter turn and separate it from the receiver.Removed at this step:
Barrel and magazine tube assembly - Clean the bore from the breech end of the separated barrel, and clean the bolt face, chamber, and receiver interior.
- Stop here. The Model 12 action is intricate and its parts are scarce.WarningIf the gun is malfunctioning, take it to a gunsmith familiar with the design.
Remove the trigger guard group
Detail Strip tools required gunsmith recommendedThe trigger guard group (hammer, trigger with integral sear, trigger safety lock, action slide lock) comes out with the carrier attached after one screw is removed; the butt stock stays on. TM 9-285 assigns this to the using arm (troop level): par. 1c says disassembly and assembly 'will be undertaken only under the supervision of an officer or the chief mechanic', and the field-inspection paragraph limits using troops to the removal and replacement of groups described here. Anything further (adjustment, stoning, trigger work, headspace) goes to ordnance personnel. TM 9-285 allows this to using
Follows TM 9-285, Shotguns, All Types — War Department, par. 16 a (3), p. 47 archive.org [3]
- Remove the barrel, magazine and action slide group first.
- Turn the receiver bottom side up and unscrew the guard screw from the rear end of the guard.TipThe guard group can be removed without removing the butt stock.Removed at this step:
Guard screw - Pull the guard, with the carrier attached, upward and to the rear out of the receiver.Removed at this step:
Trigger guard group with carrier
Remove the ejector, shell cut-off and breech bolt
Detail Strip tools required gunsmith recommendedWith the guard group out and the bolt forward, the ejector and shell cut-off are pried out of the left receiver wall and the bolt is released by depressing its retaining lever. TM 9-285 assigns this to the using arm (troop level): par. 1c says disassembly and assembly 'will be undertaken only under the supervision of an officer or the chief mechanic', and the field-inspection paragraph limits using troops to the removal and replacement of groups described here. Anything further (adjustment, stoning, trigger work, headspace) goes to ordnance personnel. TM 9-285 allows this to using troops only
Follows TM 9-285, Shotguns, All Types — War Department, par. 16 a (4), p. 54 archive.org [3]
- With the guard group removed and the breech bolt in the forward position, pry the ejector out of the left inner wall of the receiver.Removed at this step:
Ejector - Pry the shell cut-off out of the lower left inner wall of the receiver, if it has not already fallen out.Removed at this step:
Shell cut-off - Reach into the receiver with a screwdriver or similar tool and depress the rear end of the breech bolt retaining lever in the left face of the bolt.
- Slide the breech bolt to the rear and lift it from the receiver.Removed at this step:
Breech bolt group
Replace the breech bolt, ejector and shell cut-off
Detail Reassembly tools required gunsmith recommendedThe breech bolt goes back before the guard group, ejector and shell cut-off. TM 9-285 assigns this to the using arm (troop level): par. 1c says disassembly and assembly 'will be undertaken only under the supervision of an officer or the chief mechanic', and the field-inspection paragraph limits using troops to the removal and replacement of groups described here. Anything further (adjustment, stoning, trigger work, headspace) goes to ordnance personnel. TM 9-285 allows this to using troops only under the supervision of an officer or the chief mechanic (par. 1c).
Follows TM 9-285, Shotguns, All Types — War Department, par. 17 a (1), p. 54 archive.org [3]
- Clean, lightly oil and lubricate the parts before replacing them.
- Test the breech bolt retaining lever before installing the bolt; it is held by friction and should work stiffly.
- With the receiver bottom side up, drop the breech bolt, rounded face down and extractors forward, into the rear of the receiver.
- Push the bolt forward to the locked position.
- With a screwdriver or similar tool, depress the forward end of the breech bolt retaining lever.WarningThe rear end of the bolt must be fully seated before the rear end of the lever will enter its groove in the receiver. Do not force.
- With the bolt locked, insert the ejector into its aperture in the left inner wall of the receiver behind the bolt, disk-shaped head to the rear and spring toward the receiver.
- Press the ejector down into its aperture until its head is flush with the inner face of the receiver.
- Insert the shell cut-off into its aperture in the lower left inner wall just behind the magazine opening, enlarged curved end forward in its mating groove and cylindrical stud in its pivot hole, so that it lies flush in its groove.TipThe cut-off is liable to fall out until the trigger guard is in place.
Replace the trigger guard group
Detail Reassembly tools required gunsmith recommendedGoes in hammer cocked, after the breech bolt is in and locked forward. TM 9-285 assigns this to the using arm (troop level): par. 1c says disassembly and assembly 'will be undertaken only under the supervision of an officer or the chief mechanic', and the field-inspection paragraph limits using troops to the removal and replacement of groups described here. Anything further (adjustment, stoning, trigger work, headspace) goes to ordnance personnel. TM 9-285 allows this to using troops only under the supervision of an officer or the chief mechanic (par. 1c).
Follows TM 9-285, Shotguns, All Types — War Department, par. 17 a (2), pp. 54-55 archive.org [3]
- Make sure the breech bolt is installed and in the forward locked position.
- Cock the hammer.
- Grasp the guard by the bow and insert its forward end downward and forward at a slight angle into the receiver.
- Mate the forward end of the guard with the receiver, then press the rear end down until it slides into the receiver and the screw holes in guard and receiver line up.WarningWhen properly mated the guard should position easily. Do not force.
- Replace the guard screw and turn it down snugly.
Reassembly
Reassembly- Align the barrel and magazine assembly with the receiver and rotate it a quarter turn to engage.
- Tighten the takedown collar until the halves are snug with no perceptible play.WarningAdjust the collar rather than shooting a loose joint. Looseness here damages the gun and is dangerous.
- Cycle the action several times and perform the function check.
Diagrams
public domainThese are reproduced from government technical manuals, which are not subject to copyright. Manufacturer manual diagrams are not reproduced here — the entry links to the manual instead.
Torque specifications
No sourced torque values from the manufacturer are recorded for this firearm. Where a fastener has a specified torque — action screws, scope bases, muzzle devices, barrel nuts — get it from the manufacturer or a gunsmith rather than estimating it.
What the manufacturer does say: The manufacturer's documents give no torque value. They say: "Replace guard screw and turn down snugly." (TM 9-285 Shotguns, All Types (War Department Technical Manual, 21 Sept 1942), PDF p. 56)
Parts list
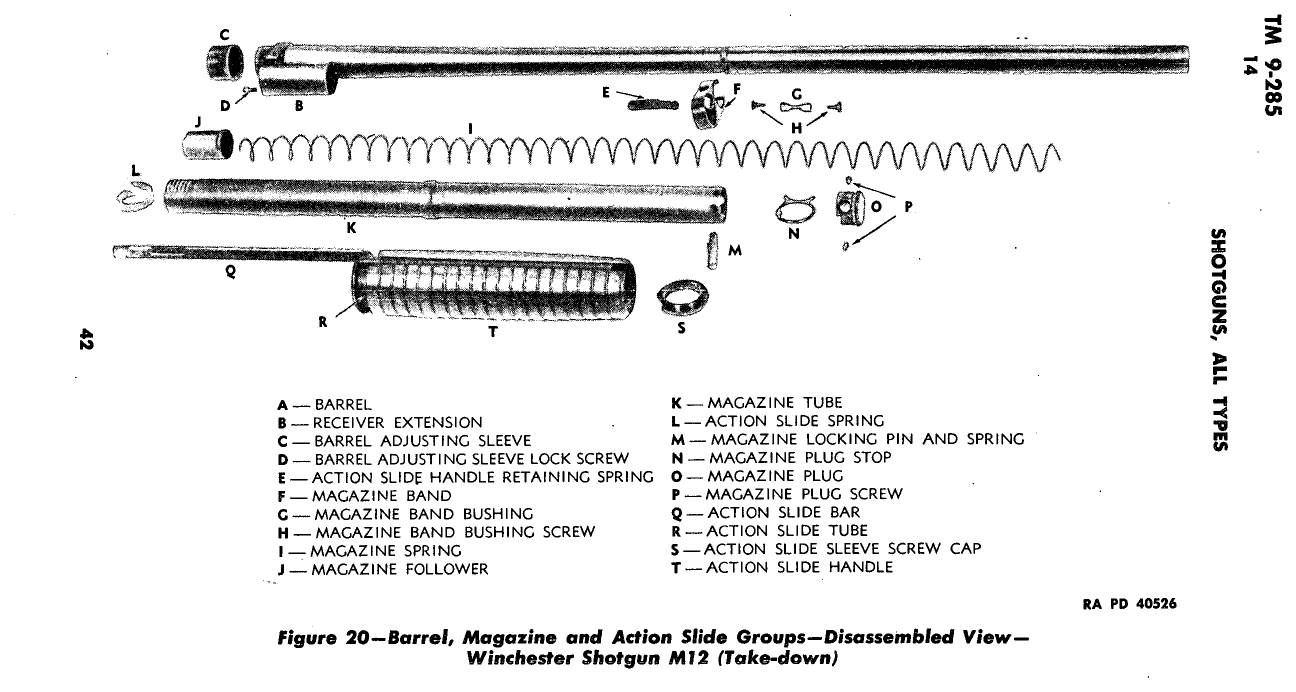
Transcribed from the manufacturer's parts list (TM 9-285, Shotguns, All Types — War Department, p. 42 archive.org [3]) — PARTIAL: TM 9-285 Figure 20 lettered legend, "Barrel, Magazine and Action Slide Groups—Disassembled View—Winchester Shotgun M12 (Take-down)". Receiver, bolt, carrier and trigger parts have no legend list.. Key numbers refer to the exploded view in that document.
20 parts
| Key | Part | Part no. | Qty | Group |
|---|---|---|---|---|
| A | BARREL | 1 | Barrel, Magazine and Action Slide Groups | |
| B | RECEIVER EXTENSION | 1 | Barrel, Magazine and Action Slide Groups | |
| C | BARREL ADJUSTING SLEEVE | 1 | Barrel, Magazine and Action Slide Groups | |
| D | BARREL ADJUSTING SLEEVE LOCK SCREW | 1 | Barrel, Magazine and Action Slide Groups | |
| E | ACTION SLIDE HANDLE RETAINING SPRING | 1 | Barrel, Magazine and Action Slide Groups | |
| F | MAGAZINE BAND | 1 | Barrel, Magazine and Action Slide Groups | |
| G | MAGAZINE BAND BUSHING | 1 | Barrel, Magazine and Action Slide Groups | |
| H | MAGAZINE BAND BUSHING SCREW | 1 | Barrel, Magazine and Action Slide Groups | |
| I | MAGAZINE SPRING | 1 | Barrel, Magazine and Action Slide Groups | |
| J | MAGAZINE FOLLOWER | 1 | Barrel, Magazine and Action Slide Groups | |
| K | MAGAZINE TUBE | 1 | Barrel, Magazine and Action Slide Groups | |
| L | ACTION SLIDE SPRING | 1 | Barrel, Magazine and Action Slide Groups | |
| M | MAGAZINE LOCKING PIN AND SPRING | 1 | Barrel, Magazine and Action Slide Groups | |
| N | MAGAZINE PLUG STOP | 1 | Barrel, Magazine and Action Slide Groups | |
| O | MAGAZINE PLUG | 1 | Barrel, Magazine and Action Slide Groups | |
| P | MAGAZINE PLUG SCREW | 1 | Barrel, Magazine and Action Slide Groups | |
| Q | ACTION SLIDE BAR | 1 | Barrel, Magazine and Action Slide Groups | |
| R | ACTION SLIDE TUBE | 1 | Barrel, Magazine and Action Slide Groups | |
| S | ACTION SLIDE SLEEVE SCREW CAP | 1 | Barrel, Magazine and Action Slide Groups | |
| T | ACTION SLIDE HANDLE | 1 | Barrel, Magazine and Action Slide Groups |
Function check
- Verify the shotgun is unloaded — chamber and magazine tube — before each step.
- Cycle the action fully and confirm it locks closed.
- With the hammer cocked, engage the safety and press the trigger. The hammer must not fall.
- Disengage the safety and press the trigger. The hammer should fall.
- Load two dummy shells into the magazine and confirm they feed and eject one at a time.
- Confirm the magazine cap or takedown fastener is tight.
- Determine whether your gun slam fires: with the action cocked and the trigger held to the rear, cycle the action fully. If it fires, there is no disconnector.
- Confirm the takedown joint is snug with no play.
Maintenance
Lubrication points
- Action bars in their receiver grooves
- Bolt body and locking lug
- Magazine tube exterior
- Hammer and sear pivots
Cleaning notes
Keep the magazine tube interior clean and dry rather than oiled — oil there collects plastic wad residue and slows the follower. Plastic fouling in the chamber and bore is normal with shotshells.
Suggested inspection interval: roughly every 1000 rounds. This is a general guideline, not a manufacturer specification.
Wear parts to inspect
Extractor · Shell latches · Magazine spring · Action bars
Common issues
| Symptom | Likely cause | What to do |
|---|---|---|
| Gun fires when the action closes with the trigger held | No trigger disconnector on many Model 12s | Original design behaviour. Handle accordingly. see a gunsmith |
| Play at the takedown joint | Takedown collar needs adjustment | Adjust the collar. Do not shoot it loose. see a gunsmith |
Also covers
The procedures above are reported to apply to: Model 12 Field, Skeet, Trap, and Riot configurations. Verify against the manual for your specific model.
Similar manual of arms
Sourcing
- Confidence
- medium — Drawn from reliable secondary sources and consistent across references, but not confirmed against a primary source.
- Verification
- Community reviewed only
- Last updated
- 2026-10-29
References
Every source this page draws on, with its web address so you can read it yourself. Numbers in brackets elsewhere on the page point here.
- [1] Winchester Model 12 Shotgun Instructions — Winchester Repeating Arms manufacturer manual primary source
- [2] TM 9-285 Shotguns, All Types (War Department Technical Manual, 21 Sept 1942) — U.S. War Department military technical manual primary source
https://archive.org/details/TM9-285 (checked 2026-09-27) - [3] TM 9-285, Shotguns, All Types — War Department (1942) military technical manual primary source
https://archive.org/download/TM9-285/TM9-285.pdf (checked 2026-09-27) - [4] Exploded View: Winchester Model 12 — American Rifleman (NRA) periodical secondary source
https://www.americanrifleman.org/articles/2020/12/12/exploded-view-winchester-model-12 (checked 2026-10-29) - [5] Winchester Model 12 Trigger Group Repair — Canadian Gun Nutz community anecdotal source
https://www.canadiangunnutz.com/forum/threads/winchester-model-12-trigger-group-repair.2004396 (checked 2026-10-29)
Notes: Rated medium pending step-by-step confirmation against a factory manual for your vintage. Whether a given Model 12 slam fires depends on its configuration and vintage — verify by function check.