← All firearms · Printable work order
Ruger 10/22 Takedown
- easy
- Shop tier 2
- high confidence
- Rimfire Rifle
- rimfire
- blowback
- takedown
- plinker
- packable
field strip ~1 min · reassembly ~2 min · detail strip ~25 min
Specifications
- Manufacturer
- Sturm, Ruger & Co.
- Origin
- United States
- Category
- Rimfire Rifle
- Action
- Blowback
- Calibers
- .22 Long Rifle
- Capacity
- 10 rounds in the standard rotary magazine
- Production
- 2012–present (in-production)
- Also known as
- 10/22 TD
Model-specific safety
- A .22 LR round can be fired by a blow to the case rim, not just the centre. Keep ammunition out of the work area.
- A .22 LR case in a chamber is small and dull-coloured and is genuinely easy to miss. Use a light and a finger, every time.
- Ruger warns that loading or firing the rifle without the barrel assembly fully locked into place may cause malfunctions, damage to the rifle, or injury or death. The locking lever must end up aligned with the magazine well.
- The lock-up is adjustable through a knob on the barrel assembly, and its directions are the reverse of what most threads suggest: turning it CLOCKWISE loosens it and COUNTERCLOCKWISE tightens it.
- The bolt must be locked back before the barrel assembly will release.
- Ruger permits dry firing in moderation for basic function checks, but directs that a snap cap be used for extensive dry-fire practice.
If it will not go back together
Common ways this firearm resists reassembly, and what is actually wrong. Forcing a part that will not seat is how firearms get damaged.
-
The barrel assembly will not rotate far enough to lock, or the locking lever does not line up with the magazine well.
Why The adjustment knob is tightened too far, or the bolt is not locked back.
Fix Lock the bolt back, then loosen the adjustment knob clockwise, seat and rotate the barrel until the locking lever aligns with the magazine well, and retighten the knob counterclockwise.
Forcing it Ruger warns that firing without the barrel fully locked risks malfunctions, damage to the rifle, and injury or death.
-
The rifle goes together but the barrel has play at the joint.
Why The adjustment knob is backed off too far.
Fix Turn the adjustment knob counterclockwise — that is the tightening direction on this rifle — and recheck. Do not shoot a loose joint tight.
Forcing it A loose lock-up loses the rifle's return to zero and loads the joint unevenly.
-
Tightening the adjustment knob seems to make the barrel looser.
Why The knob is being turned the way most fasteners go. On the 10/22 Takedown the directions are reversed.
Fix Counterclockwise tightens, clockwise loosens. The Ruger PC Carbine's equivalent knob works the opposite way, which is a common source of this mix-up.
-
The barrel assembly will not come off even with the locking lever pushed forward.
Why The bolt is not locked to the rear.
Fix Lock the bolt back, then push the locking lever forward towards the muzzle and rotate the barrel counterclockwise.
Forcing it Twisting hard against a closed bolt bears on the locking lugs.
Under spring tension
- Recoil spring and guide rod
- Magazine rotor spring
Easily lost parts
Takedown locking cam components · Recoil spring guide
Tools
No tools required for the field strip.
Shop difficulty
Shop tier 2 Tier 2 — moderate among rimfire rifles, for the full job: strip to the parts that get coated and put it back together working. The standard 10/22 action and trigger group (slave-pin rebuild, compressed recoil spring, ejector held while pinning) plus the takedown barrel joint: 70 rows, 78 pieces. The takedown adds an adjustable lock-up that must be reset, with a knob that loosens clockwise, but no extra springs under tension.
Parts: 70 numbered parts (Standard 10/22 list plus Ruger's Takedown supplemental list; 70 line items), from Ruger 10/22 Instruction Manual (Standard, model numbers 32000 and higher, including 10/22 Takedown) — Sturm, Ruger & Co., Inc., p. 50, 53 ruger-docs.s3.amazonaws.com [1].
Bench time: about 40 min to strip, 60 min to rebuild (estimate). As 10/22 plus the takedown barrel joint and lock-up adjustment.
Small parts: 12 pins, 4 springs, 12 detents or plungers (counted from the manufacturer's parts list (one per key number unless a quantity is given))
What comes off for coating
- Takedown / stock: takedown barrel assembly off (lock lever), adjustment knob, barrel band and fore-end, takedown screw (safety centred), barrelled action out of the stock
- Receiver: two receiver cross pins and trigger guard assembly, bolt stop pin, bolt, bolt handle, guide rod and recoil spring, barrel retainer screws and V-block, barrel, rear sight (dovetail) and scope base — sight pusher
- Bolt: firing pin stop pin, firing pin and rebound spring, extractor, plunger and spring
- Trigger guard assembly: hammer pivot pin, hammer, hammer spring/strut, bolt lock, bolt lock spring, sear, disconnector and trigger pivot pin, trigger and plunger spring, magazine latch, plunger and spring, ejector, safety, detent plunger and spring — slave pin / assembly dowel
Special tools
- Slave pin or 3/32 in. assembly dowel — Aligning sear, trigger and housing for the trigger pivot pin
- 3/32 in. punch — Receiver cross pins and trigger group pins
- 5/32 in. Allen wrench — Takedown screw
- Sight pusher or brass drift — Dovetail rear sight
Known pain points
- Rebuilding the trigger group, the sear, trigger and housing holes are lined up on a punch used as a slave pin, which the real pivot pin then pushes out. (reassembly)
Source: DIY 10/22 Trigger Upgrade Kit instructions — Brownells prod.brownells.com [13] — “trigger-guard assembly using a punch as a slave pin to help align the parts.” - The bolt goes back in while the guide rod and recoil spring are held fully compressed with the bolt handle. (reassembly)
Source: Ruger 10/22 Instruction Manual (Standard, model numbers 32000 and higher, including 10/22 Takedown) — Sturm, Ruger & Co., Inc. ruger-docs.s3.amazonaws.com [1] — “While holding the guide rod assembly fully to the rear with the bolt handle, lay the bolt into the receiver and push it to the rear.” - The ejector has to be held forward in its slot while the trigger guard assembly is set in and the two cross pins pushed through. (reassembly)
Source: Ruger 10/22 Instruction Manual (Standard, model numbers 32000 and higher, including 10/22 Takedown) — Sturm, Ruger & Co., Inc. ruger-docs.s3.amazonaws.com [1] — “Be sure the ejector is held forward in the ejector slot as you set the trigger guard assembly in place.”
See also 4 documented reassembly problems and their fixes.
Fit or check on rebuild
- Takedown lock-up adjusted — The adjustment knob must be reset so the barrel locks without play; the knob loosens clockwise.
- Barrel retainer screws snug, not over-tight — Ruger warns over-tightening the V-block screws can damage the rifle.
Source: Ruger 10/22 Instruction Manual (Standard, model numbers 32000 and higher, including 10/22 Takedown) — Sturm, Ruger & Co., Inc. ruger-docs.s3.amazonaws.com [1] — “CAUTION: Do not over tighten the barrel retainer screws.” - Sight re-zero — The rear sight or scope base is removed for coating; the rifle must be re-zeroed.
- Function check: safety, trigger/sear release, disconnector and feeding with dummy rounds — Standard after any detail strip; a mis-assembled sear or disconnector can double or fail to fire.
This is Pew-Takedown's rating, not the manufacturer's. How tiers are rated. Forum reports are owners' experience, not specifications.
Manufacturer videos
Official videos from Sturm, Ruger & Co.'s own channels, linked rather than copied. Where a video and the steps on this page differ, follow the manufacturer's manual and video.
- 10/22 Takedown® - Separation Ruger Firearms · plays on ruger.com
field strip, reassembly · 2015-06-19
Covers: Ruger 10/22 Takedown - Ruger® 10/22® Rifle Disassembly Tech Tip RugerFirearms
field strip · 2026-03-06
Covers: Ruger 10/22 rifles with model numbers 32000 and higher (per description); ruger.com lists current Takedown models 32010, 32011 and 32016 in that series - Ruger® 10/22® Rifle Assembly Tech Tip RugerFirearms
reassembly · 2026-03-06
Covers: Ruger 10/22 rifles with model numbers 32000 and higher (includes current Takedown models 32010/32011/32016 per ruger.com) - Ruger® 10/22® Rifle Cleaning Tech Tip RugerFirearms
cleaning · 2026-03-06
Covers: Ruger 10/22 rifles with model numbers 32000 and higher (includes current Takedown models 32010/32011/32016 per ruger.com) - Ruger® 10/22® Magazine Latch Assembly Tech Tip RugerFirearms
detail reassembly · 2024-10-03
Covers: Ruger 10/22 (description does not limit models)
Procedures
Clear and Make Safe
Clear & Make Safe- Point the muzzle in a safe direction and keep your finger off the trigger.
- Engage the safety. It can only be set when the hammer is cocked.
- Press the magazine release and remove the rotary magazine.
- Lock the bolt open.
- Verify the rifle is unloaded by visually inspecting the chamber.WarningRimfire cases are small and dull. Use a light.
- Remove all live ammunition from the work area.
Field Strip — Barrel Assembly Removal
Field StripSeparates into two halves for transport. This is the routine procedure on this model.
Manufacturer’s videos: 10/22 Takedown® - Separation Ruger Firearms · plays on ruger.com · Ruger® 10/22® Rifle Disassembly Tech Tip RugerFirearms
- Complete the Clear and Make Safe procedure, leaving the bolt locked to the rear.
- Push the locking lever forward, towards the muzzle.WarningForward, towards the muzzle — not down or rearward.
- Rotate the barrel assembly counterclockwise, the opposite of the direction that locked it in.TipClockwise locks, counterclockwise releases.
- Pull the barrel assembly forwards, away from the receiver.Removed at this step:
Barrel assembly - Clean the bore from the breech end of the separated barrel, and clean the bolt face, chamber and receiver interior.
- For deeper cleaning, the receiver half strips exactly like a standard 10/22 — see that entry, including the centred-safety caution before lifting the action out of the stock.
Reassembly and Lock-Up Adjustment
ReassemblyManufacturer’s videos: 10/22 Takedown® - Separation Ruger Firearms · plays on ruger.com · Ruger® 10/22® Rifle Assembly Tech Tip RugerFirearms
- Remove the magazine, lock the bolt open, and verify the chamber is empty.
- If this is the first installation, or the fit needs correcting, loosen the adjustment knob by turning it CLOCKWISE as far as finger pressure allows.WarningClockwise loosens on this rifle. This is the reverse of the Ruger PC Carbine's knob, which loosens counterclockwise.
- Insert the barrel into the receiver.
- Rotate the barrel assembly clockwise until it locks into place and the locking lever is aligned with the magazine well.WarningRuger's warning: attempting to load or fire the rifle without the barrel assembly fully locked into place may result in malfunctions, damage to your rifle, or injury or death to yourself or bystanders.
- Tighten the adjustment knob by turning it COUNTERCLOCKWISE as far as finger pressure allows.
- Release the bolt, cycle the action several times, and perform the function check.TipAfter the first adjustment, later installs need only the insert-and-rotate steps, and removal only the lever-and-rotate steps.
Patent drawings
not under copyrightDrawings from US patents on this design. A patent shows the invention as the inventor filed it; the firearm that shipped can differ in detail, and later production often does. Use them to see how the parts relate, not as a parts reference or a procedure. Per the USPTO, the text and drawings of a patent are typically not subject to copyright; each patent here was checked for a copyright notice.
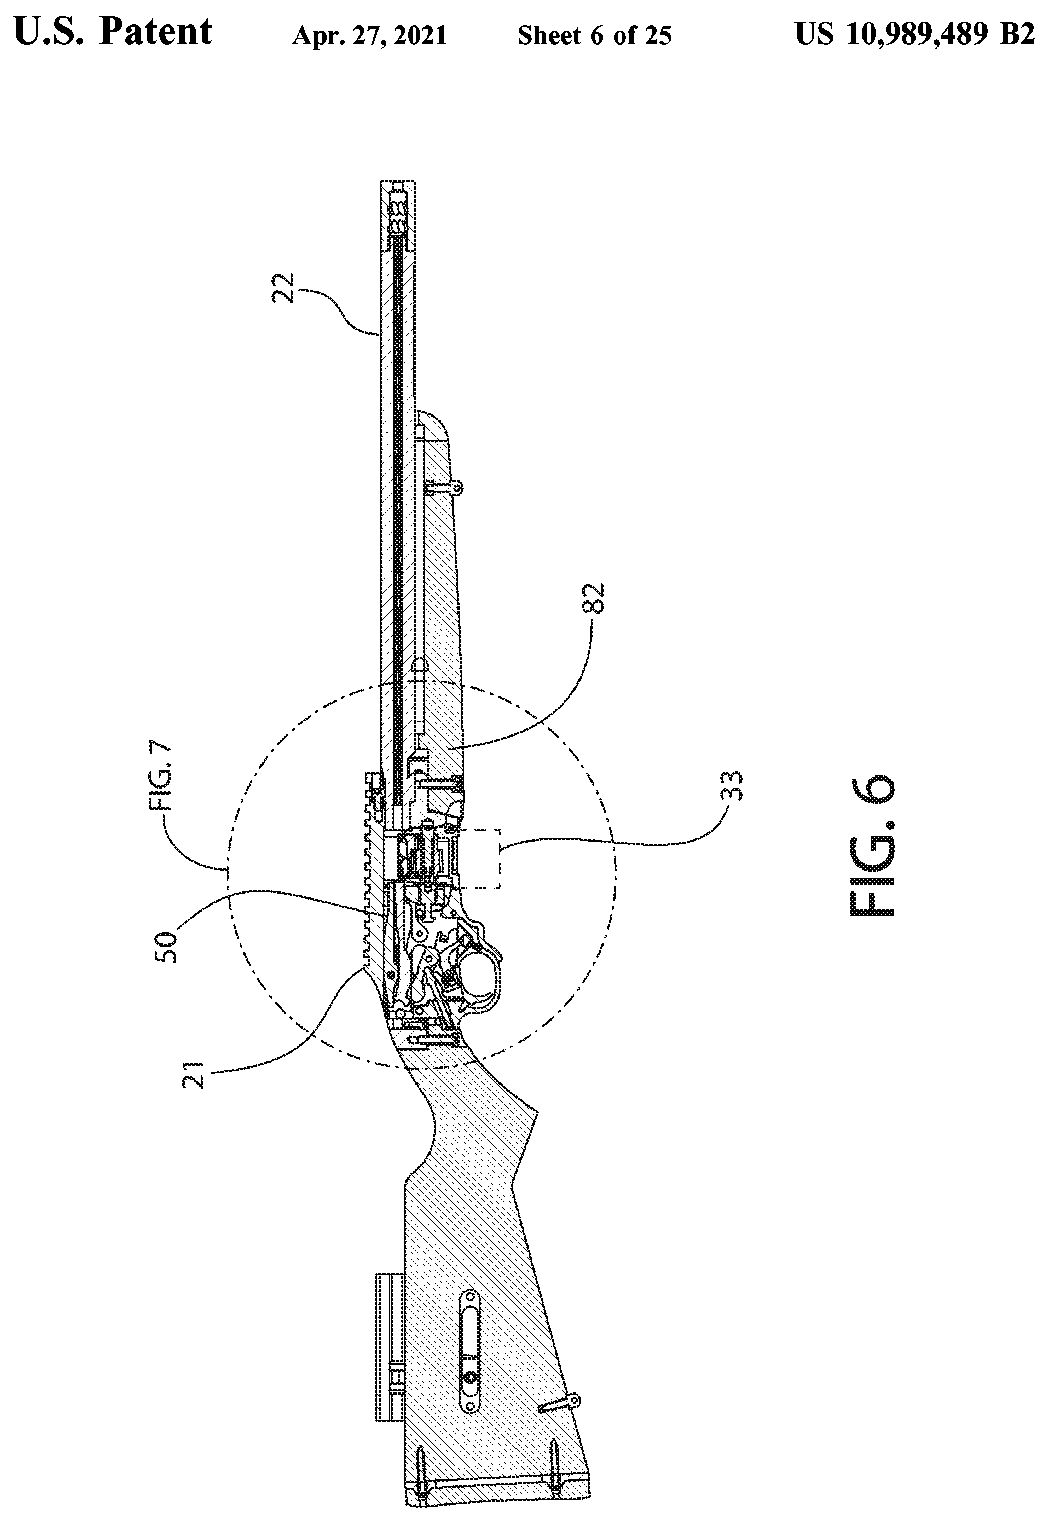
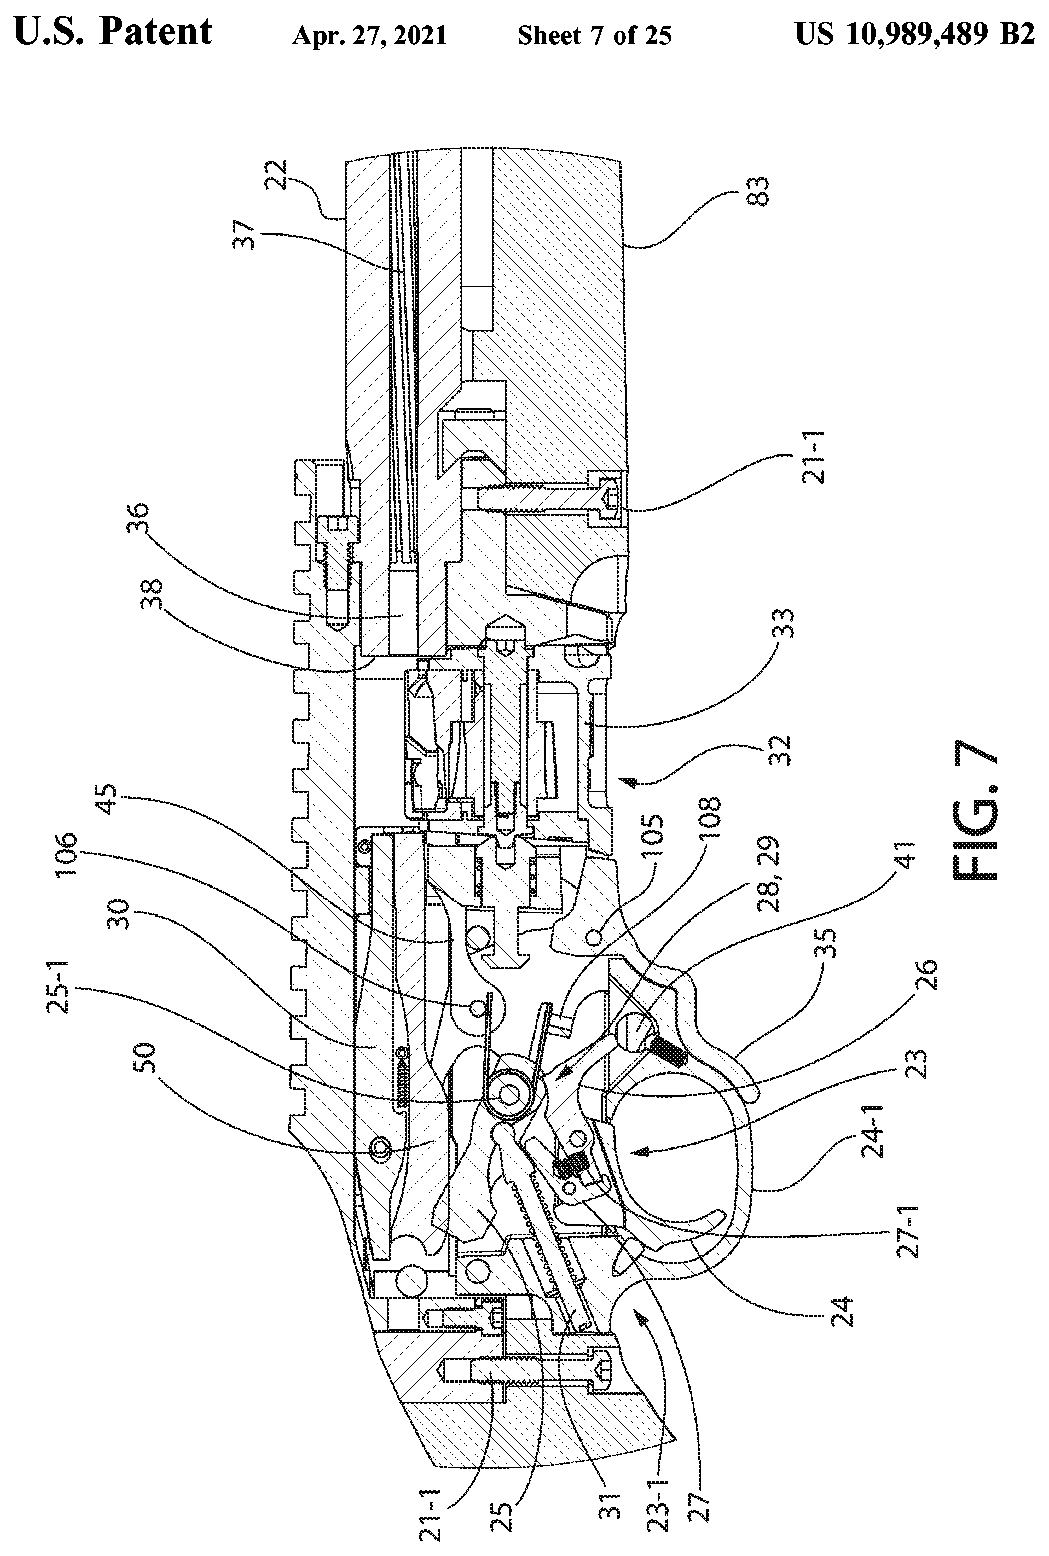
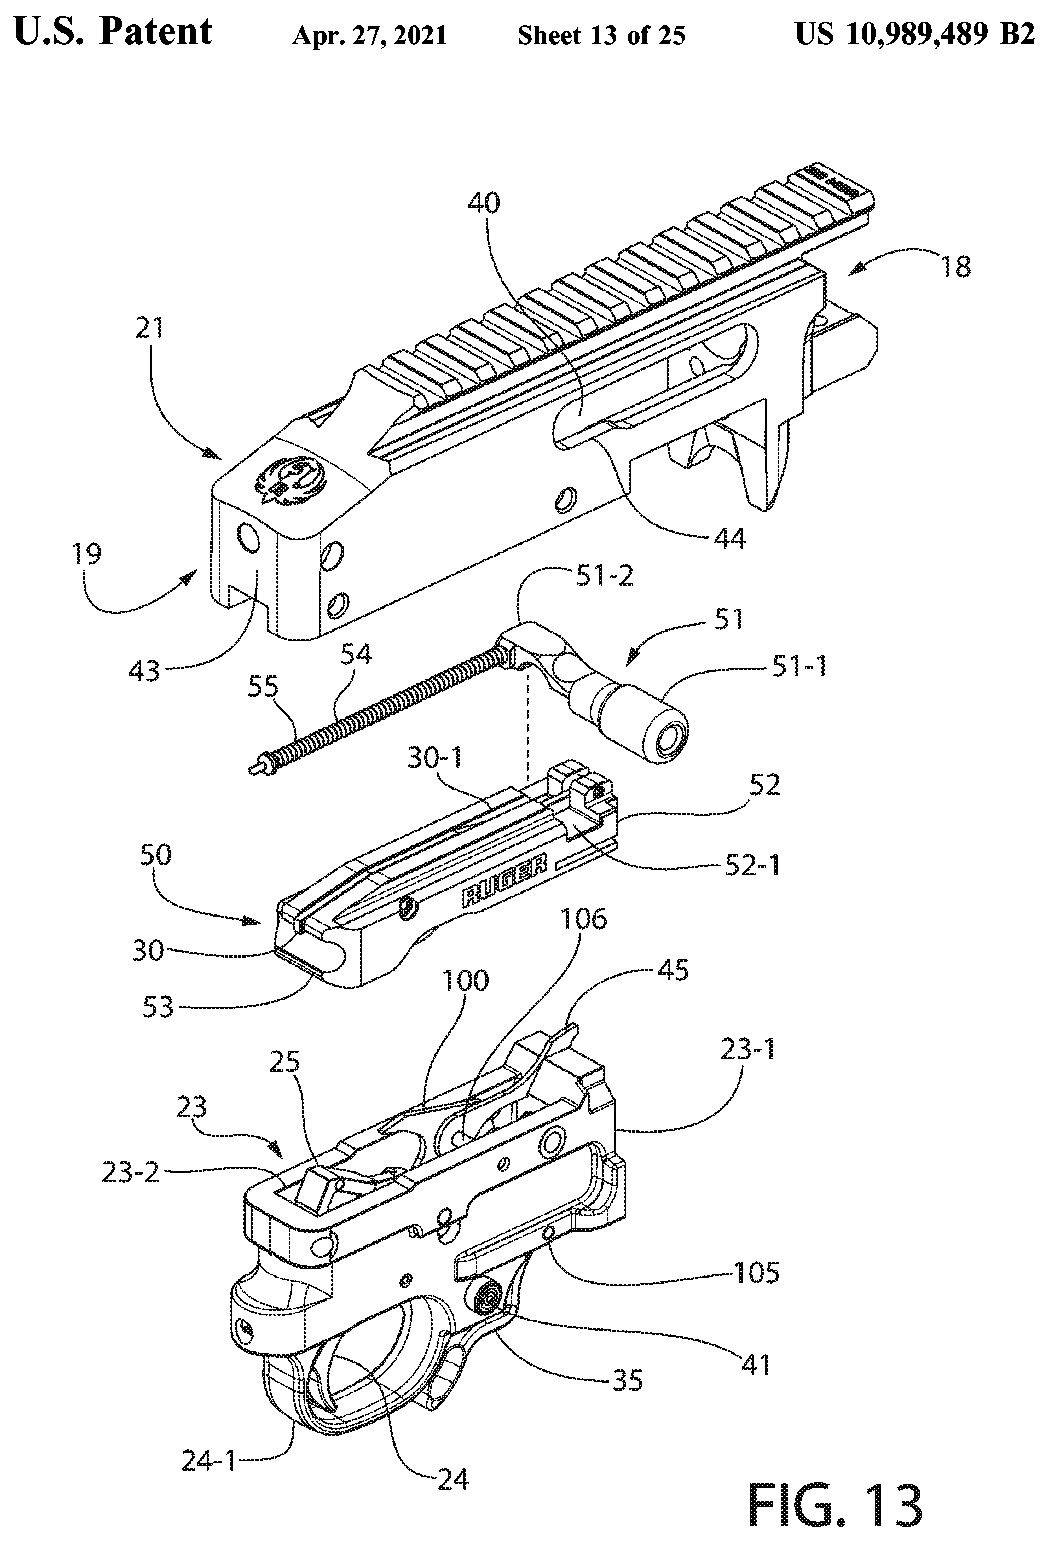
US Patent 10,989,489 — Bolt release mechanism for firearm
Matthias Downey, Jonathan Philip MATHER, Adam Jay Taylor · assigned to Sturm, Ruger & Company, Inc. · filed 2019-04-05 · granted 2021-04-27. Full patent (USPTO)
The Ruger 10/22 action: receiver, bolt with bolt-release lever, recoil spring and the trigger housing as it sits in the stock (the patent adds a manual bolt-release lever to this layout).
Why this is the Ruger 10/22 Takedown’s patent: listed on the maker’s patent-marking page — Ruger Patents — Sturm, Ruger & Co., Inc. ruger.com [11]: “10/22® / 10/22 Takedown® D681,148; 10,989,489”
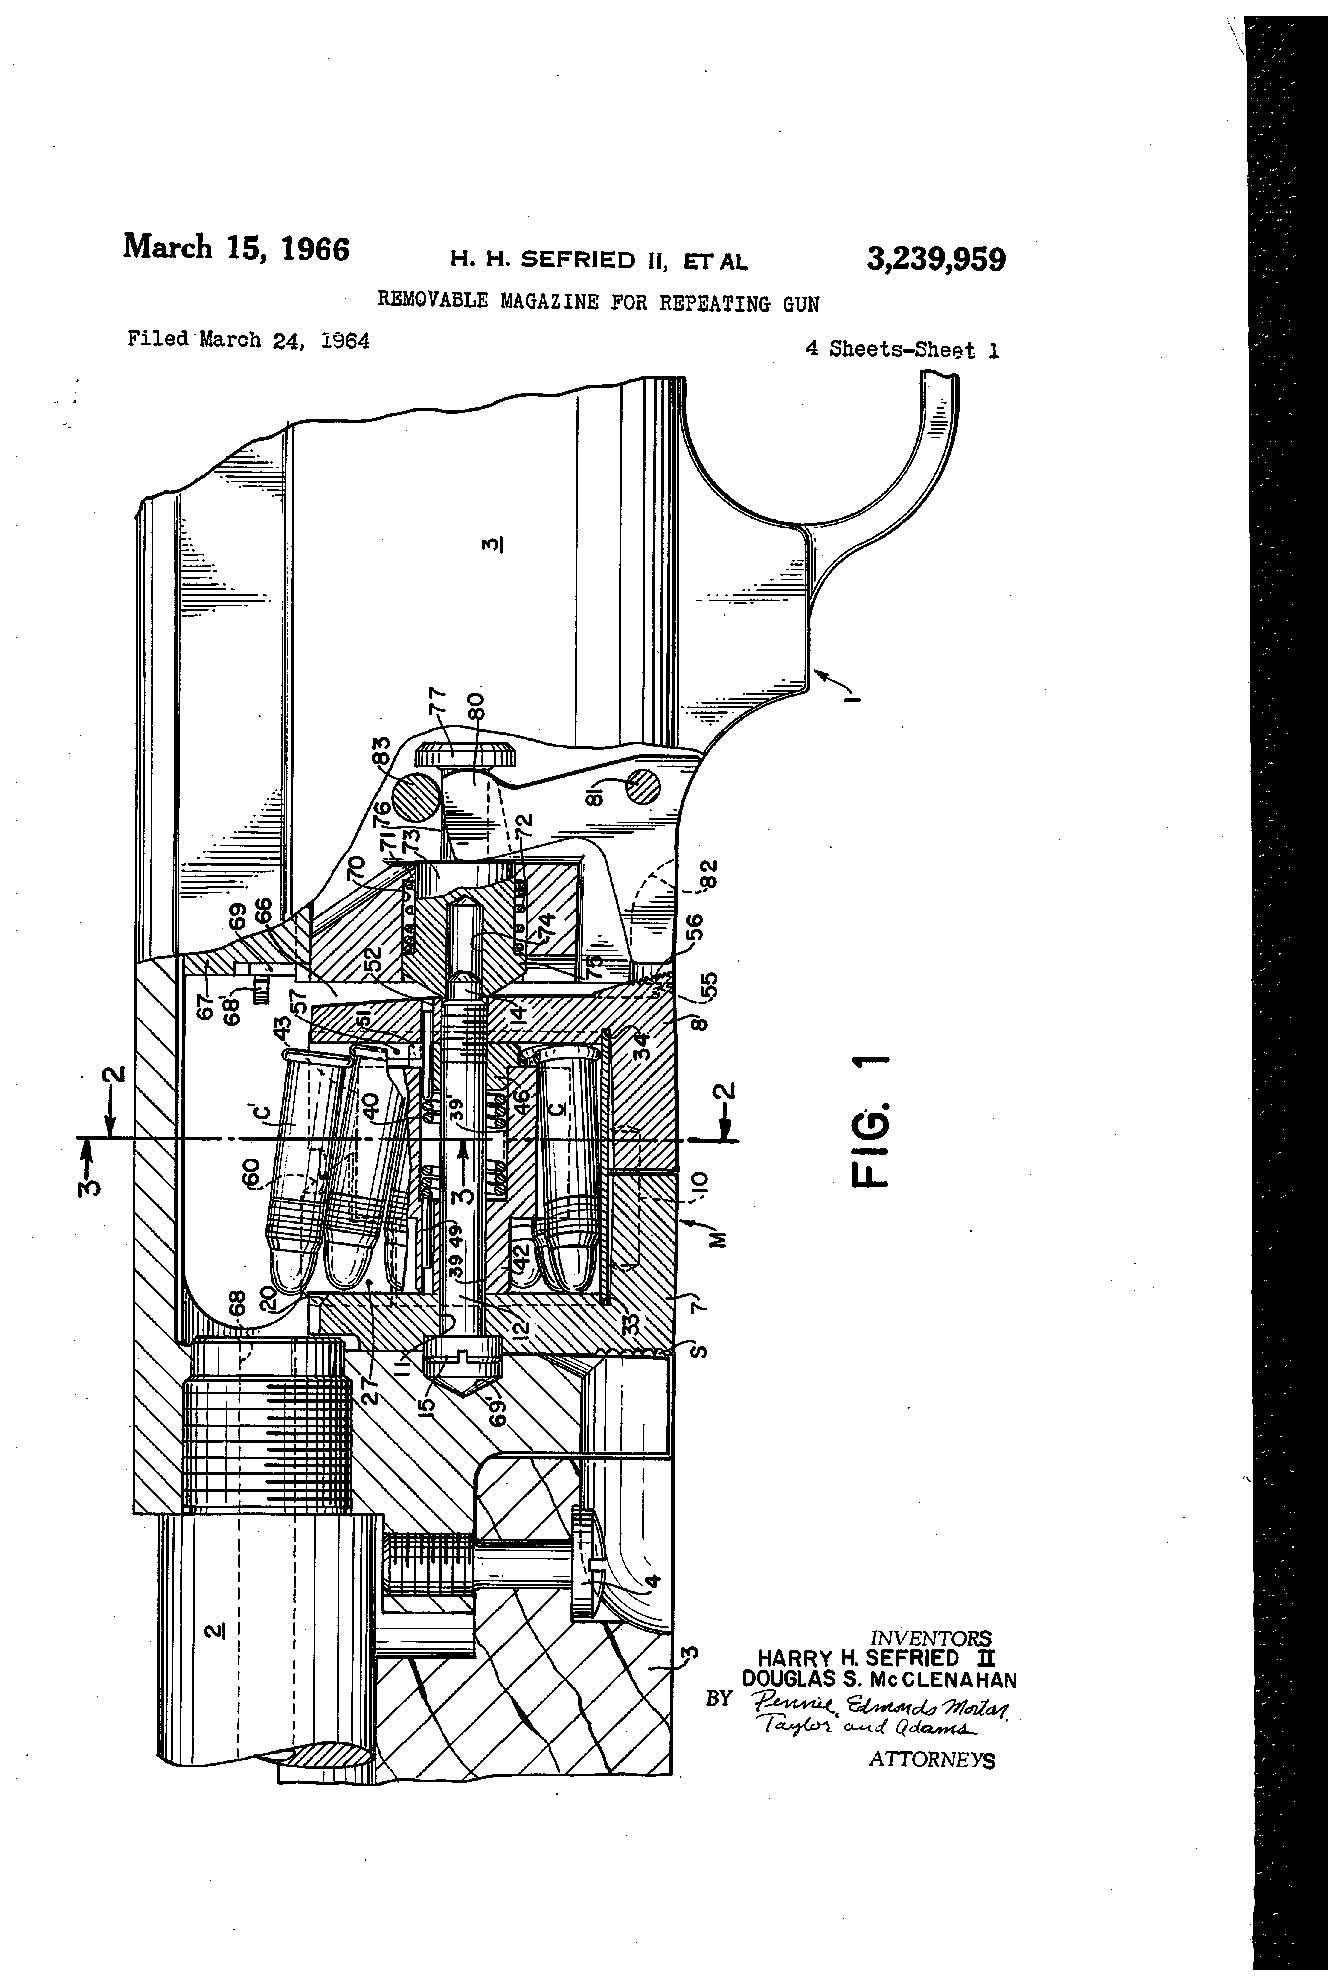
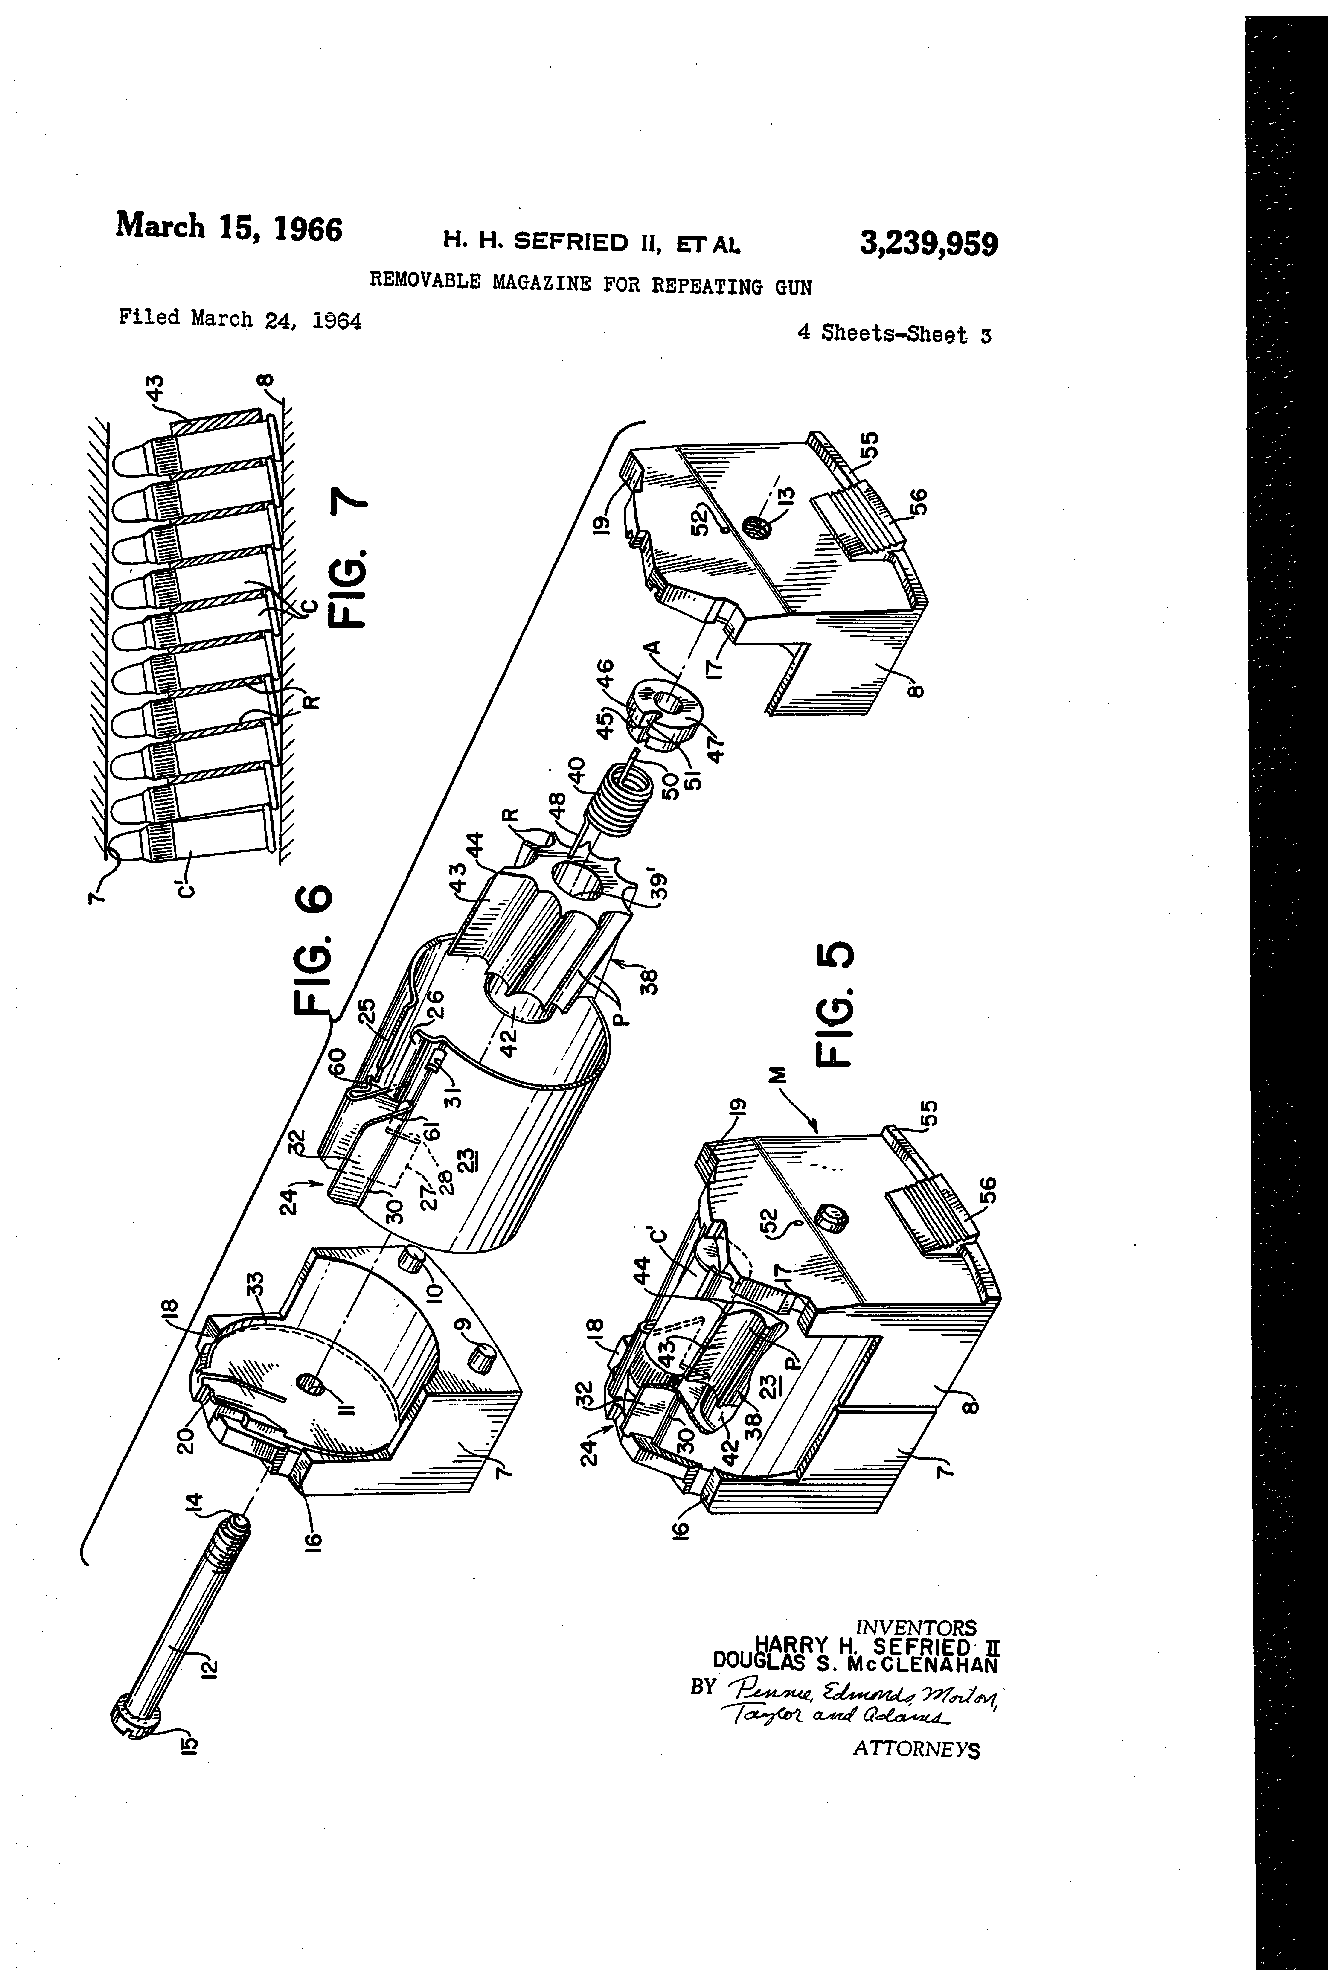
US Patent 3,239,959 — Removable magazine for repeating gun
Harry H. Sefried II, Douglas S. McClenahan · assigned to Sturm, Ruger & Company, Inc. · filed 1964-03-24 · granted 1966-03-15. Full patent (USPTO)
The 10/22's detachable rotary magazine and how it seats in the receiver below the bolt.
Why this is the Ruger 10/22 Takedown’s patent: named by a historical source — The Ruger 10/22: History & Design (posted October 22, 2020; excerpted from Walt Kuleck, "The Ruger 10/22 Complete Owner's and Assembly Guide") — NRA American Rifleman americanrifleman.org [12]: “The second of the three innovations that made the 10/22 a popular success: the detachable rotary magazine. This innovation by Harry Sefried made the 10/22 the dead-on reliable shooter it is today. Patent 3239959: The Rotary Magazine”
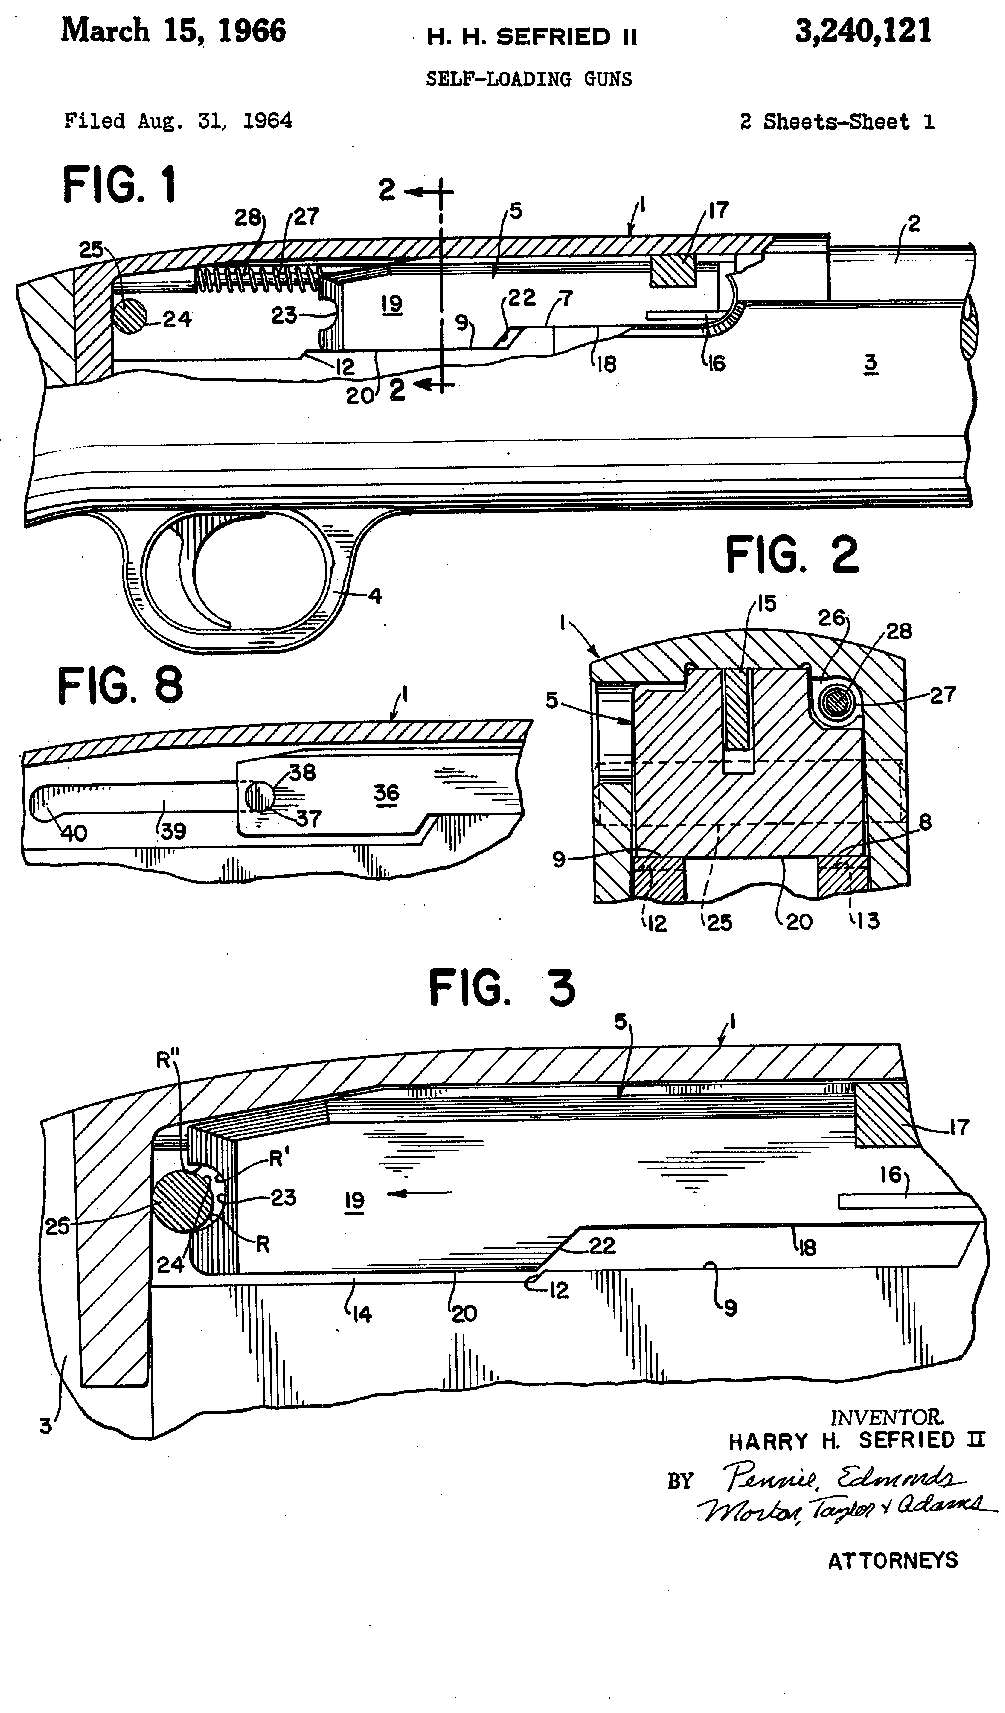
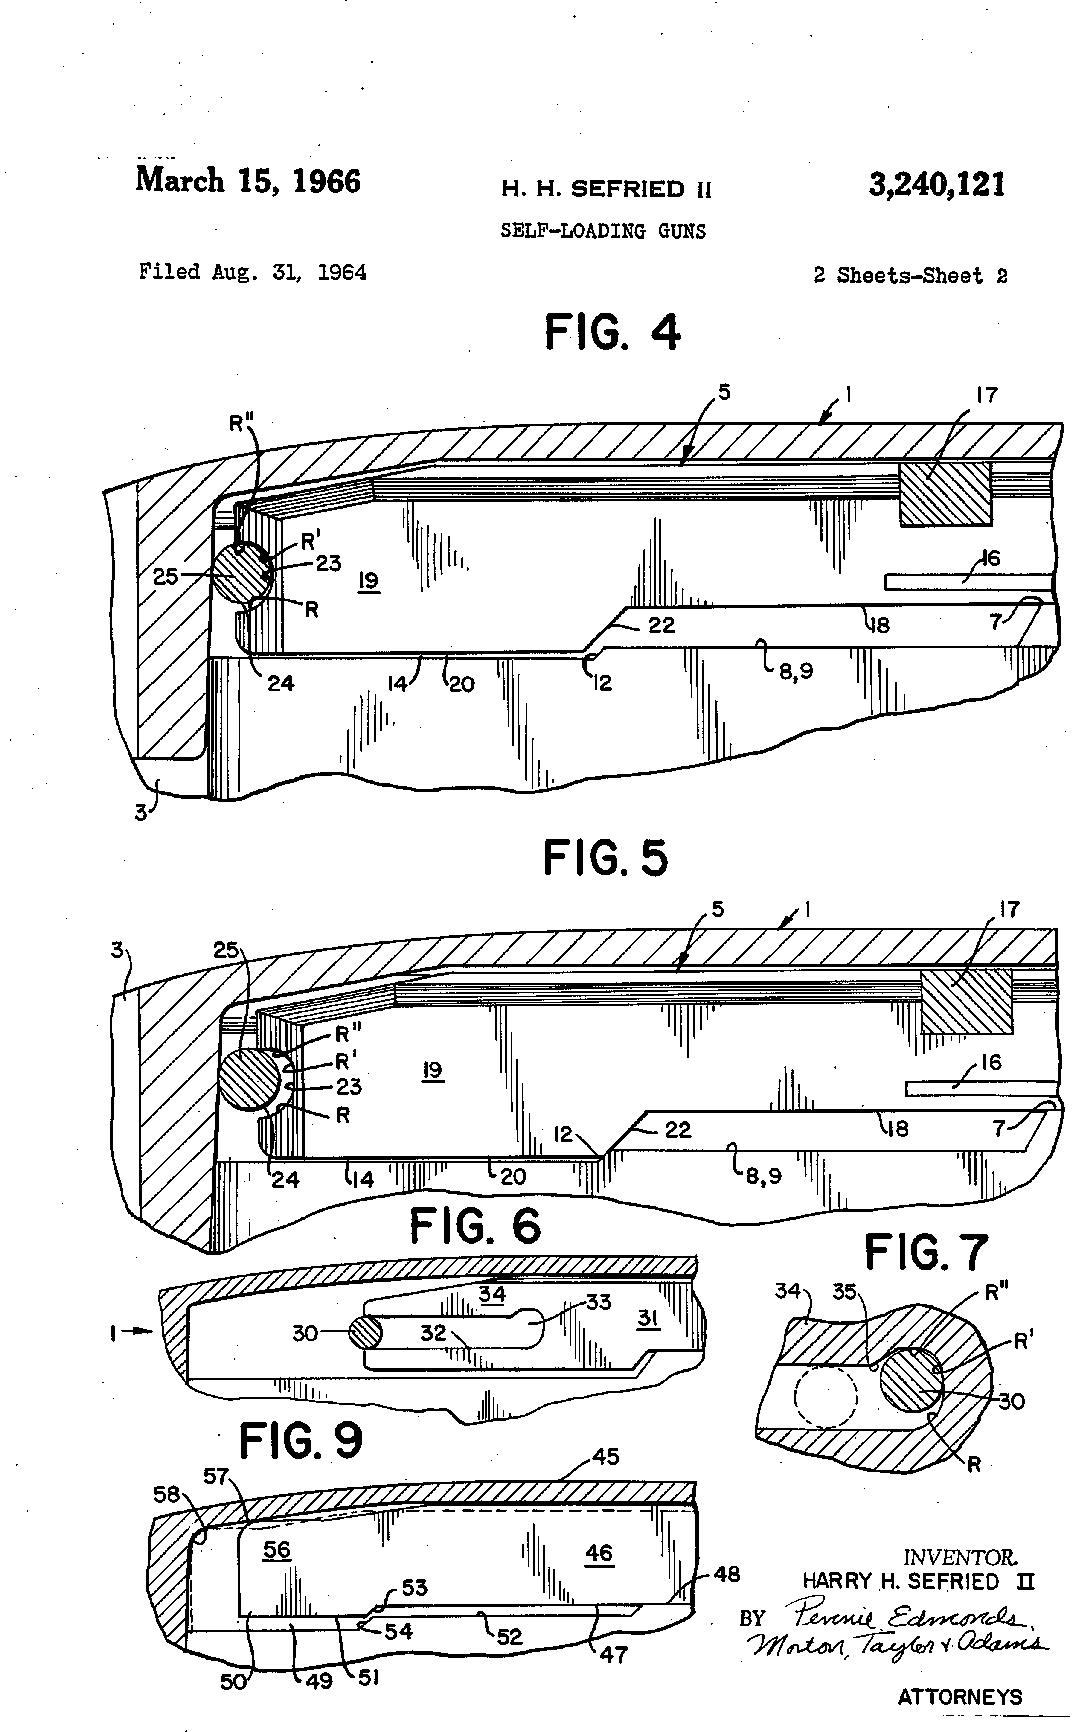
US Patent 3,240,121 — Self-loading guns
Harry H. Sefried II · assigned to Sturm, Ruger & Company, Inc. · filed 1964-08-31 · granted 1966-03-15. Full patent (USPTO)
The 10/22's receiver and breechblock (bolt) with its cross-pin 'breechblock decelerator' that slows the bolt's rearward travel.
Why this is the Ruger 10/22 Takedown’s patent: named by a historical source — The Ruger 10/22: History & Design (posted October 22, 2020; excerpted from Walt Kuleck, "The Ruger 10/22 Complete Owner's and Assembly Guide") — NRA American Rifleman americanrifleman.org [12]: “Patent 3240121: The Breechblock Decelerator The third innovation that has contributed to the 10/22’s success is its “breechblock decelerator,” again from Ruger’s Harry Sefried.”
Torque specifications
| Fastener | Torque | Sequence, notes and the source's words | Where it comes from |
|---|---|---|---|
| Scope base adapter mounting screws (4) Receivers drilled for the scope base adapter |
12–15 in-lb 1.4–1.7 N·m · 1–1.2 ft-lb |
Remove the four filler screws with a correctly sized #1 flat-head screwdriver (a wider blade damages the receiver). Start all four base-mounting screws until they just catch, then bring them down a part turn at a time in rotation. Afterwards cycle the bolt several times: a screw that binds on the bolt must be shortened and its top chamfered. Ruger calls this range a maximum and cautions that over-tightening may damage the rifle. “Starting at the first screw, turn each screw part way in; then move to the next screw, repeating the procedure until all four screws are tightened to a maximum torque setting of 12-15 inch/lb.” |
Ruger 10/22 Instruction Manual (Standard, model numbers 32000 and higher, including 10/22 Takedown) — Sturm, Ruger & Co., Inc., p. 42 ruger-docs.s3.amazonaws.com [1] |
Notes: From Ruger's current 10/22 instruction manual (model numbers 32000 and higher). Ruger's current 10/22 manual (p. 46) warns that on some models a barrel nut sits behind the muzzle cap, is torqued to precise factory specifications, and must not be tightened or removed by the owner. Its value is not published.
Reported by other sources — not the manufacturer
| Fastener | Torque | Who says so, and their words | Where it comes from |
|---|---|---|---|
| Receiver (takedown) screw Ruger 10/22 Takedown in a Magpul Hunter X-22 Takedown stock |
20 in-lb 2.3 N·m · 1.7 ft-lb |
Reported by Magpul Industries Make sure barrel and receiver are still together and locked into place; be sure safety switch is centered during removal and installation of receiver. “Place receiver into Hunter X-22 Takedown Stock, install receiver screw, and tighten to 20 [in-lb] according to manufacturer’s instructions.” |
Hunter X-22 Takedown Stock (MAG760) Installation Instructions, 072-0119-A — Magpul Industries, PDF p. 2 magpul.com [2] |
| Barrel clamp block retaining screws Ruger 10/22 Takedown (when adjusting the barrel clamp block for forend alignment) |
20 in-lb 2.3 N·m · 1.7 ft-lb |
Reported by Magpul Industries Separate barrel from receiver; loosen the barrel clamp block retaining screws and shift the clamp; lightly snug the screws and reinstall the barrel without rotating too far; rotate barrel and forend until aligned; separate barrel from receiver without disturbing the clamp block; then tighten the retaining screws; reassemble and function check. “Tighten barrel clamp block retaining screws to 20 [in-lb] according to manufacturer’s instructions.” |
Hunter X-22 Takedown Stock (MAG760) Installation Instructions, 072-0119-A — Magpul Industries, PDF p. 2 magpul.com [2] |
| Receiver (takedown) screw Ruger 10/22 Takedown in a Magpul X-22 Backpacker stock |
20 in-lb 2.3 N·m · 1.7 ft-lb |
Reported by Magpul Industries “Place receiver into X-22 Backpacker Stock, install receiver screw, and tighten to 20 [in-lb] according to manufacturer’s instructions.” |
X-22 Backpacker Stock (MAG808) Installation Instructions, 072-0121-A — Magpul Industries, PDF p. 1 magpul.com [3] |
| Forend screw (forend to barrel) Magpul Hunter X-22 Takedown Stock (MAG760) on a Ruger 10/22 Takedown |
20 in-lb 2.3 N·m · 1.7 ft-lb |
Reported by Magpul Industries “Install Forend to barrel and set gap so it does not interfere with stock when “taking down” the rifle. Tighten screw to 20 [in-lb].” |
Hunter X-22 Takedown Stock (MAG760) Installation Instructions, 072-0119-A — Magpul Industries, PDF p. 2 of 3 magpul.com [2] |
| Barrel tray screws Magpul Hunter X-22 Takedown Stock (MAG760) on a Ruger 10/22 Takedown |
12 in-lb 1.4 N·m · 1 ft-lb |
Reported by Magpul Industries “Re-install Barrel Tray Screws tightening to 12 [in-lb].” |
Hunter X-22 Takedown Stock (MAG760) Installation Instructions, 072-0119-A — Magpul Industries, PDF p. 1 of 3 magpul.com [2] |
| Forend screw (forend to barrel) Magpul X-22 Backpacker Stock (MAG808) on a Ruger 10/22 Takedown |
20 in-lb 2.3 N·m · 1.7 ft-lb |
Reported by Magpul Industries “Install Forend to barrel and set gap so it does not interfere with stock when “taking down” the rifle. Tighten screw to 20 [in-lb].” |
X-22 Backpacker Stock (MAG808) Installation Instructions, 072-0121-A — Magpul Industries, PDF p. 1 of 3 magpul.com [3] |
| Optic mount top screws, (4) 4-40 socket head cap screws Magpul X-22 Backpacker Optic Mount (MAG799) on a Ruger 10/22 Takedown barrel (X-22 Backpacker forend) |
5 in-lb 0.56 N·m · 0.42 ft-lb |
Reported by Magpul Industries “Re-install the optics mount top and (4) 4-40 socket head cap screws. Tighten to 5 [in-lb] (Do not over torque).” |
Magpul MAG799 X-22 Backpacker Optic Mount — Installation Instructions — Magpul Industries, PDF p. 1 (single page) magpul.com [5] |
| Receiver-to-chassis 12-24 x 3/4 hex screw (replaces factory stock screw) Midwest Industries Ruger 10/22 Take-Down Chassis (MI-1022-TDC) on new Ruger 10/22 TakeDown models |
55 in-lb 6.2 N·m · 4.6 ft-lb |
Reported by Midwest Industries, Inc. “Drop the provided 12-24x3/4 hex screw in the screw hole in the hole in front of the magazine well and tighten to 55 inch/pounds, securing receiver to chassis.” |
Midwest Industries Ruger 10/22 Take-Down Chassis (MI-1022-TDC) — Installation Instructions — Midwest Industries, Inc., PDF p. 1 (single page) midwestindustriesinc.com [6] |
| AR grip adaptor 1/4-20 x 1.5" screw Midwest Industries Ruger 10/22 Take-Down Chassis (MI-1022-TDC) |
35 in-lb 4 N·m · 2.9 ft-lb |
Reported by Midwest Industries, Inc. “install the ¼-20x1.5” screw from the top and torque screw to 35 inch/pounds.” |
Midwest Industries Ruger 10/22 Take-Down Chassis (MI-1022-TDC) — Installation Instructions — Midwest Industries, Inc., PDF p. 1 (single page) midwestindustriesinc.com [6] |
| Receiver extension anti-rotation 6-32 set screw Midwest Industries Ruger 10/22 Take-Down Chassis (MI-1022-TDC) |
15 in-lb 1.7 N·m · 1.2 ft-lb |
Reported by Midwest Industries, Inc. “When aligned tighten 6/32 set screw to 15 inch/pounds to prevent rotation.” |
Midwest Industries Ruger 10/22 Take-Down Chassis (MI-1022-TDC) — Installation Instructions — Midwest Industries, Inc., PDF p. 1 (single page) midwestindustriesinc.com [6] |
| AR grip screw Midwest Industries Ruger 10/22 Take-Down Chassis (MI-1022-TDC) |
45 in-lb 5.1 N·m · 3.7 ft-lb |
Reported by Midwest Industries, Inc. “Install AR style grip with provided grip screw/washer and torque grip screw to 45 inch/pounds.” |
Midwest Industries Ruger 10/22 Take-Down Chassis (MI-1022-TDC) — Installation Instructions — Midwest Industries, Inc., PDF p. 1 (single page) midwestindustriesinc.com [6] |
| Hand guard retaining screw (replaces factory forearm screw) Midwest Industries Ruger 10/22 Take-Down M-Lok Hand Guard (MI-1022-8H / 13H) |
55 in-lb 6.2 N·m · 4.6 ft-lb |
Reported by Midwest Industries, Inc. “Drop the provided screw in the screw hole in the Midwest Industries M-Lok handguard and tighten to 55-inch pounds.” |
Midwest Industries Ruger 10/22 Take-Down M-Lok Hand Guard (MI-1022-8H / MI-1022-13H) — Installation Instructions — Midwest Industries, Inc., PDF p. 1 (single page) midwestindustriesinc.com [7] |
| M-Lok rail section screws Midwest Industries Ruger 10/22 Take-Down M-Lok Hand Guard (MI-1022-8H / 13H) |
15 in-lb 1.7 N·m · 1.2 ft-lb |
Reported by Midwest Industries, Inc. “Install M-Lok rails to the outside of the handguard, torque M-Lok screws to 15in/lbs.” |
Midwest Industries Ruger 10/22 Take-Down M-Lok Hand Guard (MI-1022-8H / MI-1022-13H) — Installation Instructions — Midwest Industries, Inc., PDF p. 1 (single page) midwestindustriesinc.com [7] |
| Forend screw (forend to takedown barrel) Tactical Solutions X-RING TD TSS Gen 2 takedown barrel in the Ruger 10/22 Takedown forend |
12–15 in-lb 1.4–1.7 N·m · 1–1.2 ft-lb |
Reported by Tactical Solutions (TacSol) “Tighten the forend screw to 12 - 15 inch pounds of torque.” |
Tactical Solutions X-RING TD TSS Gen 2 (takedown .22 LR barrel) — Product Manual REV2026-03 (linked from tacsolusa.com/product-manuals; hosted on TacSol's BigCommerce store CDN) — Tactical Solutions (TacSol), PDF p. 1 of 3 store-cixt9wadn9.mybigcommerce.com [8] |
| Forend takedown screw (forend to takedown barrel) Tactical Solutions X-RING TD TSS takedown barrel (first generation) in a Ruger 10/22 Takedown forend |
15 in-lb 1.7 N·m · 1.2 ft-lb |
Reported by Tactical Solutions (TacSol) “Insert your new Tactical Solutions barrel into the rifle stock forend and tighten the forend takedown screw to 15 inch-pounds - do not over tighten.” |
Tactical Solutions X-RING TD TSS takedown barrel — Installation Instructions (7-24-23) (linked from tacsolusa.com/product-manuals; hosted on TacSol's BigCommerce store CDN) — Tactical Solutions (TacSol), PDF p. 1 of 4 store-cixt9wadn9.mybigcommerce.com [9] |
| Action screw (receiver into stock) Ruger 10/22 Takedown receiver in the Tactical Solutions X-RING Takedown barrel and stock combo |
15–20 in-lb 1.7–2.3 N·m · 1.2–1.7 ft-lb |
Reported by Tactical Solutions (TacSol) “Install the action screw and tighten to 15 – 20 inch-pounds – do not over tighten.” |
Tactical Solutions X-RING Takedown Barrel and Stock Combo — Installation Instructions (linked from tacsolusa.com/product-manuals; hosted on TacSol's BigCommerce store CDN) — Tactical Solutions (TacSol), PDF p. 1 (single page) store-cixt9wadn9.mybigcommerce.com [10] |
Materials and factory finish
As stated by Sturm, Ruger & Co.. Prep, masking and cure depend on these; a polymer or aluminium part, a nitrided or anodised finish, and a blued steel part are each a different job. Variants with other finishes may exist — check the maker's page for the exact SKU on the bench.
| Component | Material | Factory finish | Where it comes from |
|---|---|---|---|
| Barrel Takedown Model 32010 (18.50 in) | Stainless Steel | Matte Stainless | Ruger 10/22 Standard Autoloading Rifle — Specifications (Takedown Model 32010) — Sturm, Ruger & Co. ruger.com [4] “Barrel Material Stainless Steel … Barrel Finish Matte Stainless” |
| Stock Takedown Model 32010 | Black Synthetic | — | Ruger 10/22 Standard Autoloading Rifle — Specifications (Takedown Model 32010) — Sturm, Ruger & Co. ruger.com [4] “Stock Black Synthetic” |
| Stock Takedown Model 32011 | Black Synthetic | — | Ruger 10/22 Standard Autoloading Rifle — Specifications (Takedown Model 32010) — Sturm, Ruger & Co. ruger.com [4] “Stock Black Synthetic” |
| Trigger guard all 10/22 models | glass-filled, polymer | — | Ruger 10/22 Standard Autoloading Rifle — Specifications (Takedown Model 32010) — Sturm, Ruger & Co. ruger.com [4] “Heat-stabilized, glass-filled, polymer trigger housing assembly is precision made of high-tech material for improved manufacturing tolerances, impact and abrasion-resistance and an unmatched ability to withstand the elements.” |
Parts list
Transcribed from the manufacturer's parts list (Ruger 10/22 Instruction Manual (Standard, model numbers 32000 and higher, including 10/22 Takedown) — Sturm, Ruger & Co., Inc., p. 50, 53 ruger-docs.s3.amazonaws.com [1]) — The standard 10/22 list, then Ruger's Takedown supplemental list, which gives the parts that differ on the Takedown. Exploded views on pp. 51–52 and 54. Key numbers refer to the exploded view in that document.
70 parts
| Key | Part | Part no. | Qty | Group |
|---|---|---|---|---|
| 10/22 parts list | ||||
| 1 | Stock Assembly | 1 | ||
| 2 | Barreled Action – Complete | 1 | ||
| 3 | Receiver The receiver is a serial-numbered part and is not offered for sale. | 1 | Barreled Action | |
| 4 | Barrel | 1 | Barreled Action | |
| 5 | Front Sight | 1 | Barreled Action | |
| 6 | Rear Sight | 1 | Barreled Action | |
| 7 | Barrel Retainer Screw | 2 | Barreled Action | |
| 8 | Barrel Retainer V-Block | 1 | Barreled Action | |
| 9 | Filler Screws | 4 | Barreled Action | |
| 10 | Cleanout Hole Plug | 1 | Barreled Action | |
| 11 | Bolt Assembly – Complete | 1 | ||
| 12 | Bolt | 1 | Bolt Assembly | |
| 13 | Extractor | 1 | Bolt Assembly | |
| 14 | Last Round Spring | 1 | Bolt Assembly | |
| 15 | Firing Pin | 1 | Bolt Assembly | |
| 16 | Firing Pin Retention Pin | 1 | Bolt Assembly | |
| 17 | Extractor Plunger | 1 | Bolt Assembly | |
| 18 | Firing Pin Rebound Spring | 1 | Bolt Assembly | |
| 19 | Guide Rod Assembly | 1 | ||
| 20 | Trigger Guard Assembly – Complete | 1 | ||
| 21 | Trigger Guard | 1 | Trigger Guard Assembly | |
| 22 | Trigger Parts so marked must be factory fit. | 1 | Trigger Guard Assembly | |
| 23 | Safety Button, Complete | 1 | Trigger Guard Assembly | |
| 24 | Trigger Plunger | 1 | Trigger Guard Assembly | |
| 25 | Trigger Pivot Pin | 1 | Trigger Guard Assembly | |
| 26 | Disconnector | 1 | Trigger Guard Assembly | |
| 27 | Trigger Pivot Pin | 1 | Trigger Guard Assembly | |
| 28 | Sear Parts so marked must be factory fit. | 1 | Trigger Guard Assembly | |
| 29 | Safety Detent Plunger | 1 | Trigger Guard Assembly | |
| 30 | Hammer Parts so marked must be factory fit. | 1 | Trigger Guard Assembly | |
| 31 | Bolt Lock | 1 | Trigger Guard Assembly | |
| 32 | Magazine Latch | 1 | Trigger Guard Assembly | |
| 33 | Magazine Latch Pivot Pin | 2 | Trigger Guard Assembly | |
| 34 | Magazine Latch Plunger | 1 | Trigger Guard Assembly | |
| 35 | Ejector | 1 | Trigger Guard Assembly | |
| 36 | Hammer Pivot Pin | 1 | Trigger Guard Assembly | |
| 37 | Hammer Strut | 1 | Trigger Guard Assembly | |
| 38 | Hammer Spring | 1 | Trigger Guard Assembly | |
| 39 | Hammer Strut Washer | 1 | Trigger Guard Assembly | |
| 40 | Trigger Plunger Spring | 1 | Trigger Guard Assembly | |
| 41 | Disconnector Spring | 1 | Trigger Guard Assembly | |
| 42 | Safety Detent Plunger Spring | 1 | Trigger Guard Assembly | |
| 43 | Magazine Latch Plunger Spring | 1 | Trigger Guard Assembly | |
| 44 | Bolt Lock Spring | 1 | Trigger Guard Assembly | |
| 45 | Receiver Cross Pin | 2 | ||
| 46 | Bolt Stop Pin | 1 | ||
| 47 | Takedown Screw | 1 | ||
| 48 | Magazine Assembly | 1 | ||
| 10/22 Takedown supplemental parts list | ||||
| 1 | Barrel | 1 | ||
| 2 | Receiver The receiver is a serial-numbered part and is not offered for sale. | 1 | ||
| 3 | Buttstock Assembly | 1 | ||
| 4 | Insert Parts so marked must be factory fit. | 1 | ||
| 5 | Detent Spring | 1 | ||
| 6 | Safety Detent Plunger | 1 | ||
| 7 | Adjusting Knob | 1 | ||
| 8 | Spacer | 1 | ||
| 9 | Spacer Pin | 1 | ||
| 10 | Clamp | 1 | ||
| 11 | Barrel Retainer Screws | 2 | ||
| 12 | Take Down Screw | 1 | ||
| 13 | Locking Plunger | 1 | ||
| 14 | Locking Plunger Detent | 1 | ||
| 15 | Locking Plunger Spring | 1 | ||
| 16 | Mounting Screws | 2 | ||
| 17 | Locking Lever | 1 | ||
| 18 | Block | 1 | ||
| 19 | Stock – Forend | 1 | ||
| 20 | Barrel Band, Black Plastic | 1 | ||
| 21 | Barrel Band Screw | 1 | ||
| 22 | Barrel Band Retaining Nut | 1 | ||
Function check
- Verify the rifle is unloaded — chamber and magazine — before each step.
- Cycle the bolt by hand and confirm it travels smoothly and returns fully into battery.
- Cock the action, engage the safety, and press the trigger. The hammer must not fall.
- Disengage the safety and press the trigger. The hammer should fall.
- Confirm the magazine seats, locks, and releases cleanly.
- Confirm the takedown joint is fully locked by attempting to twist and pull the barrel assembly off.
- If the rifle has play at the joint, adjust the locking cam before shooting it.
Maintenance
Lubrication points
- Bolt body sides where it rides in the receiver
- Recoil spring guide
- Hammer and sear pivots
Cleaning notes
Rimfire fouling is waxy and heavy, and .22 LR produces a lot of unburned powder. Clean the chamber and bolt face regularly and keep lubrication light — oil plus unburned powder makes a paste that stops the rifle. Most rimfire reliability complaints trace to a dirty chamber, a tired magazine, or cheap bulk ammunition rather than to the rifle.
Suggested inspection interval: roughly every 500 rounds. This is a general guideline, not a manufacturer specification.
Wear parts to inspect
Extractor and extractor spring · Recoil spring · Magazine follower and feed lips · Firing pin
Common issues
| Symptom | Likely cause | What to do |
|---|---|---|
| Failures to feed or fire | Dirty chamber, tired magazine, or inconsistent bulk ammunition | Clean the chamber thoroughly, try a known-good magazine, and try a different ammunition brand before suspecting the rifle. |
| Failure to extract | Worn or chipped extractor | Replace the extractor — an inexpensive and common wear part on rimfire rifles. |
| Takedown will not release | Bolt not locked to the rear | Lock the bolt back first. |
| Point of impact shifts between takedowns | Joint not fully seated, or the locking cam needs adjustment | Verify the joint is locked and adjust the cam. Mount optics on the receiver for consistency. |
Similar manual of arms
Sourcing
- Confidence
- high — Cross-checked against a primary source such as the manufacturer's manual or an issuing military technical manual.
- Verification
- Checked against the manufacturer manual
- Last updated
- 2026-10-29
References
Every source this page draws on, with its web address so you can read it yourself. Numbers in brackets elsewhere on the page point here.
- [1] Ruger 10/22 Instruction Manual (Standard, model numbers 32000 and higher, including 10/22 Takedown) — Sturm, Ruger & Co., Inc. manufacturer manual primary source
https://ruger-docs.s3.amazonaws.com/_manuals/Ruger_1022.pdf (checked 2026-09-15) - [2] Hunter X-22 Takedown Stock (MAG760) Installation Instructions, 072-0119-A — Magpul Industries manufacturer manual secondary source
https://magpul.com/media/wysiwyg/Instructions/MAG760_X-22_Takedown_Stock_INSRT.pdf (checked 2026-09-27) - [3] X-22 Backpacker Stock (MAG808) Installation Instructions, 072-0121-A — Magpul Industries manufacturer manual secondary source
https://magpul.com/media/wysiwyg/Instructions/MAG808_X-22_Backpacker_Stock_INSRT.pdf (checked 2026-09-27) - [4] Ruger 10/22 Standard Autoloading Rifle — Specifications (Takedown Model 32010) — Sturm, Ruger & Co. website primary source
https://ruger.com/products/1022/specSheets/32010.html (checked 2026-10-03) - [5] Magpul MAG799 X-22 Backpacker Optic Mount — Installation Instructions — Magpul Industries manufacturer manual secondary source
https://magpul.com/media/wysiwyg/Instructions/MAG799_X-22_Backpacker_Optic_Mount_INSRT.pdf (checked 2026-10-11) - [6] Midwest Industries Ruger 10/22 Take-Down Chassis (MI-1022-TDC) — Installation Instructions — Midwest Industries, Inc. manufacturer manual secondary source
https://midwestindustriesinc.com/content/installation-instructions/Ruger-Chassis-MI-1022-TDC-Instructions.pdf (checked 2026-10-11) - [7] Midwest Industries Ruger 10/22 Take-Down M-Lok Hand Guard (MI-1022-8H / MI-1022-13H) — Installation Instructions — Midwest Industries, Inc. manufacturer manual secondary source
https://midwestindustriesinc.com/content/installation-instructions/Ruger-M-Lok-Handguard-Instructions.pdf (checked 2026-10-11) - [8] Tactical Solutions X-RING TD TSS Gen 2 (takedown .22 LR barrel) — Product Manual REV2026-03 (linked from tacsolusa.com/product-manuals; hosted on TacSol's BigCommerce store CDN) — Tactical Solutions (TacSol) manufacturer manual secondary source
https://store-cixt9wadn9.mybigcommerce.com/content/X-RING%20TD%20TSS%20GEN%202%20Product%20Manual%20REV2026-03%202.pdf (checked 2026-10-11) - [9] Tactical Solutions X-RING TD TSS takedown barrel — Installation Instructions (7-24-23) (linked from tacsolusa.com/product-manuals; hosted on TacSol's BigCommerce store CDN) — Tactical Solutions (TacSol) manufacturer manual secondary source
https://store-cixt9wadn9.mybigcommerce.com/content/X-RING%20TD%20TSS%E2%84%A2_Instructions_Updated_7-24-23.pdf (checked 2026-10-11) - [10] Tactical Solutions X-RING Takedown Barrel and Stock Combo — Installation Instructions (linked from tacsolusa.com/product-manuals; hosted on TacSol's BigCommerce store CDN) — Tactical Solutions (TacSol) manufacturer manual secondary source
https://store-cixt9wadn9.mybigcommerce.com/content/TD_Barrel_Stock_Combo_Instructions%20%281%29.pdf (checked 2026-10-11) - [11] Ruger Patents — Sturm, Ruger & Co., Inc. website primary source
https://ruger.com/micros/Patents/index.html (checked 2026-10-13) - [12] The Ruger 10/22: History & Design (posted October 22, 2020; excerpted from Walt Kuleck, "The Ruger 10/22 Complete Owner's and Assembly Guide") — NRA American Rifleman periodical secondary source
https://www.americanrifleman.org/content/the-ruger-10-22-history-design/ (checked 2026-10-13) - [13] DIY 10/22 Trigger Upgrade Kit instructions — Brownells book secondary source
https://prod.brownells.com/globalassets/pdfs/product-pdfs/076-200-163_diy_10_22_trigger_upgrade_kit.pdf (checked 2026-10-29)
Notes: Verified against Ruger's current 10/22 manual (60 pages), which covers the Takedown model in "RUGER 10/22 Takedown Barrel Assembly Instructions" (pp. 15-17) and "Disassembly" (pp. 27-30). Ruger publishes no separate Takedown manual. Corrections against the previous text: the locking lever is pushed forward towards the muzzle, not pressed on the underside of the forend; the barrel rotates clockwise to lock and counterclockwise to release; the lock-up adjustment knob was not described at all, and its directions are inverted relative to most fasteners and relative to the Ruger PC Carbine. The dry-fire flag was also flipped: Ruger's current manual states the rifle can be dry fired in moderation for basic function checks, with a snap cap recommended for extensive practice, rather than prohibiting it outright.