← All firearms · Printable work order
Smith & Wesson M&P15-22
- easy
- Shop tier 2
- high confidence
- Rimfire Rifle
- rimfire
- blowback
- training
- ar pattern ergonomics
field strip ~2 min · reassembly ~3 min · detail strip ~20 min
Specifications
- Manufacturer
- Smith & Wesson
- Origin
- United States
- Category
- Rimfire Rifle
- Action
- Blowback
- Calibers
- .22 Long Rifle
- Capacity
- 25+1 with the standard magazine
- Production
- 2009–present (in-production)
- Also known as
- M&P 15-22 Sport
Model-specific safety
- Never dry fire this rifle while it is disassembled. S&W states damage to the firearm may result — on a rimfire the firing pin strikes the chamber mouth with nothing to stop it.
- This rifle looks like an AR-15 but is a dedicated blowback rimfire. Its bolt, buffer, and internals are not AR-15 parts and do not interchange.
- Because it is blowback, there is no bolt cam pin and no rotating bolt. Do not apply AR-15 bolt disassembly steps to it.
- A .22 LR case in the chamber is small and dull. Use a light and a finger.
- The receiver halves separate on takedown pins like an AR, but the bolt assembly is retained differently — do not force it.
Under spring tension
- Recoil/action spring
- Magazine spring
Easily lost parts
Bolt assembly guide rods · Takedown pins
Tools
No tools required for the field strip.
Shop difficulty
Shop tier 2 Tier 2 — moderate among rimfire rifles, for the full job: strip to the parts that get coated and put it back together working. AR-15-pattern .22 with a polymer upper and lower: stripping the lower means the usual AR detents and springs (pivot and takedown pin detents, selector detent, magazine catch, bolt catch) and a hammer/trigger group on pins, plus a blowback bolt. Conventional AR traps (spring-loaded detents held while pins go in) and S&W does not publish a parts list.
No sourced part count yet.
Bench time: about 40 min to strip, 60 min to rebuild (estimate). AR-pattern strip: upper/lower separation, bolt and charging handle, lower parts (trigger, hammer, disconnector, selector and detent, bolt catch, magazine catch, pivot and takedown detents), buttstock and sights; rebuild longer for the spring-loaded detents.
What comes off for coating
- Upper: charging handle, bolt/carrier, recoil spring and guide, handguard, front/rear flip sights
- Bolt: firing pin and spring, extractor, plunger and spring
- Lower: takedown and pivot pins, detents and springs, hammer and trigger pins, hammer, trigger, disconnector and springs, selector, detent and spring, bolt catch roll pin, catch, plunger and spring, magazine catch, button and spring, buttstock and buffer retainer — roll-pin punch, vise block
Special tools
- Pivot-pin detent tool or razor blade — Pivot pin detent and spring
- Roll-pin holder punch — Bolt catch roll pin
- Lower receiver vise block — Holding the polymer lower
Known pain points
- S&W limits owners to what the manual shows; any further service must be done by a qualified gunsmith, and a parts list is only available on request. (both)
Source: Safety & Instruction Manual For M&P15-22 Rifle — Smith & Wesson assets.contentstack.io [1] — “ANY MAINTENANCE, ADJUSTMENT OR SER- VICE NOT SPECIFIED IN THIS MANUAL MAY AFFECT THE SAFETY AND RELIABILITY OF YOUR FIREARM”
Fit or check on rebuild
- Hammer/trigger pin retention and screw torque on the polymer lower — Over-torqued fasteners strip polymer; pins must be retained.
- Sight re-zero — Sights removed for coating.
- Function check: safety, trigger/sear release, disconnector and feeding with dummy rounds — Standard after any detail strip; a mis-assembled sear or disconnector can double or fail to fire.
This is Pew-Takedown's rating, not the manufacturer's. How tiers are rated. Forum reports are owners' experience, not specifications.
Procedures
Clear and Make Safe
Clear & Make Safe- Point the muzzle in a safe direction and keep your finger off the trigger.
- Press the magazine release and remove the magazine.Removed at this step:
Magazine - Pull the charging handle fully rearward and lock the bolt back.
- Inspect the chamber and magazine well with a light and physically confirm the chamber is empty.WarningRimfire cases are small and easy to miss.
- Place the selector on SAFE and remove all live ammunition from the work area.
Field Strip
Field Strip- Complete the Clear and Make Safe procedure and put on safety glasses specified for firearms use. S&W asks for them every time.
- Confirm the magazine is out and the rifle is not loaded.
- Push the top of the bolt release to make sure the bolt is in the forward position.
- Push the takedown pin — above and behind the trigger — in from the left of the lower receiver, and pull it out on the right until it comes to a positive stop.TipOne pin, not two. S&W's field strip leaves the front pivot pin alone and the receivers hinged.
- Pivot the lower receiver down and away from the upper receiver.TipExpect some initial resistance as the parts separate; that is normal.
- Pull the charging handle to the rear and remove the bolt assembly, which comes out together with the charging handle.WarningNever dry fire this rifle while it is disassembled. S&W states damage to the firearm may result — on a rimfire the firing pin strikes the chamber mouth with nothing to stop it.Removed at this step:
Bolt assemblyCharging handle - Clean the chamber, bore, bolt face and receiver interior. Rimfire fouling accumulates fast.
- Stop here. S&W directs any maintenance beyond this to a qualified gunsmith using genuine Smith & Wesson parts.
Reassembly
Reassembly- Wipe the metal parts with a cloth dampened with good gun oil, remove the excess, and leave a light film inside and out.
- Assemble the charging handle onto the bolt BEFORE the bolt goes back into the upper receiver.TipThis is the order that trips people up. The charging handle does not go in separately afterwards.
- Orient the bolt as the manual shows and partially insert the charging handle into the upper receiver slot before sliding the bolt in.
- Slide the bolt and charging handle fully home in the upper receiver.
- Pivot the lower receiver back up to the upper and push the takedown pin fully home from the right.
- Cycle the action several times by hand, confirm it returns fully to battery, and perform the function check.WarningNever dry fire this rifle while it is disassembled. S&W states damage to the firearm may result — on a rimfire the firing pin strikes the chamber mouth with nothing to stop it.
Patent drawings
not under copyrightDrawings from US patents on this design. A patent shows the invention as the inventor filed it; the firearm that shipped can differ in detail, and later production often does. Use them to see how the parts relate, not as a parts reference or a procedure. Per the USPTO, the text and drawings of a patent are typically not subject to copyright; each patent here was checked for a copyright notice.
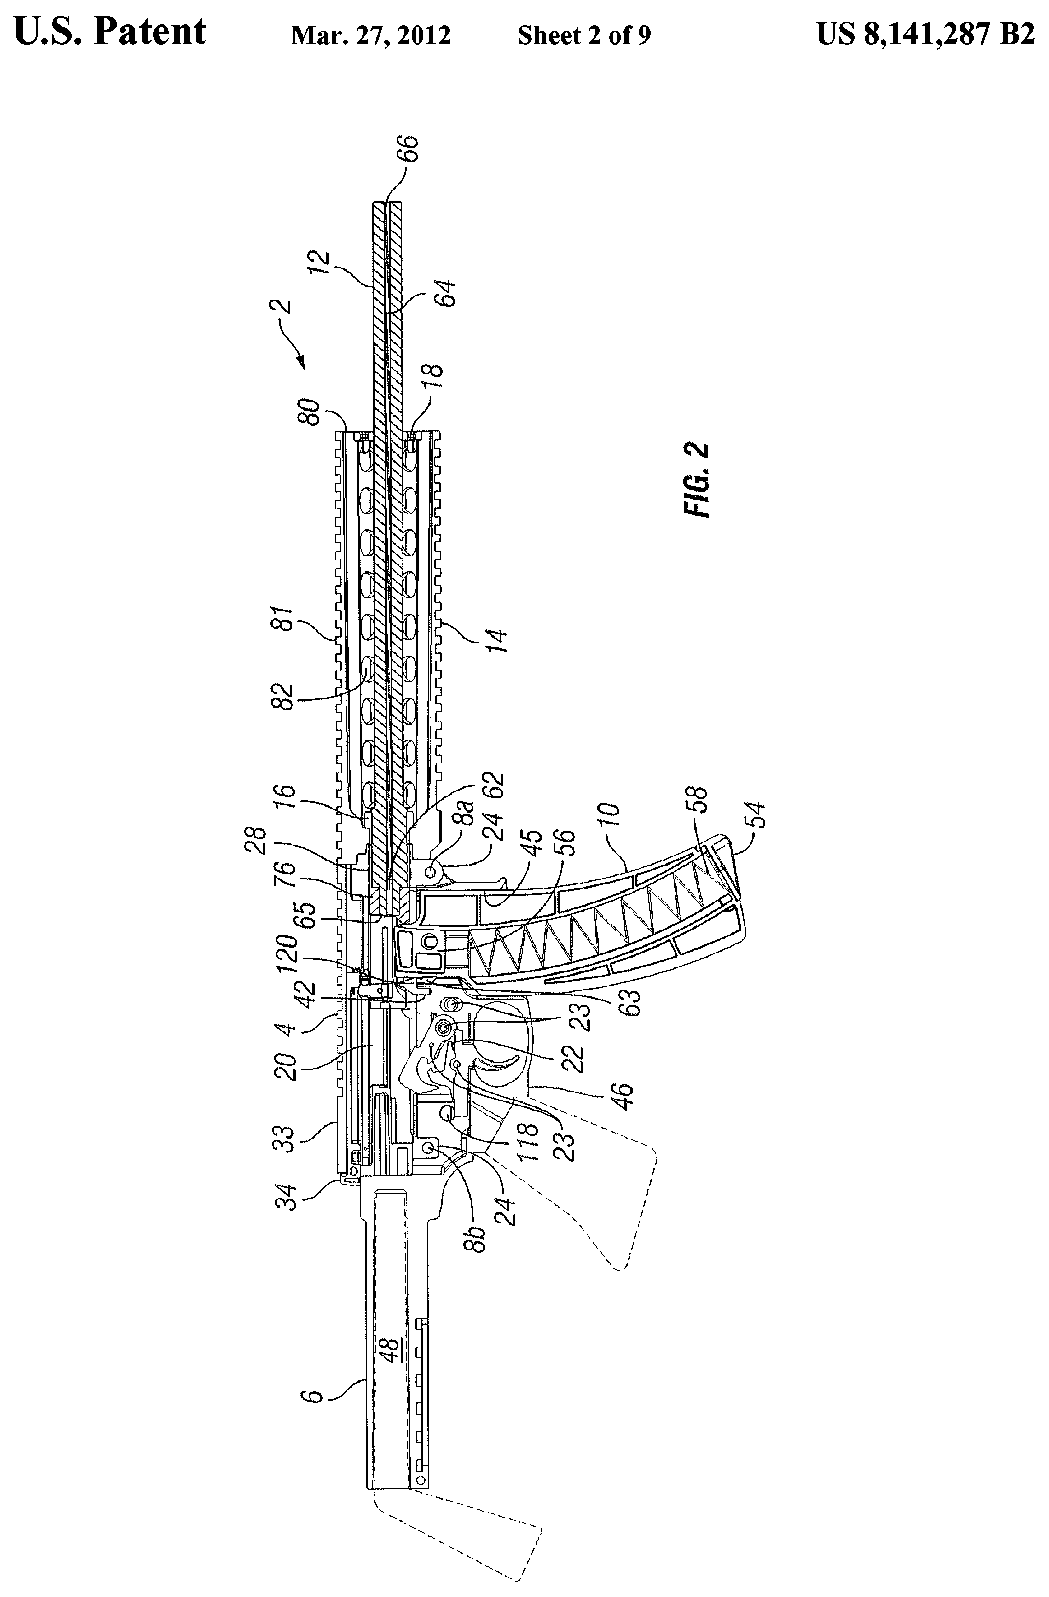
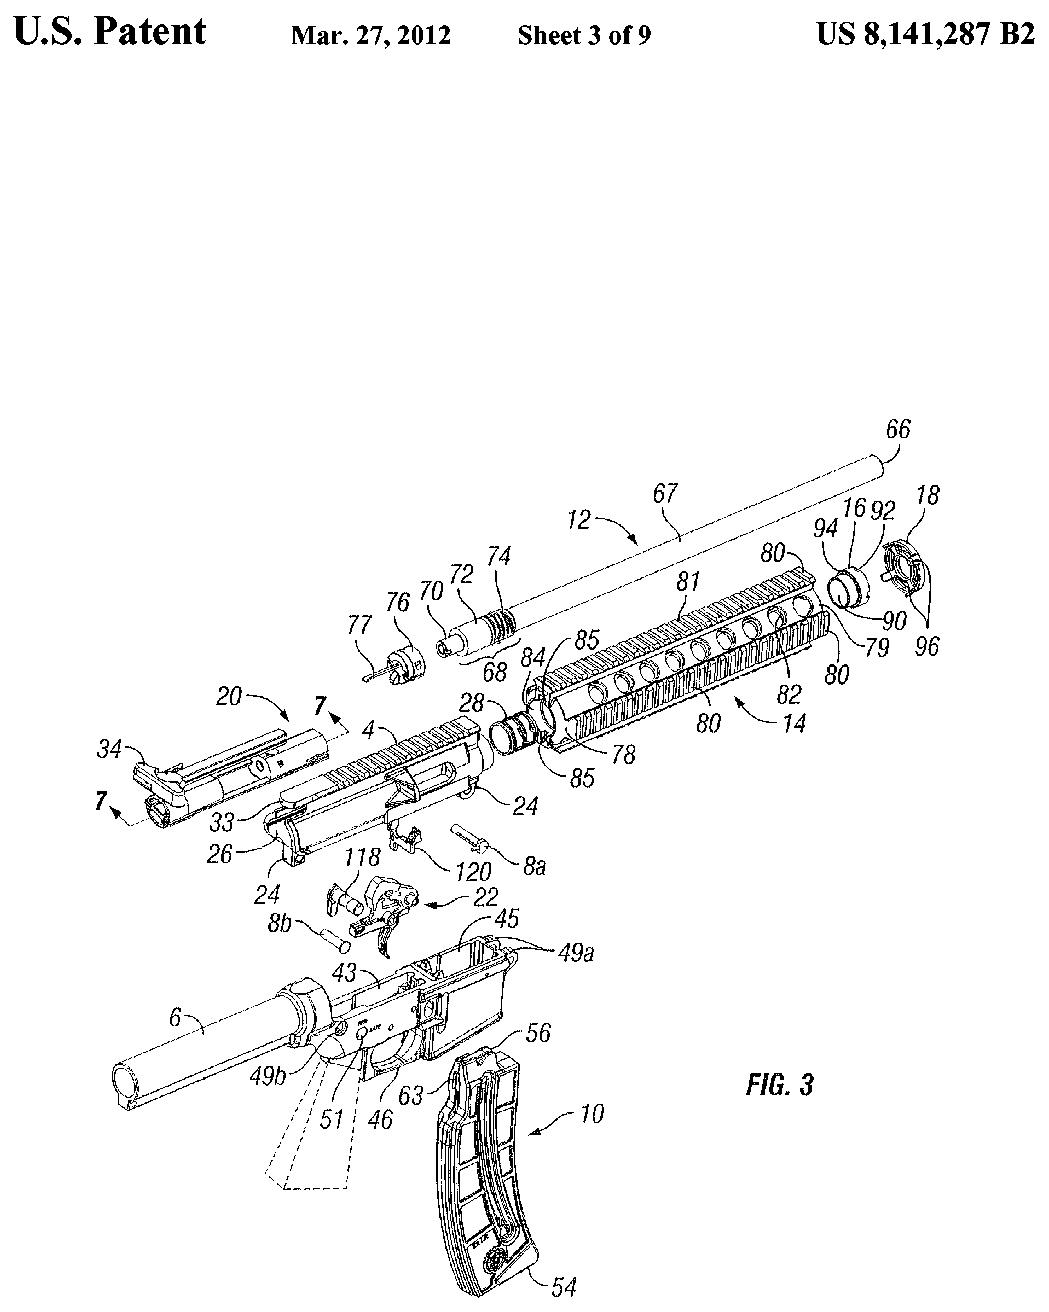
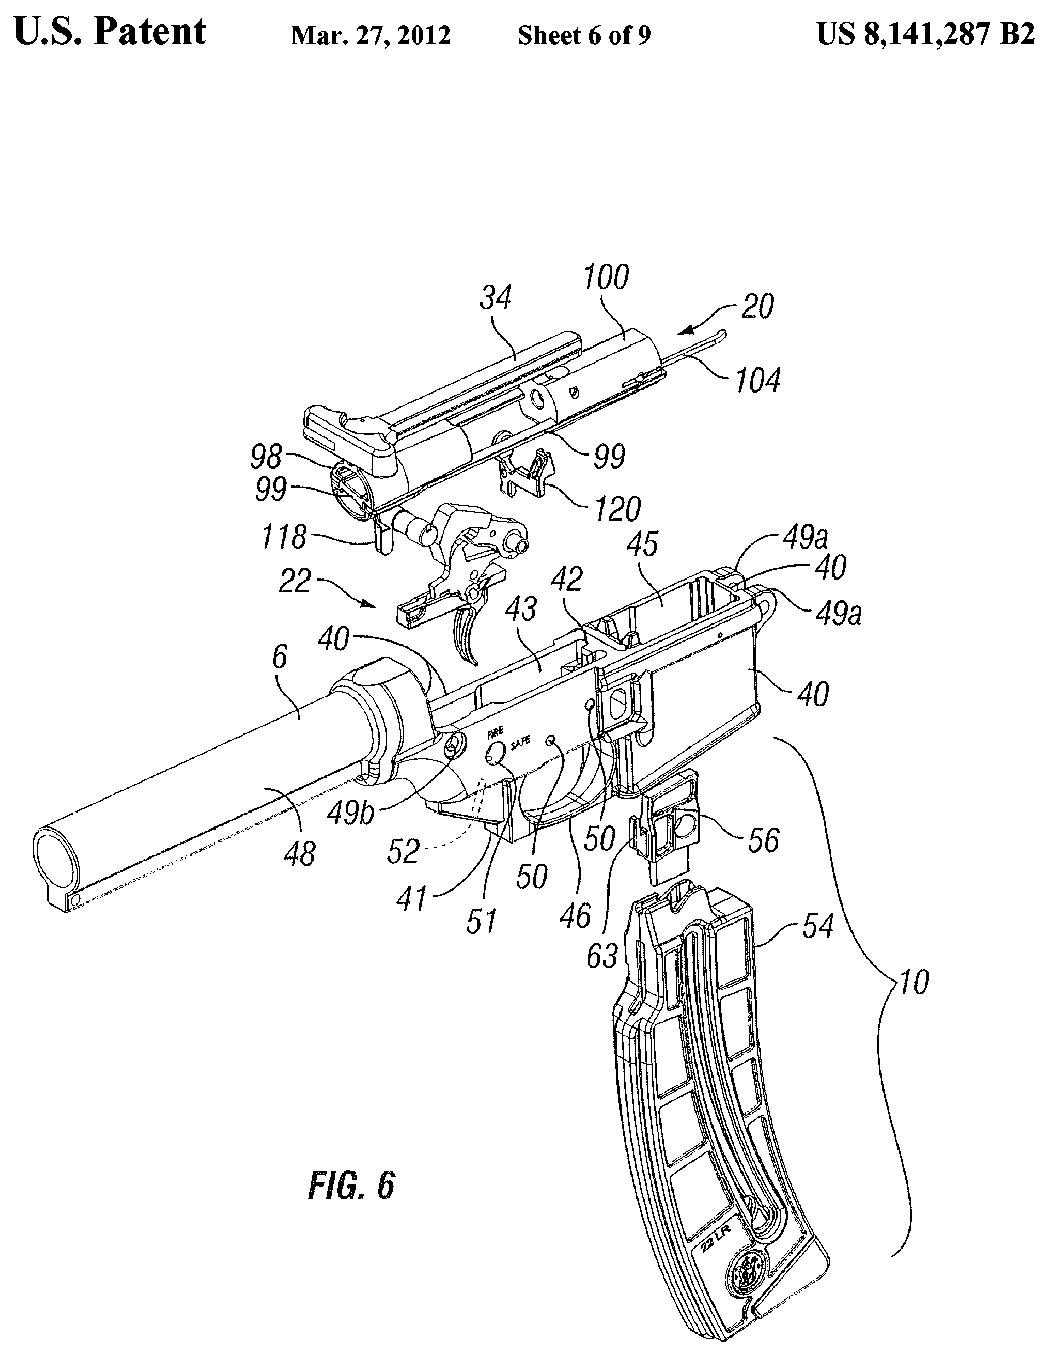
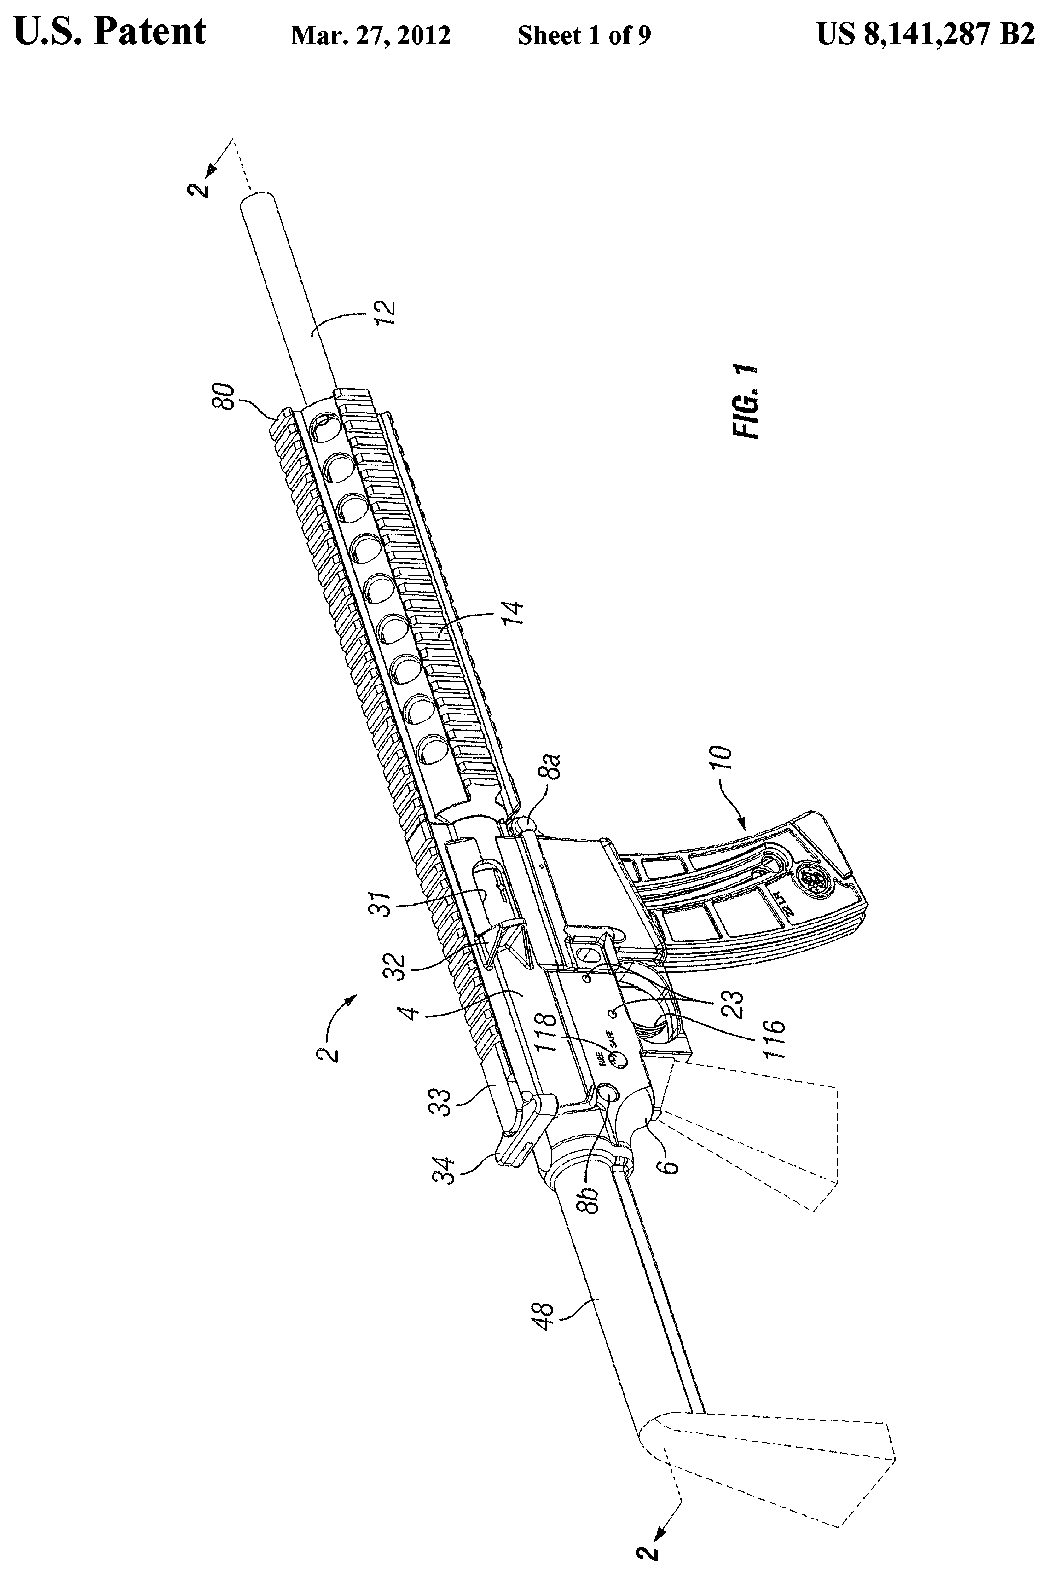
US Patent 8,141,287 — Lightweight, low cost semi-automatic rifle
Jason R. Dubois · assigned to Smith & Wesson Corp. · filed 2009-12-28 · granted 2012-03-27. Full patent (USPTO)
The M&P15-22 rimfire rifle as a whole: upper and lower receivers, barrel and handguard, bolt group, action group and magazine, in sectional and exploded views.
Why this is the Smith & Wesson M&P15-22’s patent: listed on the maker’s patent-marking page — Virtual Patent Marking | Smith & Wesson — Smith & Wesson smith-wesson.com [4]: “8,141,287 M&P®15-22 rifles”
Torque specifications
| Fastener | Torque | Sequence, notes and the source's words | Where it comes from |
|---|---|---|---|
| M-LOK accessory screws — metal accessory on metal hand guard | max. 35 in-lb 4 N·m · 2.9 ft-lb |
S&W: the recoil lugs do most of the work and excessive torque on the nuts is not required; over-torquing can damage the rail or hand guard and leave an insecure mount. Pull on both ends of the accessory to confirm it is engaged. “For attaching metal accessories to metal hand guards: 35 in/lbs. … The installation torque values are not minimums, they are recommended limits.” |
Safety & Instruction Manual For M&P15-22 Rifle — Smith & Wesson, p. 40 assets.contentstack.io [1] |
| M-LOK accessory screws — polymer accessory on metal hand guard | max. 15 in-lb 1.7 N·m · 1.2 ft-lb |
S&W: the recoil lugs do most of the work and excessive torque on the nuts is not required; over-torquing can damage the rail or hand guard and leave an insecure mount. Pull on both ends of the accessory to confirm it is engaged. “For attaching polymer accessories to metal hand guards: 15 in/lbs. … The installation torque values are not minimums, they are recommended limits.” |
Safety & Instruction Manual For M&P15-22 Rifle — Smith & Wesson, p. 40 assets.contentstack.io [1] |
| M-LOK accessory screws — any accessory on polymer hand guard | max. 15 in-lb 1.7 N·m · 1.2 ft-lb |
S&W: the recoil lugs do most of the work and excessive torque on the nuts is not required; over-torquing can damage the rail or hand guard and leave an insecure mount. Pull on both ends of the accessory to confirm it is engaged. “For attaching polymer or metal accessories to polymer hand guards: 15 in/lbs. … The installation torque values are not minimums, they are recommended limits.” |
Safety & Instruction Manual For M&P15-22 Rifle — Smith & Wesson, p. 40 assets.contentstack.io [1] |
Notes: These are the Magpul M-LOK values as S&W's M&P15-22 manual reproduces them (p. 40). S&W stresses that they are limits, not targets, and that the nylon thread-locking patch on the screws can slightly affect a torque wrench reading. Without a torque wrench, the manual (p. 42) describes approximating them with an L-shaped hex key: 35 in-lb is about 15 lb at the end of a standard 2 5/16" key using its long arm; 15 in-lb is about 6 1/2 lb there, or the maximum force achievable by hand on the short arm.
Materials and factory finish
As stated by Smith & Wesson. Prep, masking and cure depend on these; a polymer or aluminium part, a nitrided or anodised finish, and a blued steel part are each a different job. Variants with other finishes may exist — check the maker's page for the exact SKU on the bench.
| Component | Material | Factory finish | Where it comes from |
|---|---|---|---|
| Receiver (upper/lower) M&P15-22 Sport, 16.5in, SKU 10208 | POLYMER | — | Smith & Wesson M&P15-22 Sport — product specifications, SKU 10208 — Smith & Wesson Brands, Inc. smith-wesson.com [3] “FRAME MATERIAL … POLYMER” |
| Barrel M&P15-22 Sport, 16.5in, SKU 10208 | 1137 CS | — | Smith & Wesson M&P15-22 Sport — product specifications, SKU 10208 — Smith & Wesson Brands, Inc. smith-wesson.com [3] “BARREL MATERIAL … 1137 CS” |
| Whole firearm M&P15-22 Sport, 16.5in, SKU 10208 | — | BLACK The maker states this for the firearm as a whole, not for a named part. | Smith & Wesson M&P15-22 Sport — product specifications, SKU 10208 — Smith & Wesson Brands, Inc. smith-wesson.com [3] “COLOR/FINISH … BLACK” |
| Grips M&P15-22 Sport, 16.5in, SKU 10208 | POLYMER | — | Smith & Wesson M&P15-22 Sport — product specifications, SKU 10208 — Smith & Wesson Brands, Inc. smith-wesson.com [3] “GRIP … POLYMER” |
Function check
- Verify the rifle is unloaded with no magazine inserted before each step.
- Cycle the charging handle and confirm the bolt returns fully into battery.
- Charge the rifle, place the selector on SAFE, and press the trigger. The hammer must not fall.
- Move to FIRE and press the trigger. The hammer should fall.
- Confirm the magazine seats, locks, and drops free.
Maintenance
Lubrication points
- Bolt body and guide rods
- Receiver interior where the bolt rides
- Hammer and sear pivots
Cleaning notes
Rimfire fouling is waxy and heavy. Clean the chamber and bolt face regularly and keep lubrication light so unburned powder does not build into a paste.
Suggested inspection interval: roughly every 500 rounds. This is a general guideline, not a manufacturer specification.
Wear parts to inspect
Extractor · Action spring · Magazine followers and feed lips · Firing pin
Common issues
| Symptom | Likely cause | What to do |
|---|---|---|
| Failures to feed or fire | Dirty chamber, or inconsistent bulk ammunition | Clean the chamber and try a different ammunition brand. |
| AR-15 parts do not fit | This is a dedicated rimfire, not an AR-15 | Order M&P15-22-specific parts. |
Similar manual of arms
Sourcing
- Confidence
- high — Cross-checked against a primary source such as the manufacturer's manual or an issuing military technical manual.
- Verification
- Checked against the manufacturer manual
- Last updated
- 2026-10-29
References
Every source this page draws on, with its web address so you can read it yourself. Numbers in brackets elsewhere on the page point here.
- [1] Safety & Instruction Manual For M&P15-22 Rifle — Smith & Wesson manufacturer manual primary source
https://assets.contentstack.io/v3/assets/bltb61dcb3c40854cd9/blt484b89d2ae4eeadd/65d518a7bdb22a85b5c23612/M&P1522_Rifle_113022_3005746.pdf (checked 2026-09-15) - [2] Smith & Wesson — Consumer Firearm Recalls: M&P15-22 Consumer Safety Alert — Smith & Wesson website primary source
https://www.smith-wesson.com/safety/recalls (checked 2026-10-03) - [3] Smith & Wesson M&P15-22 Sport — product specifications, SKU 10208 — Smith & Wesson Brands, Inc. website primary source
https://www.smith-wesson.com/product/m-p-15-22-sport (checked 2026-10-03) - [4] Virtual Patent Marking | Smith & Wesson — Smith & Wesson website primary source
https://www.smith-wesson.com/company/virtual-patent-marking (checked 2026-10-13)
Notes: CORRECTED on 2026-09-15 against the factory manual. The entry described an AR-pattern strip using both takedown pins and fully separating the upper from the lower. S&W's procedure uses the single takedown pin above and behind the trigger and leaves the receivers hinged. Reassembly gained the ordering that actually matters — the charging handle is fitted to the bolt before the bolt goes into the upper, not separately afterwards — and S&W's caution never to dry fire this rimfire while it is disassembled. Rated medium pending confirmation of bolt assembly removal detail against the factory manual; the important safety point — that this is a blowback rimfire and not an AR-15 internally — is well established.